.png)
Workflow
- 13 Minutes to read
-
Contributors


Workflow
- 13 Minutes to read
-
Contributors
Article summary
Did you find this summary helpful?
Thank you for your feedback!
Workflow is the stage where you outline the business process flow, moving from one step to the next, in a series of sequential, parallel, or conditional steps structured as a tree to access the application.
For instance, let's consider a leave application process in an organization, which can have three scenarios:
Scenario 1: An employee applies for leave, and the manager either approves or rejects it. (Sequential Workflow)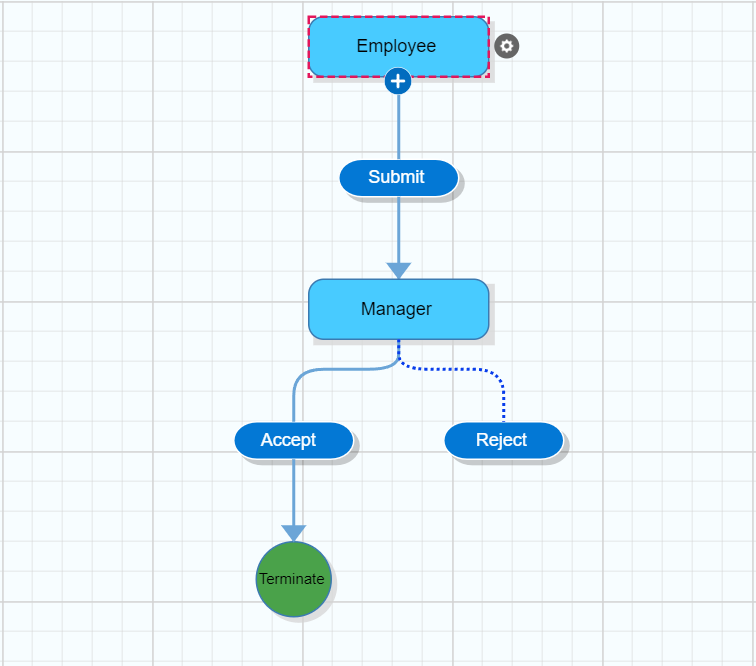
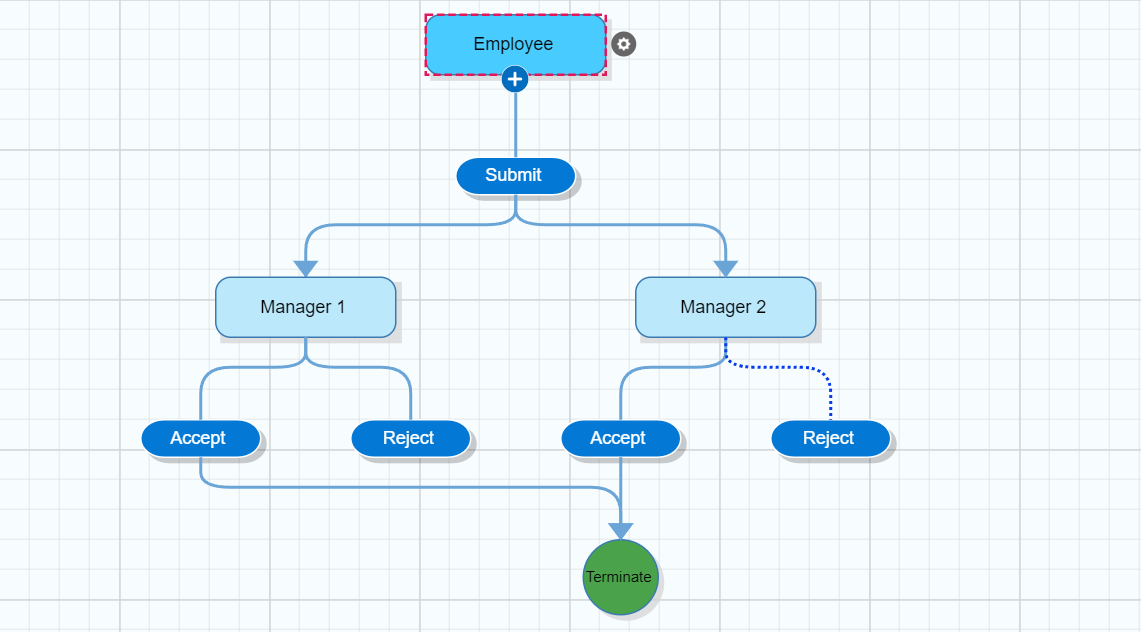
Scenario 2: An employee reports to two different managers. If the employee applies for leave, both managers should receive the leave request for approval. (Parallel Workflow)
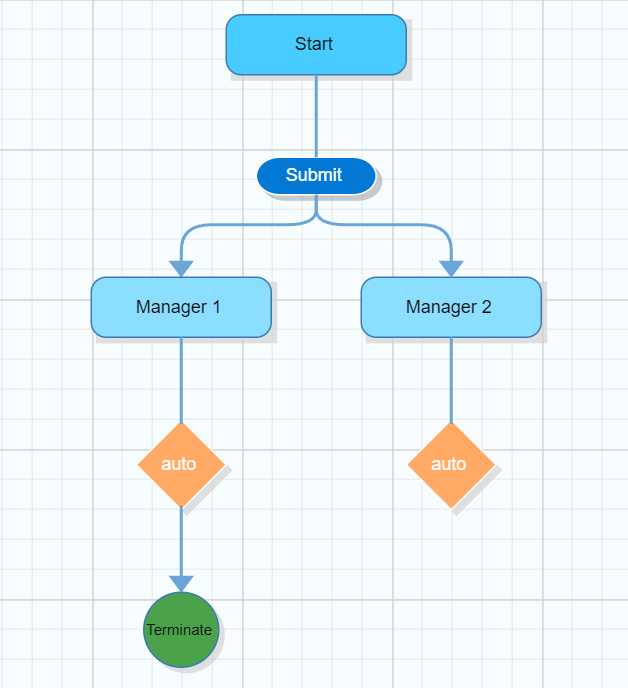
Scenario 3: An employee reports to two different managers. If the employee applies for leave and the leave type is based on a condition, the respective managers should receive the leave request for approval. (Conditional Workflow)
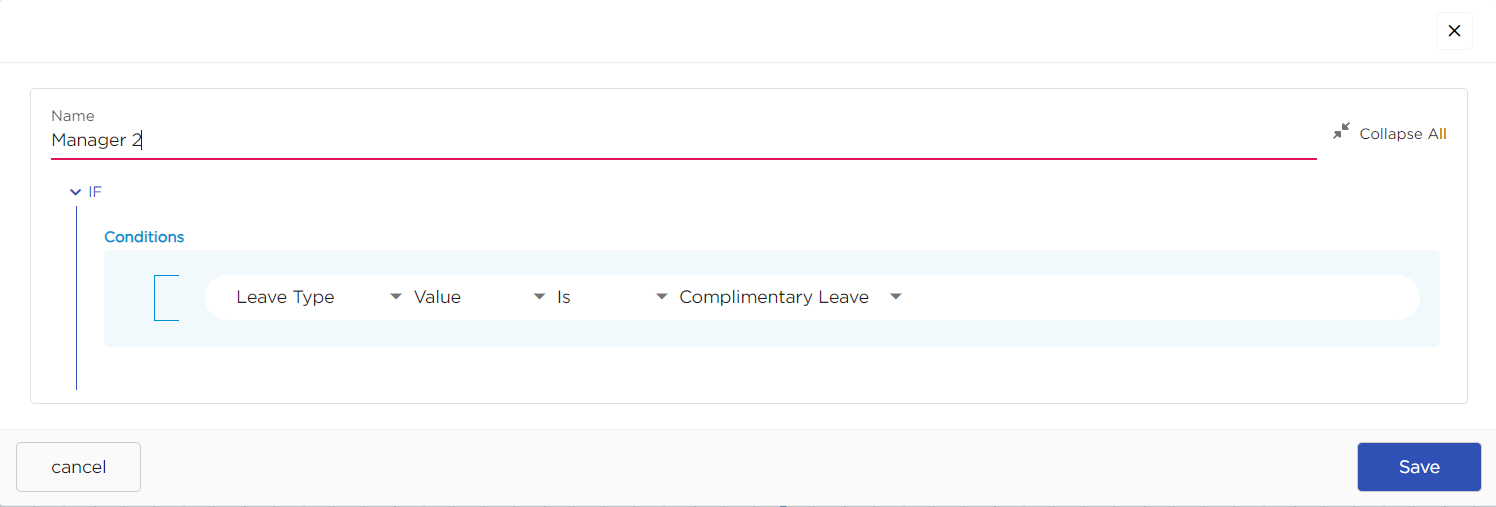
Condition: If the employee applies for privileged leave, manager 1 should receive the leave request for approval. If the employee applies for complimentary leave, manager 2 should receive the leave request for approval.
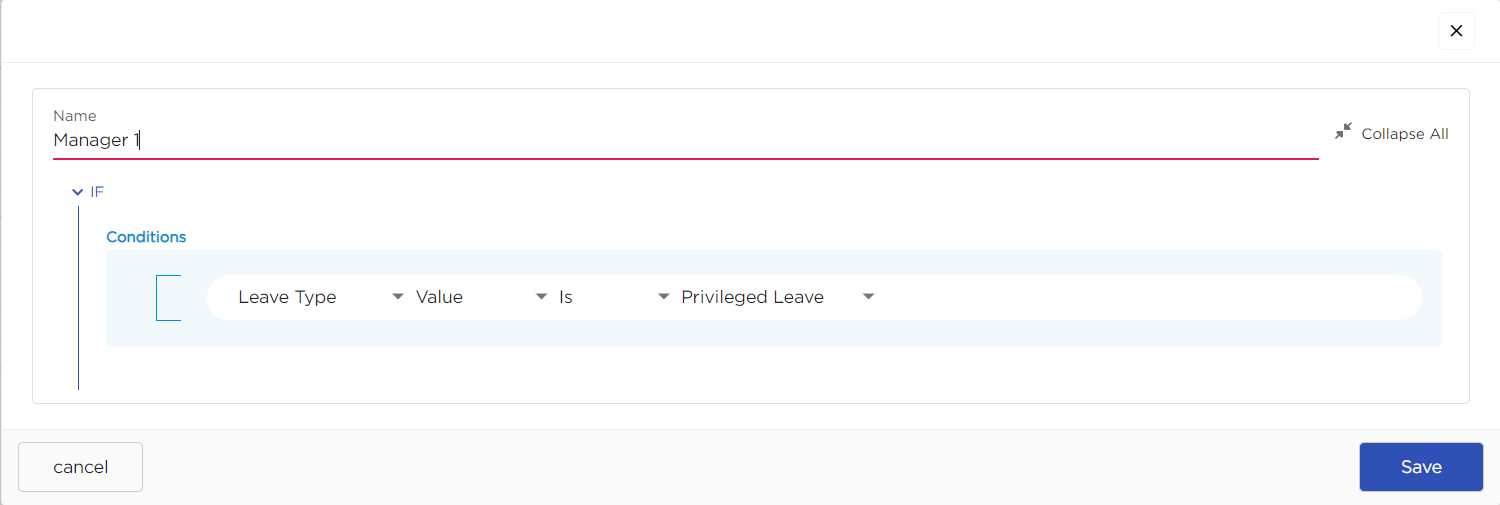
Privileged Leave for Manager 1 Condition:
Complimentary Leave for Manager 2:
How to configure these workflows is explained below.
How to create a Basic Workflow?
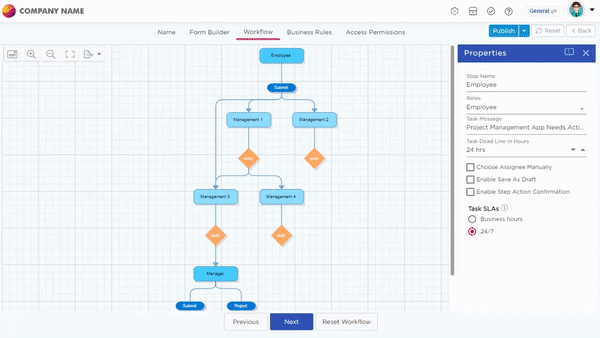
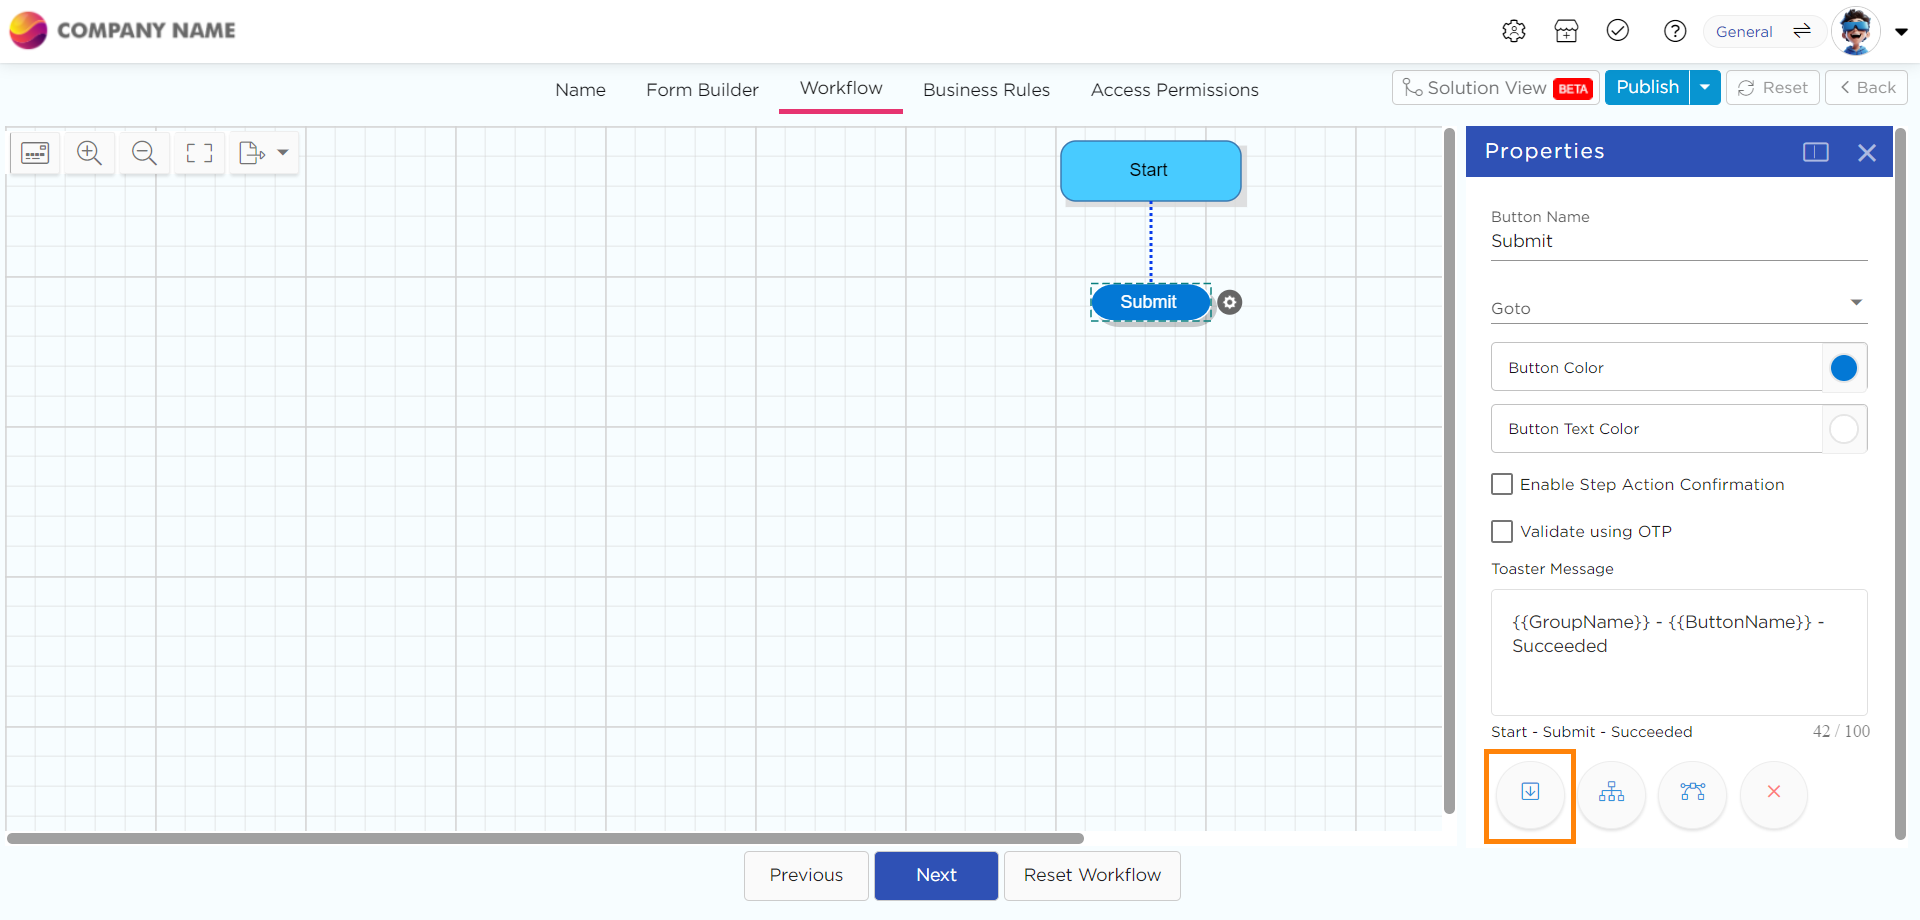
To create a Workflow, click on the process step Start, and you will see a Settings icon attached to the process step.
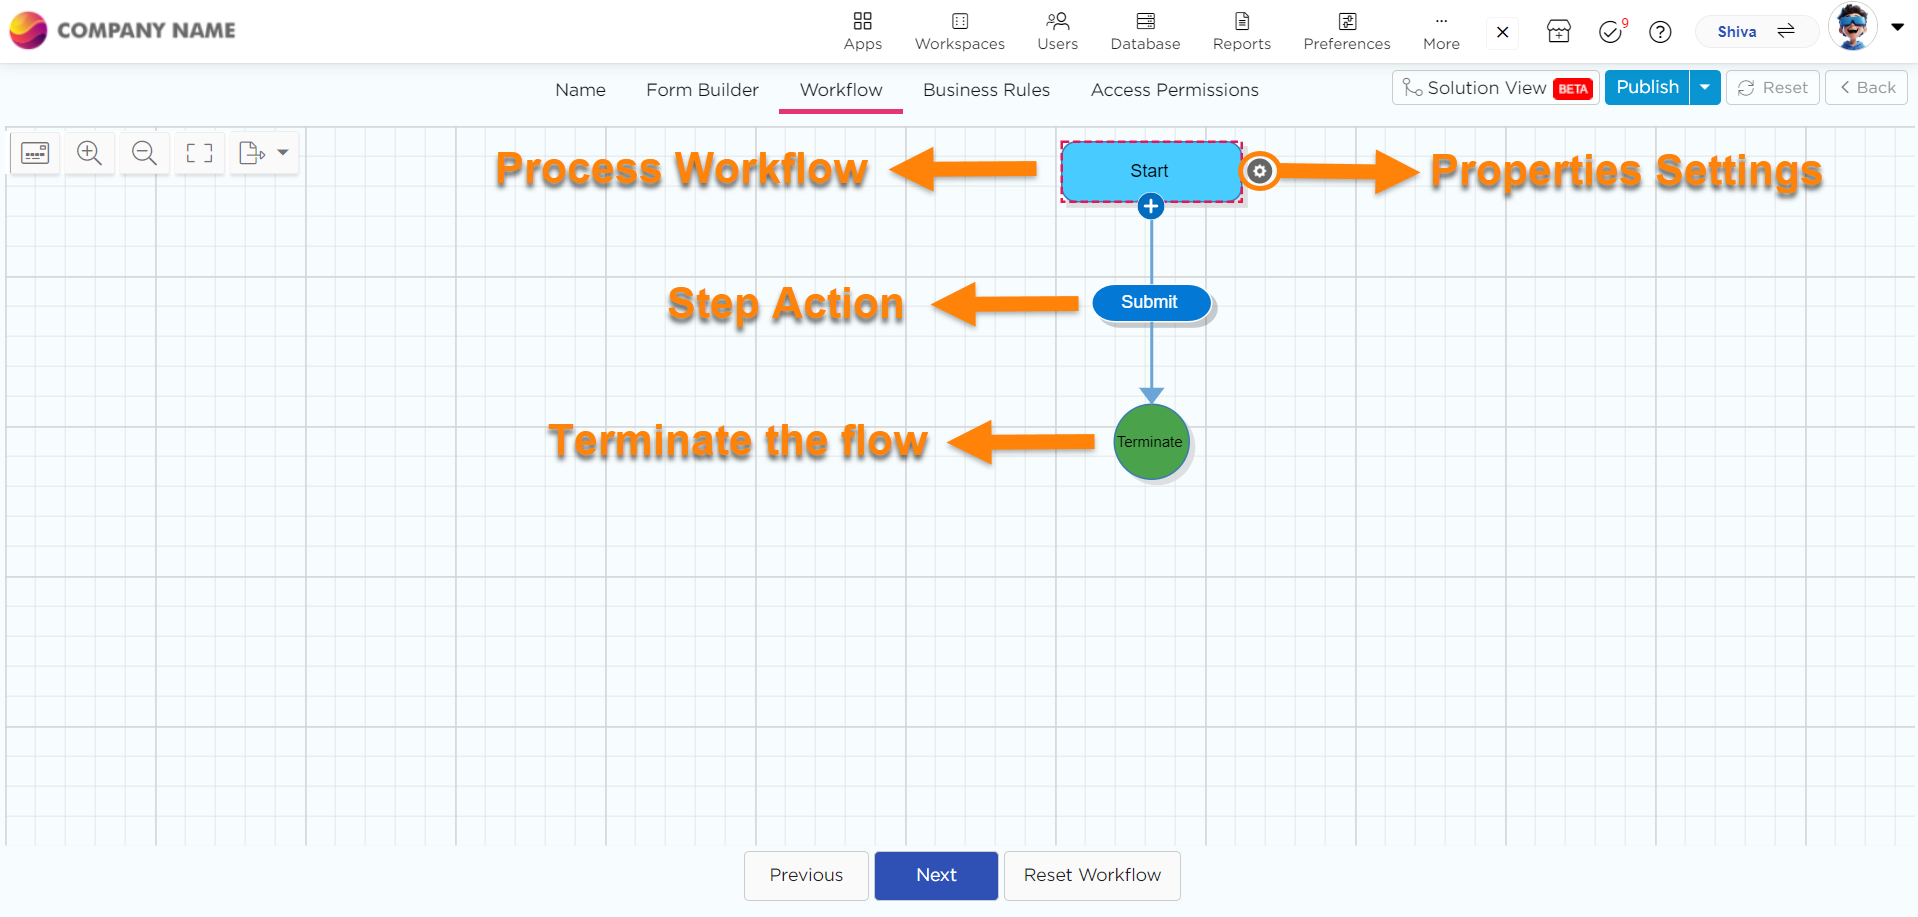
Clicking on the Settings icon or anywhere within the workflow step or step action button will open the Properties window on the right side of the page.
Depending on the solution or use case being automated, the workflow can include various process steps dedicated to specific users or roles. Users can then take appropriate actions using the action buttons when the workflow reaches their assigned step.
NOTE
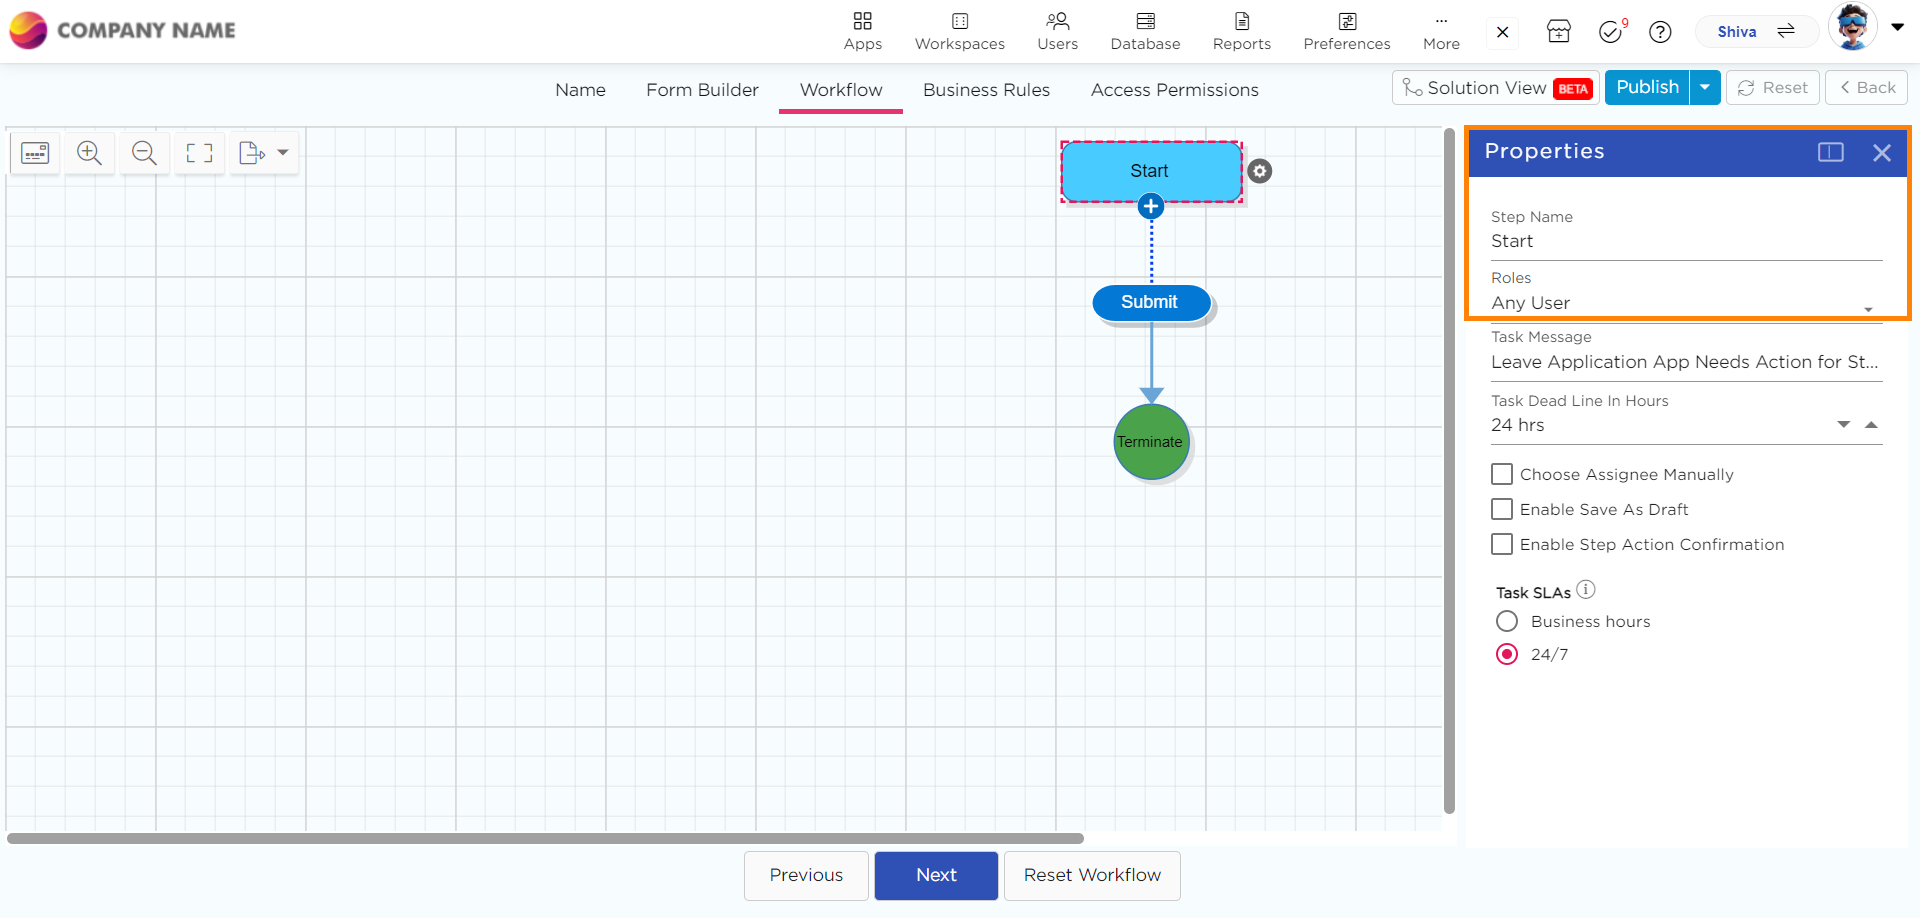
The default workflow is consistent for every newly created app. It includes Start and Terminate as initial process steps, along with a Submit action button. The Start process step is automatically assigned to any user.
You can change the properties of the start step as needed.
Start by naming the step and then assigning a role to it.
To add new process steps to the workflow, you must first delete the Terminate step. While it's possible to add process steps without deleting Terminate, doing so can simplify the process.
NOTE
Users can export workflows seamlessly to create tangible versions, facilitating easy comparisons and efficient change management. This feature empowers users to maintain snapshots of their processes, providing a valuable tool for understanding process evolution.
Different Types of Workflows:
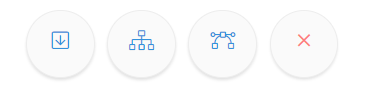
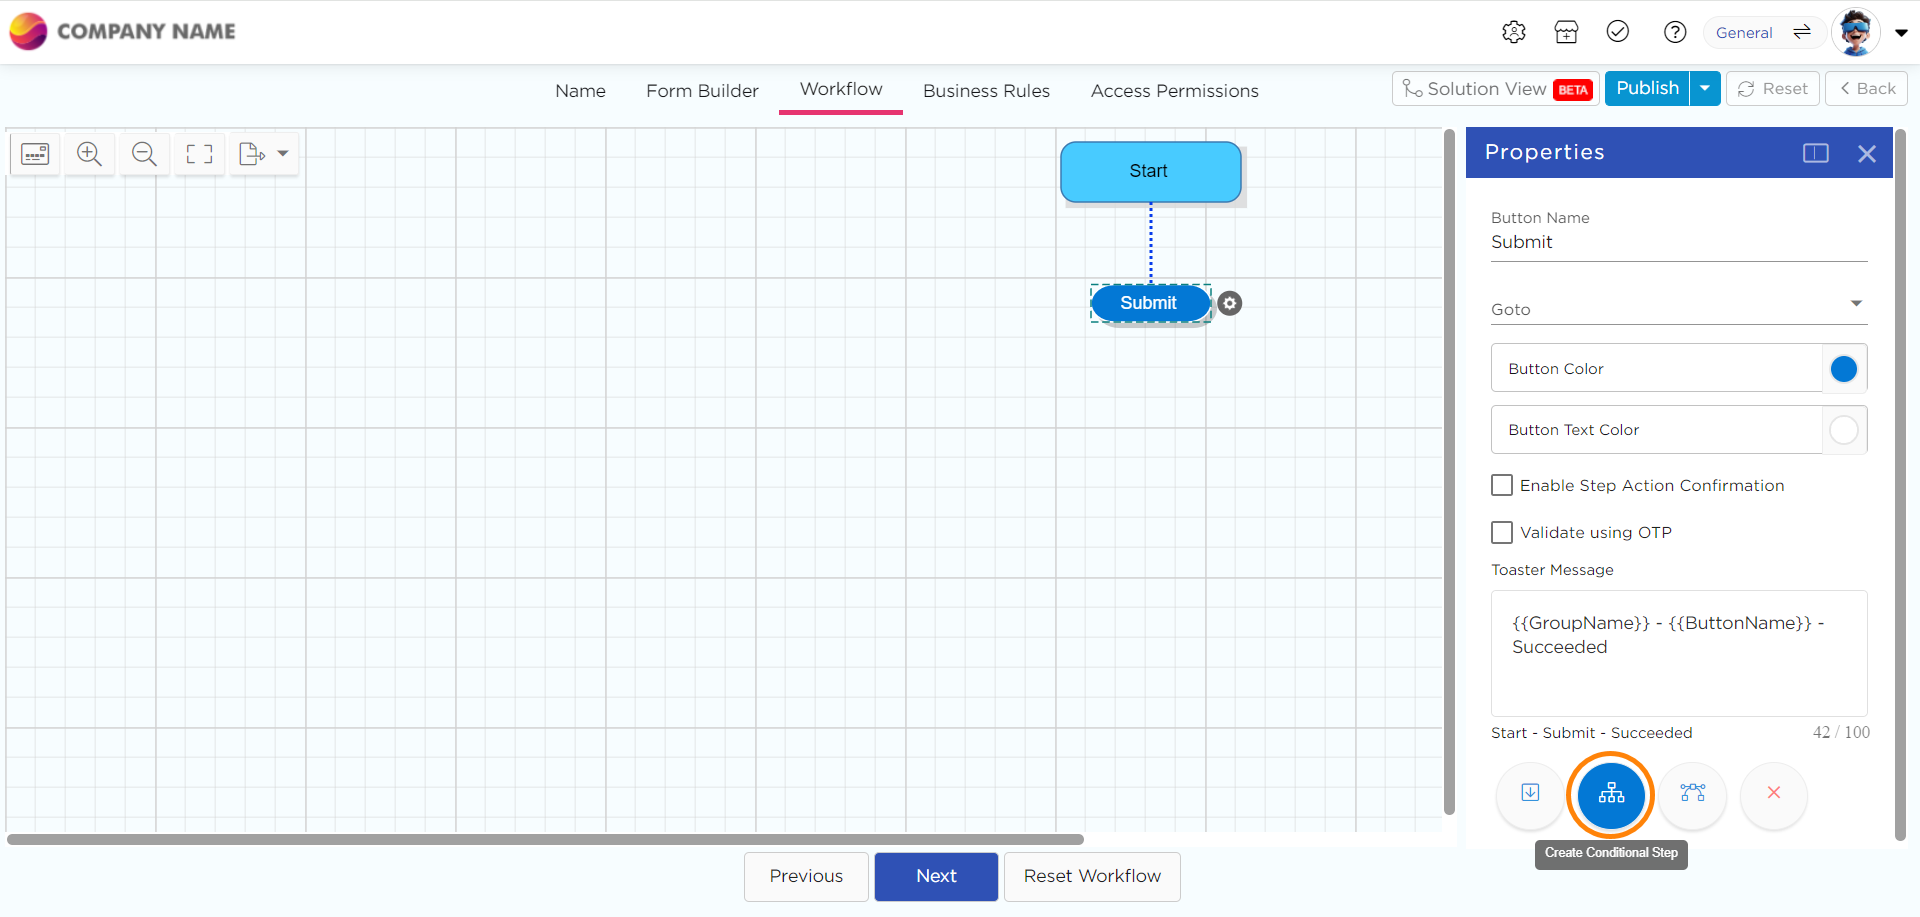
After clicking on the properties settings icon for a workflow step, a properties window appears. At the bottom of the properties settings, there are four different types of buttons.
Sequential Workflow
Click on the Create Sequential Step icon to add a Sequential step.
An additional process step will be added below the Submit action button in the workflow.

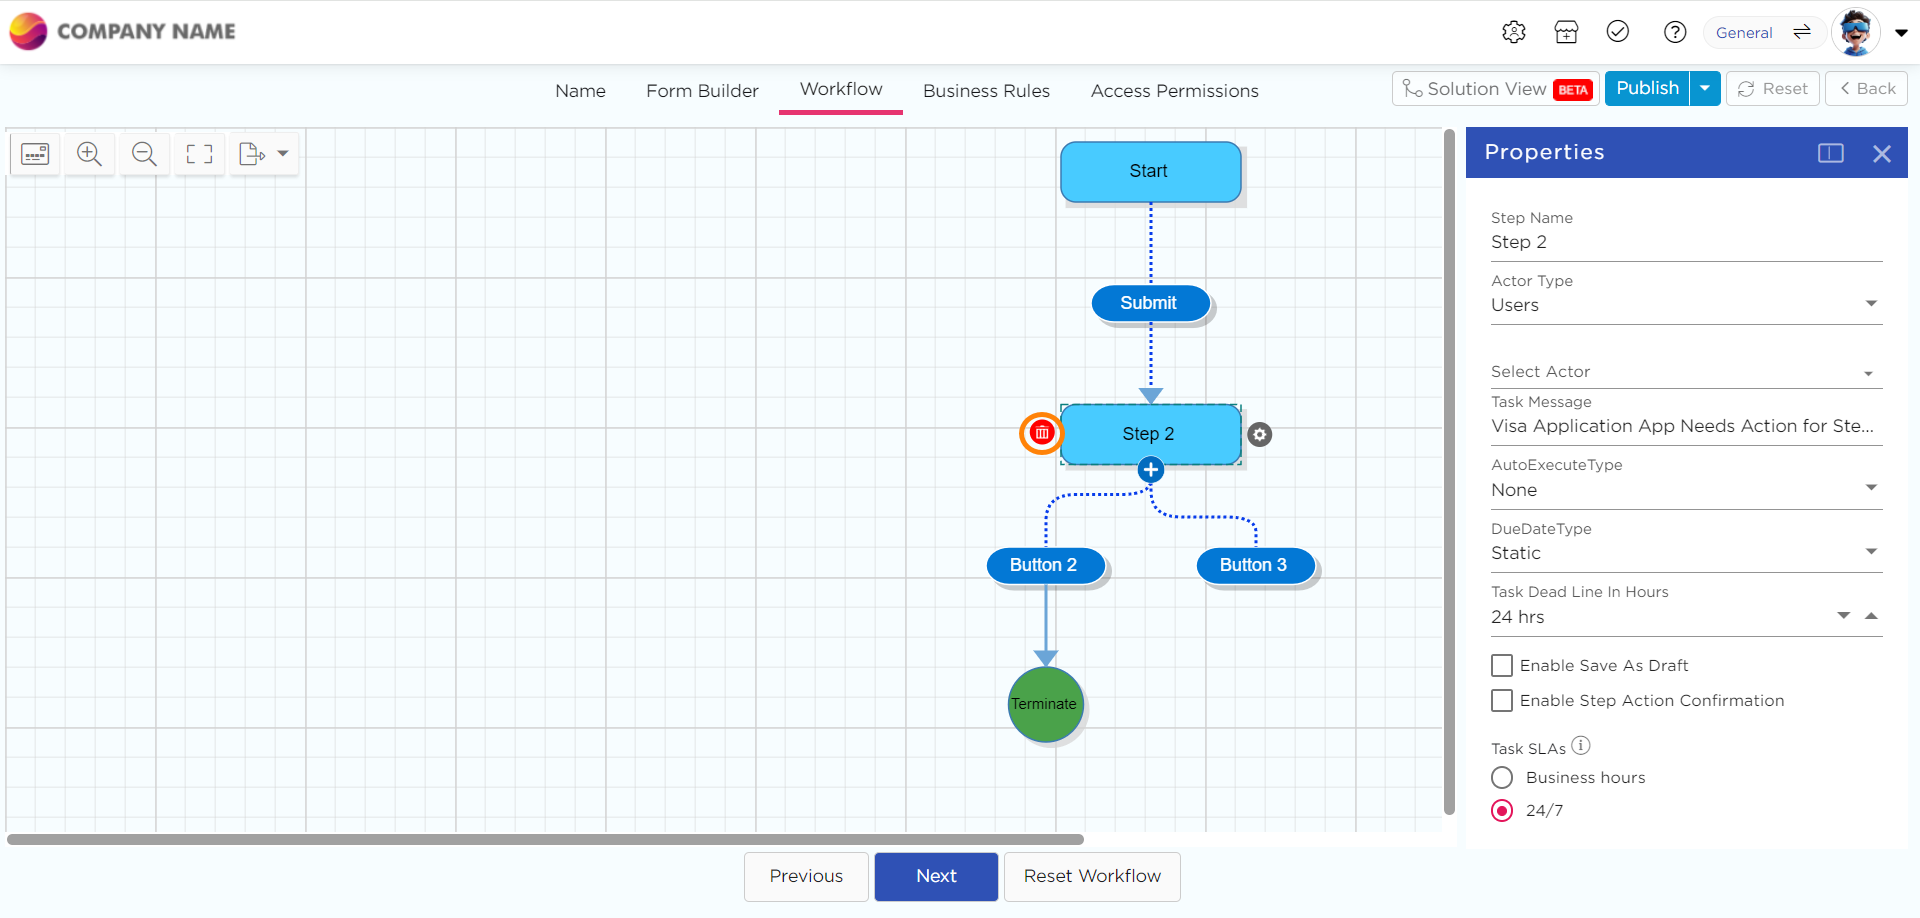
Click on the Step 2 process step of the workflow to define its properties.

Change the name of the step in the Step Name text box in the properties.
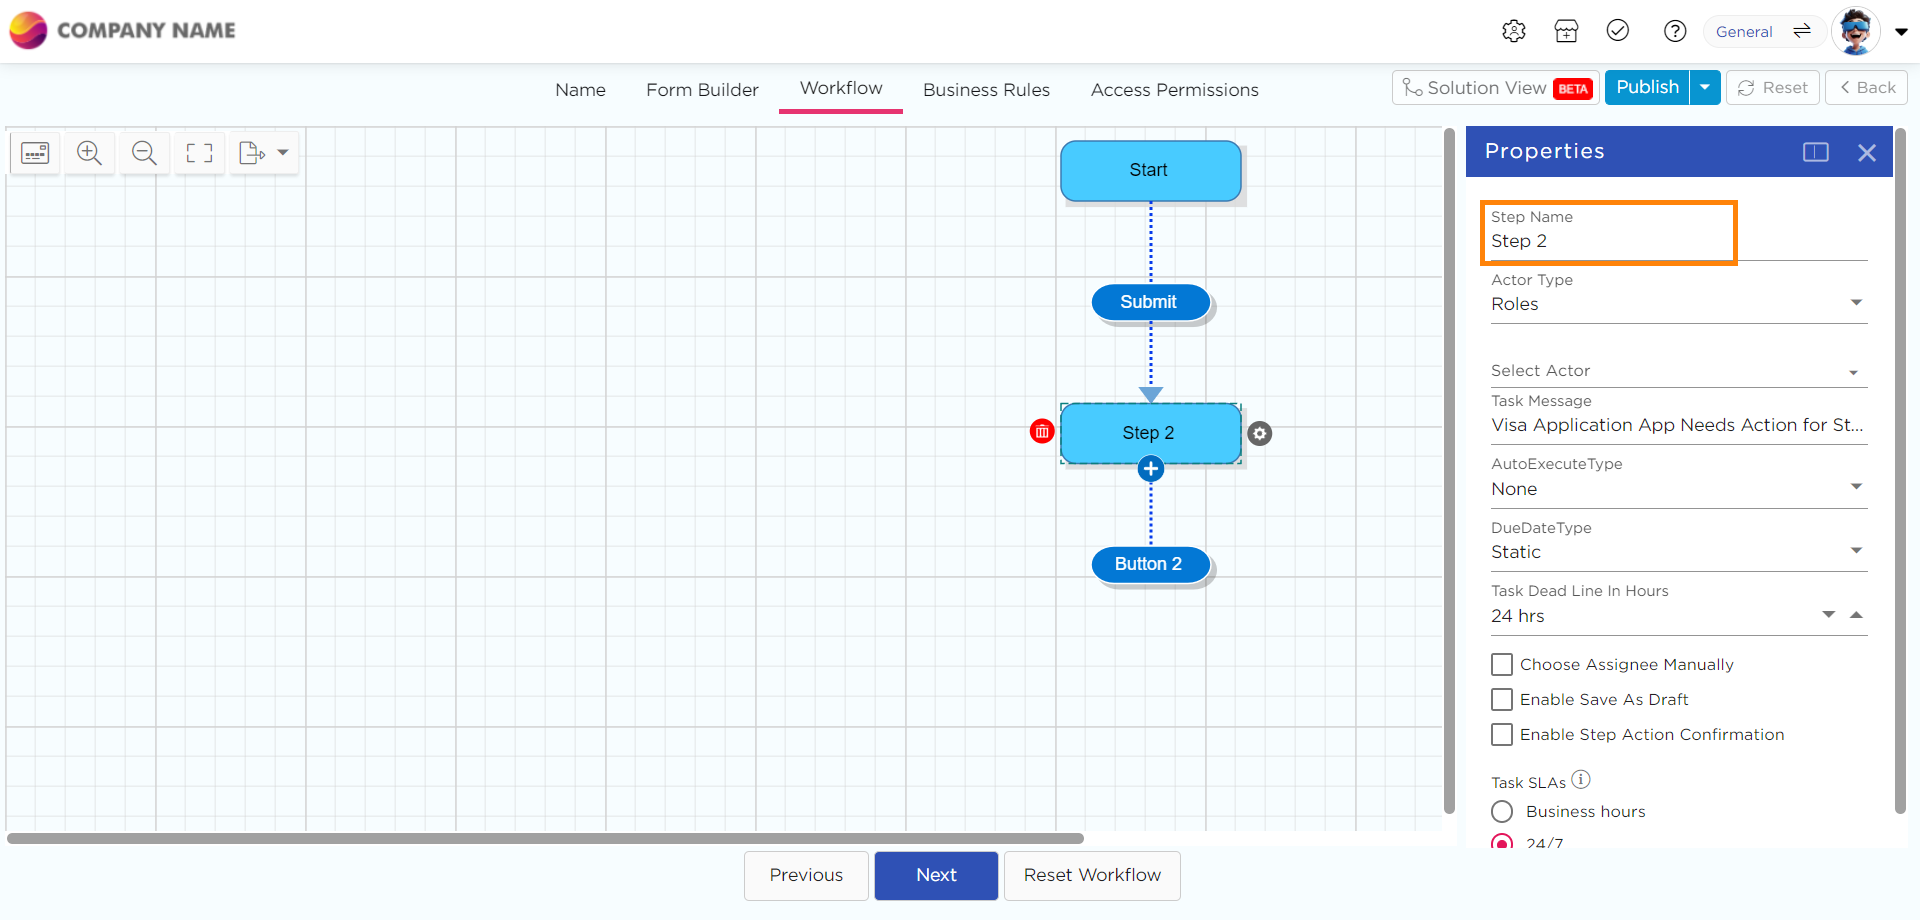
Click on the Actor Type drop-down and select the Actor for the step.
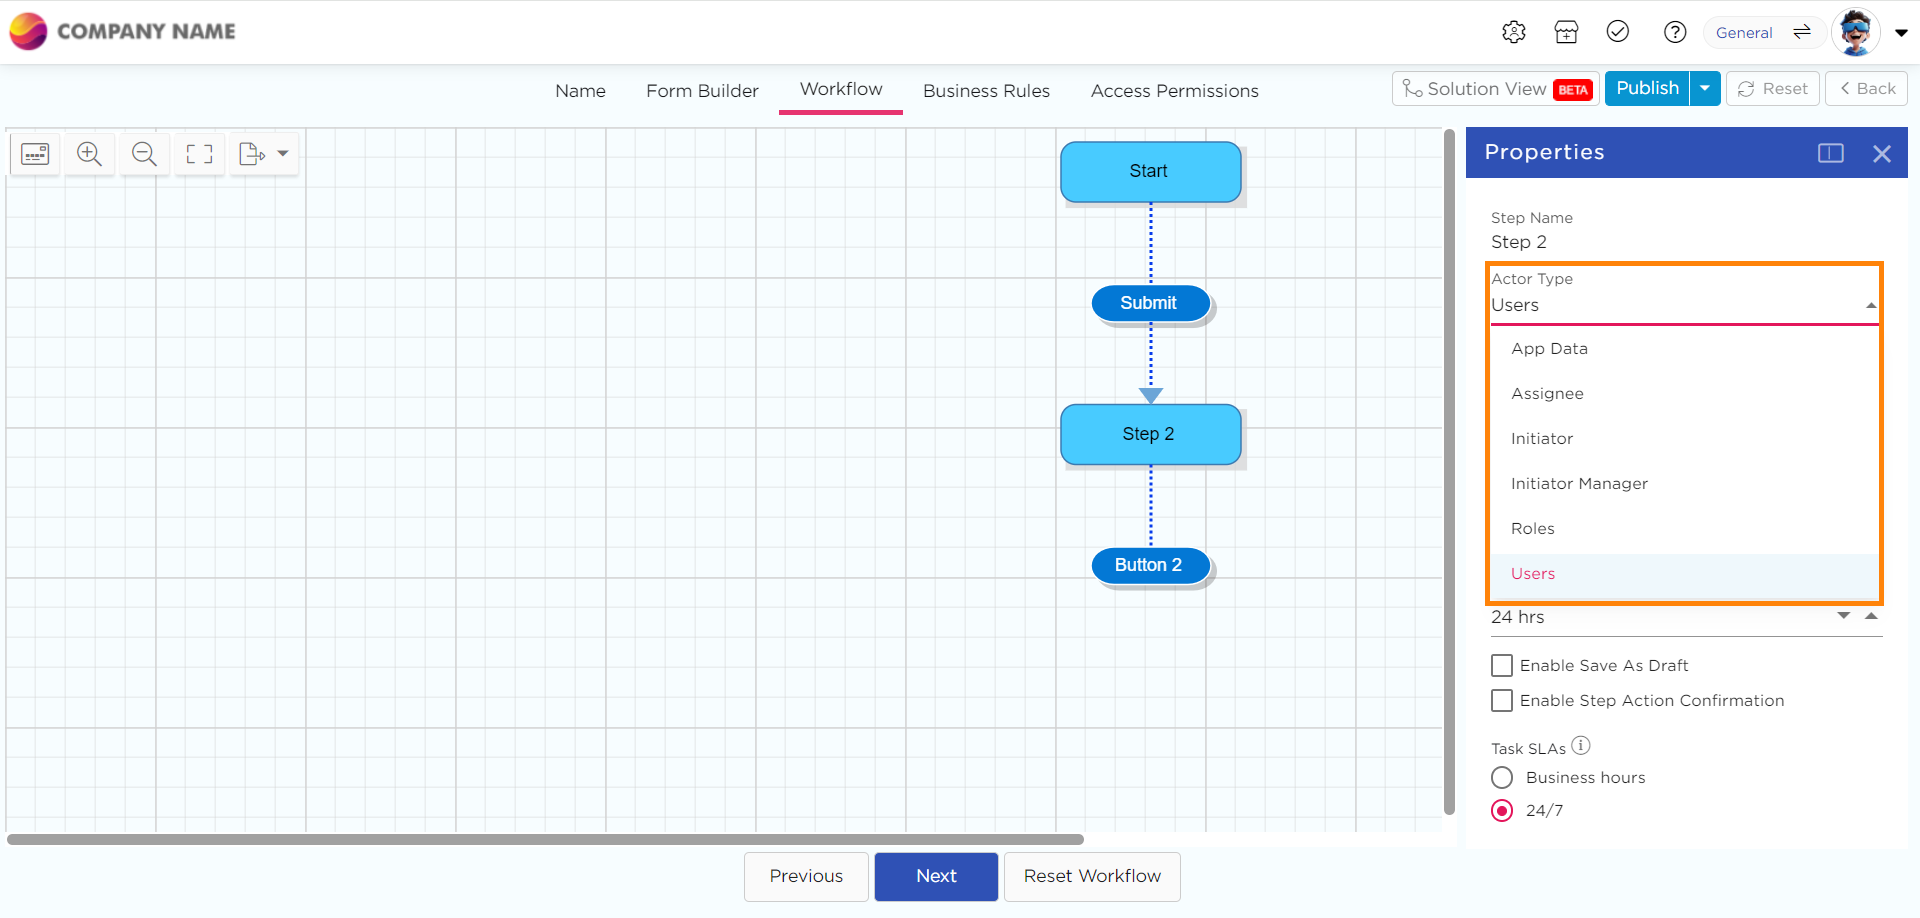
You will see different Actor Types in the drop-down. i.e., Users, Roles, Initiator Manager, Initiator, Assignee, and App Data.
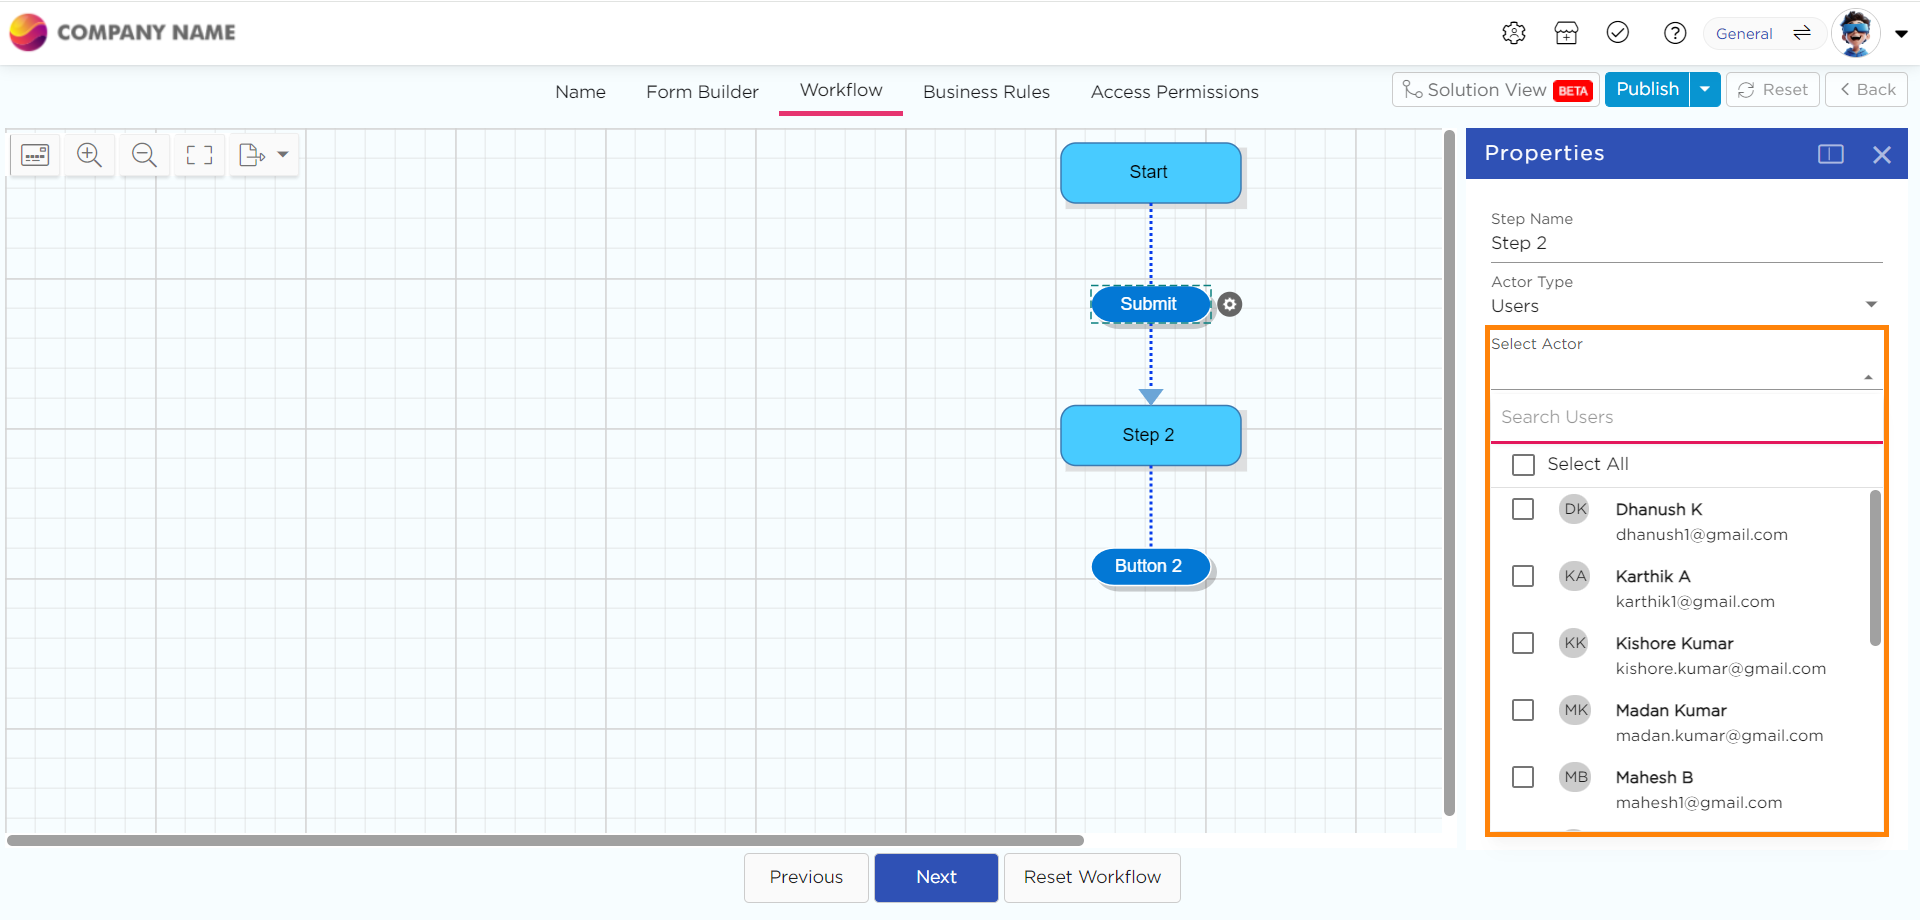
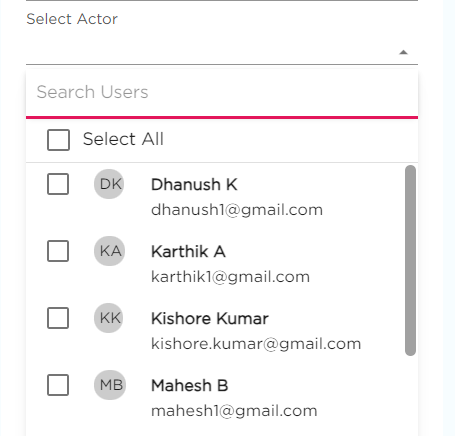
If you select users, the system will populate all the user email addresses present in that workspace.
All the user email addresses are visible in the below Actor drop-down, and you can select a user to whom you want to assign the responsibility of that particular process step.
The same process applies for Roles as well.
Initiator Manager: Manager of the user who initiated the process.
Initiator: The User who initiated the process.
Assignee: The user to whom the initiator assigns the next process step.
App Data: Email ID for users present in the application.
Select a user as an Actor.
Add Action Button
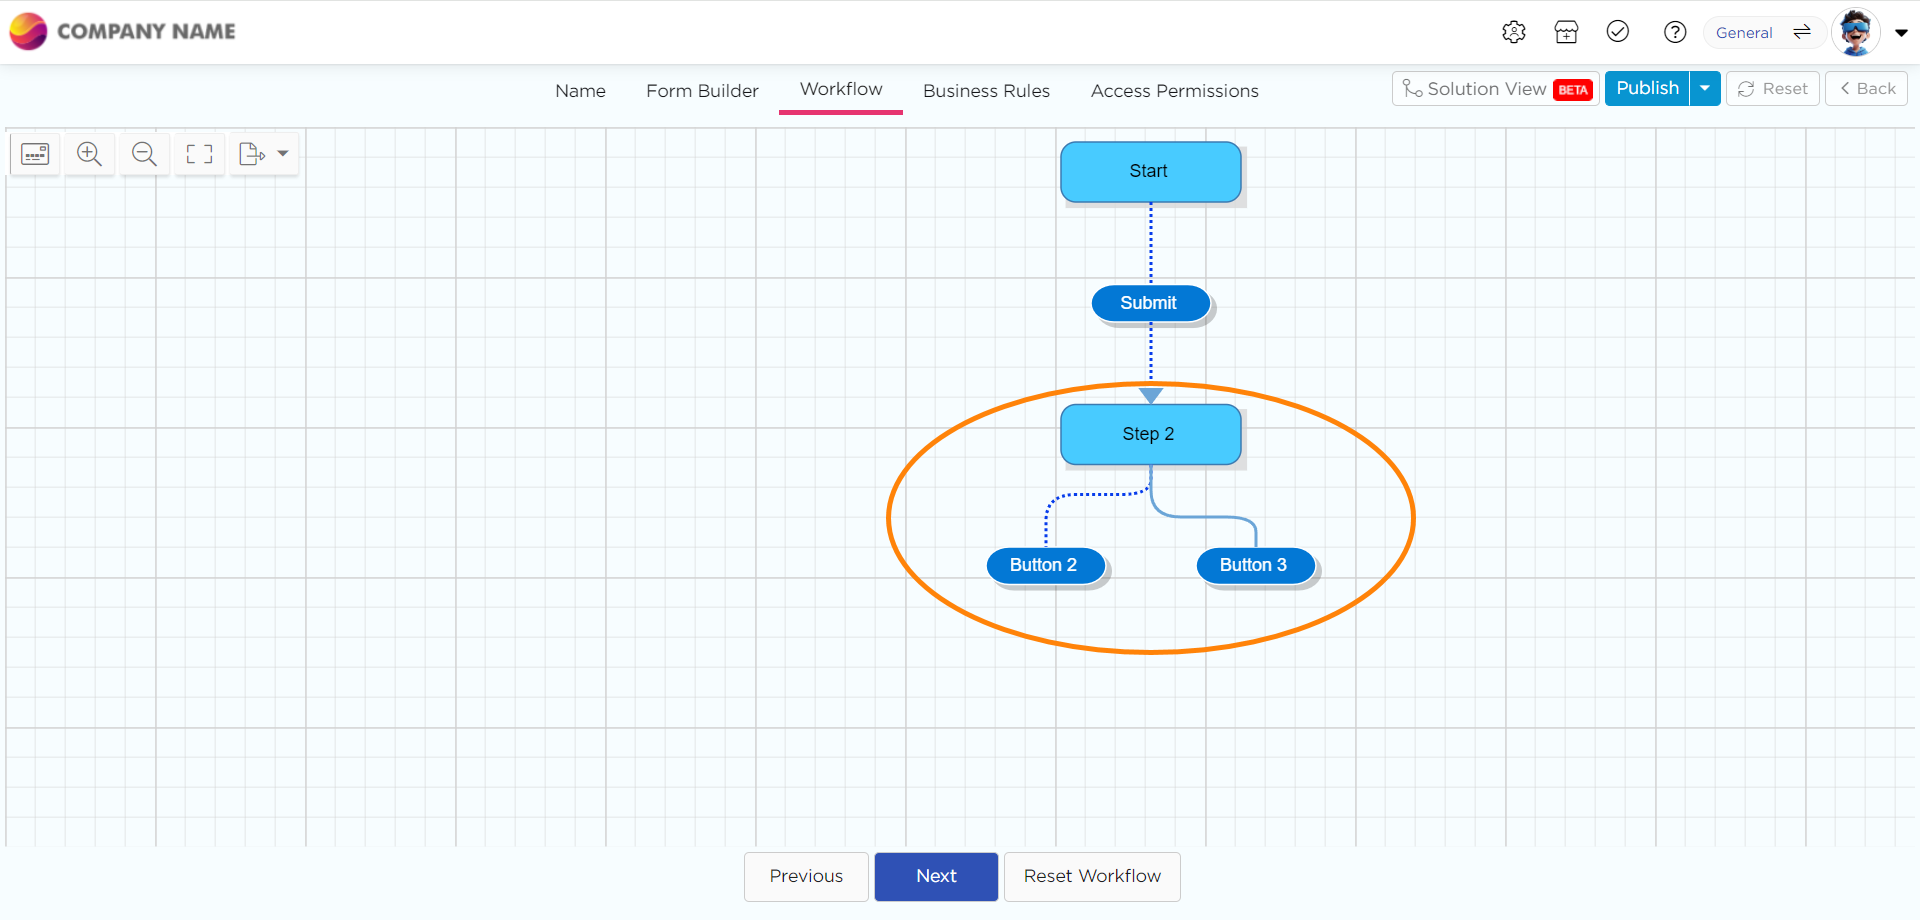
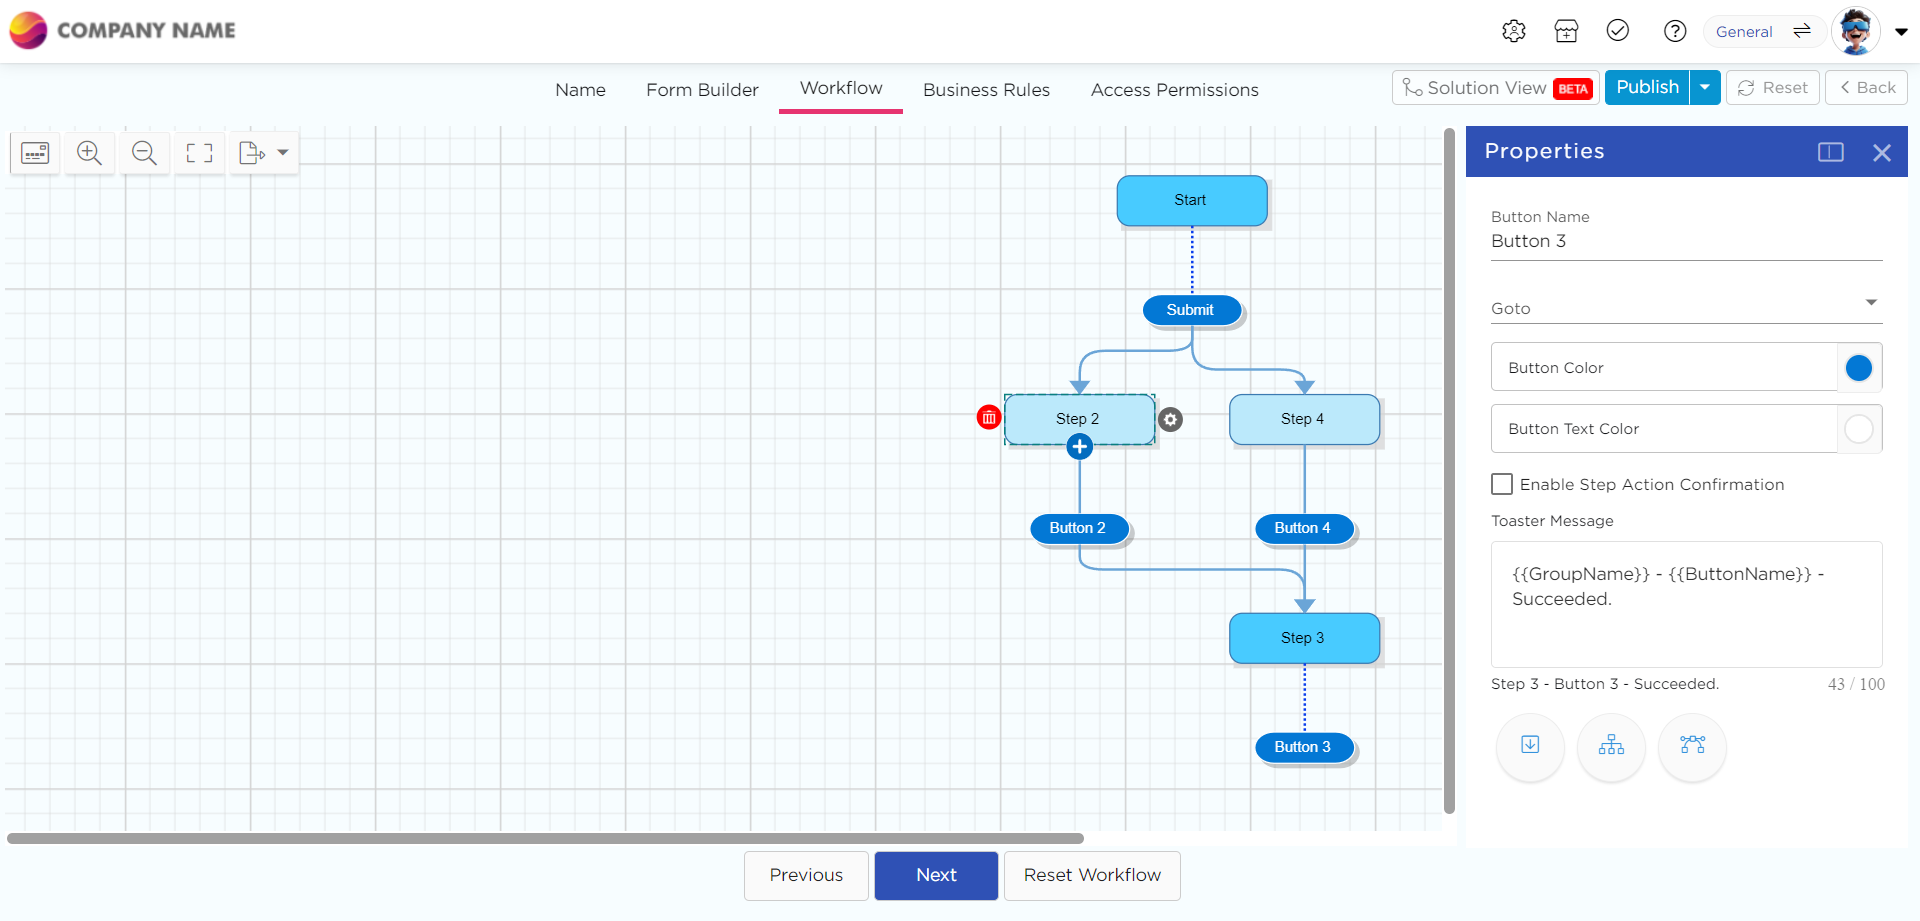
To add one more action button to a process Step, click on the process Step in the workflow and click on the + icon.

An additional action button, Button 3, will add to the process step.
Delete action Button
To delete a button that you added, click on the Delete icon of the button.
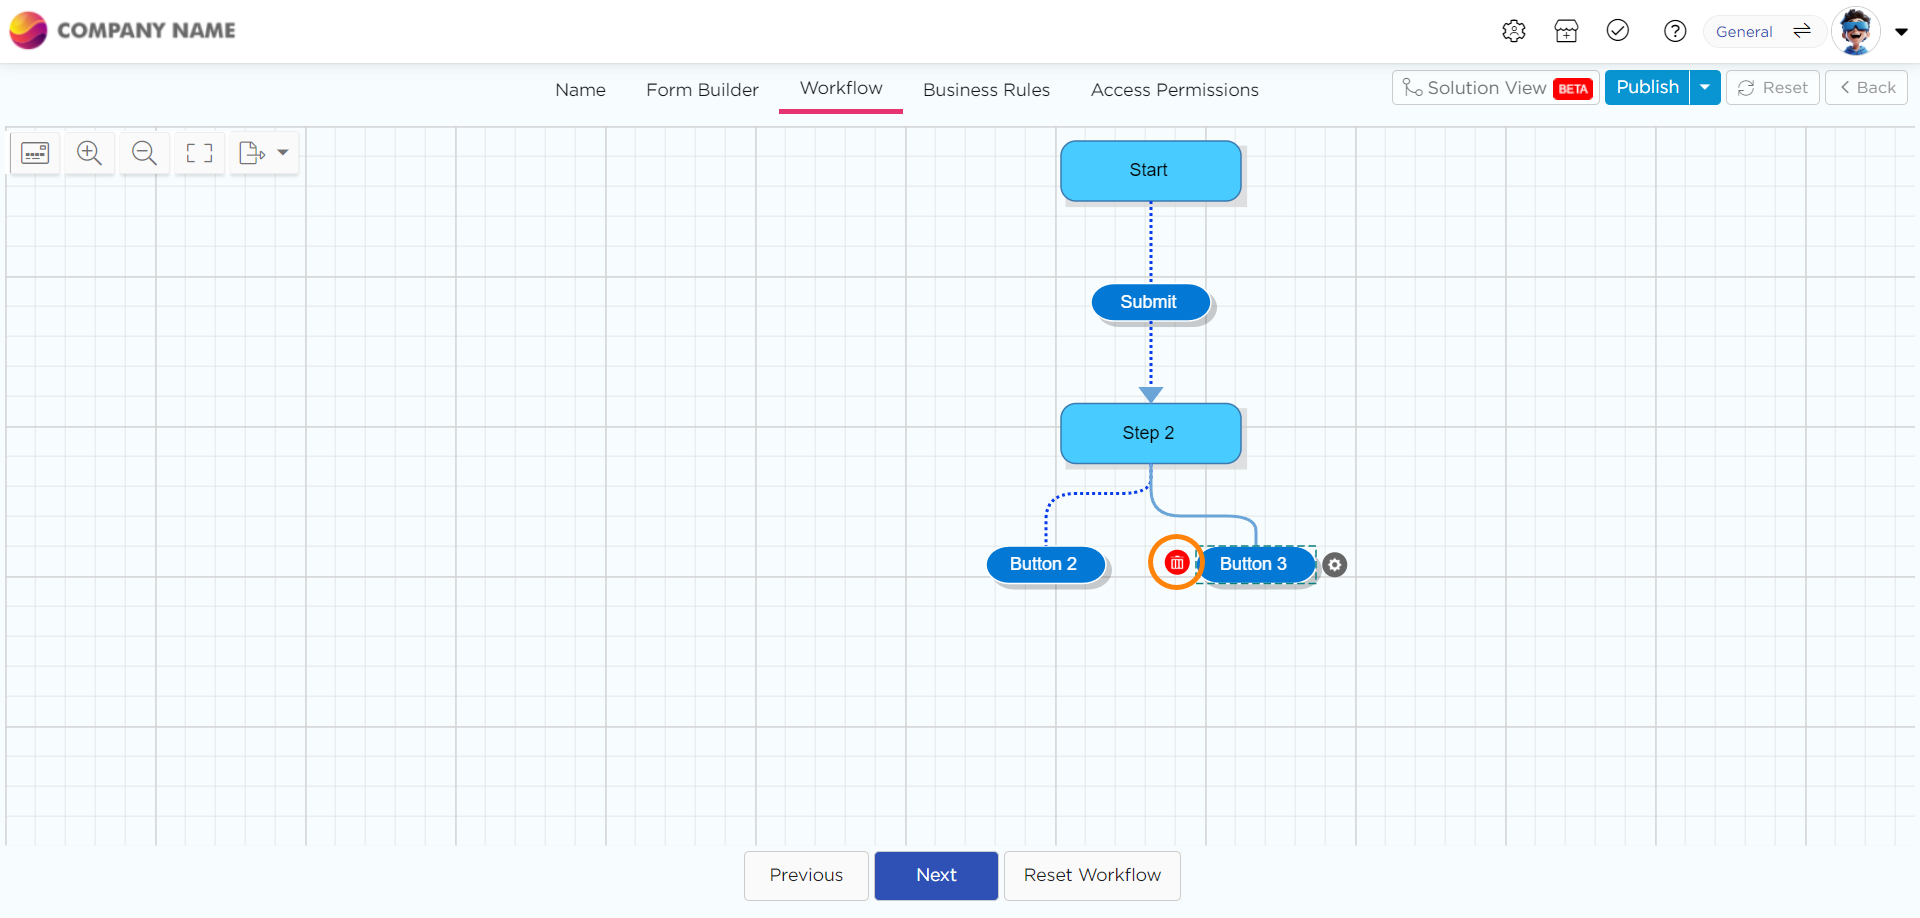
Click on the YES button to Confirm.
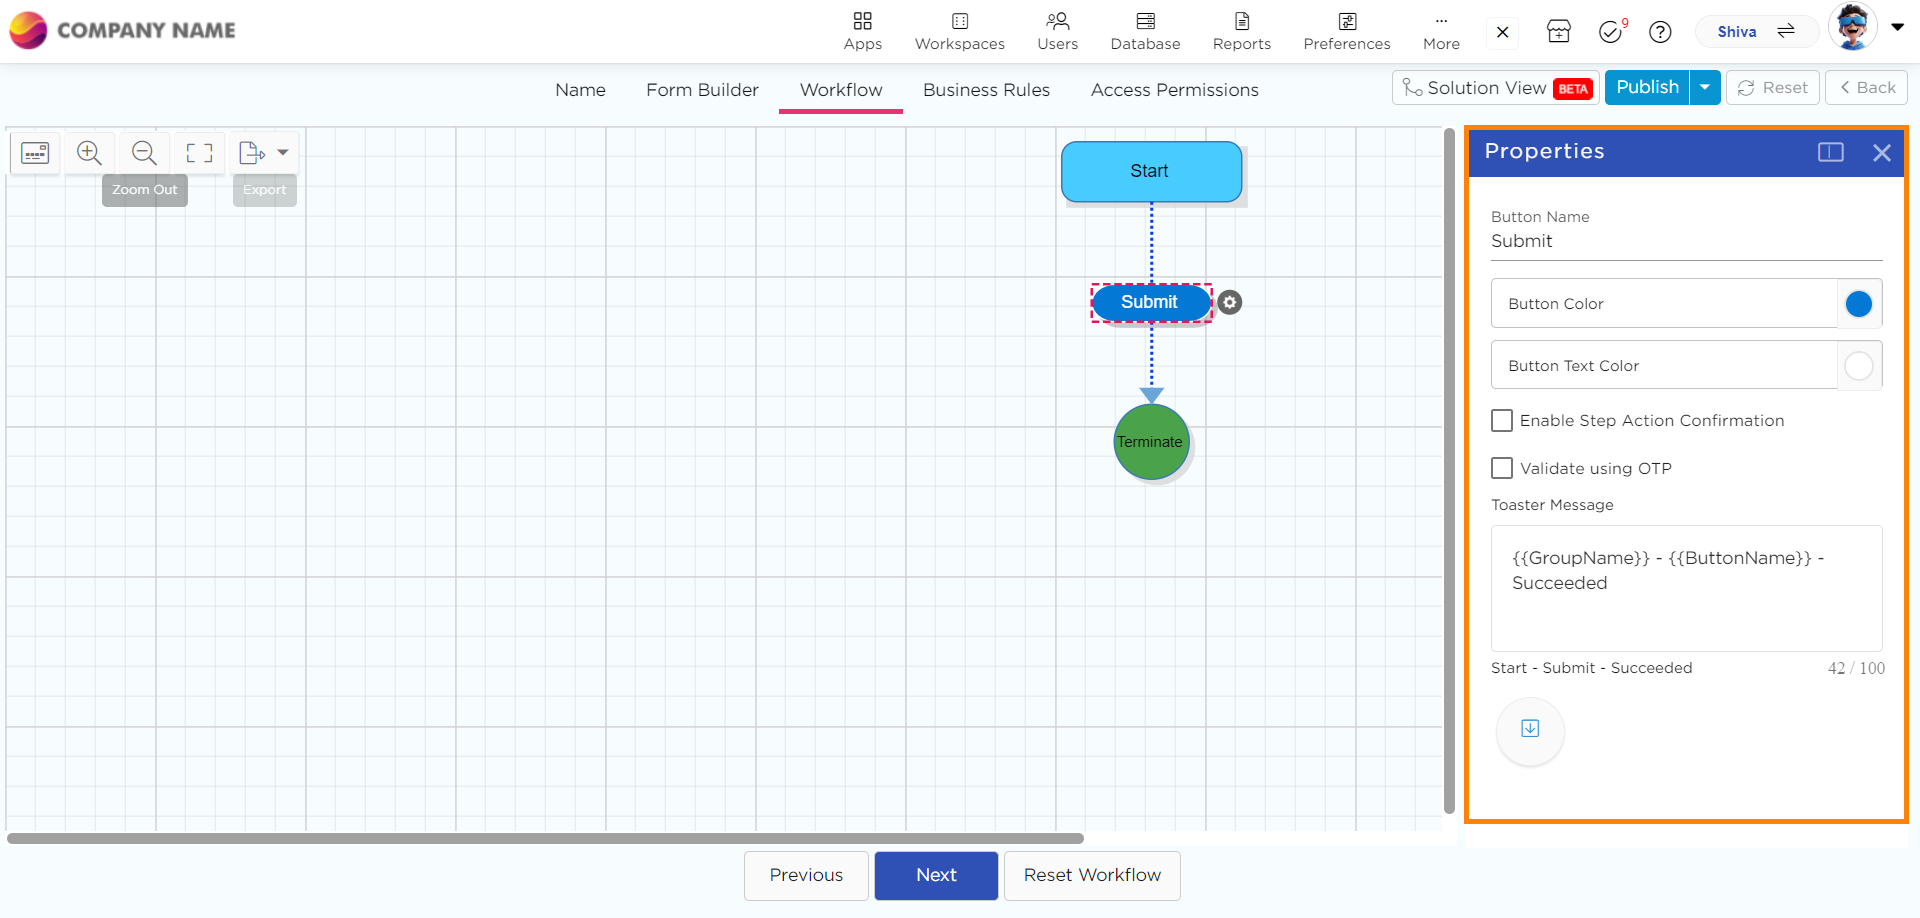
To define the action button properties, click on the action button.
Define the action button name in the Button Name text box.
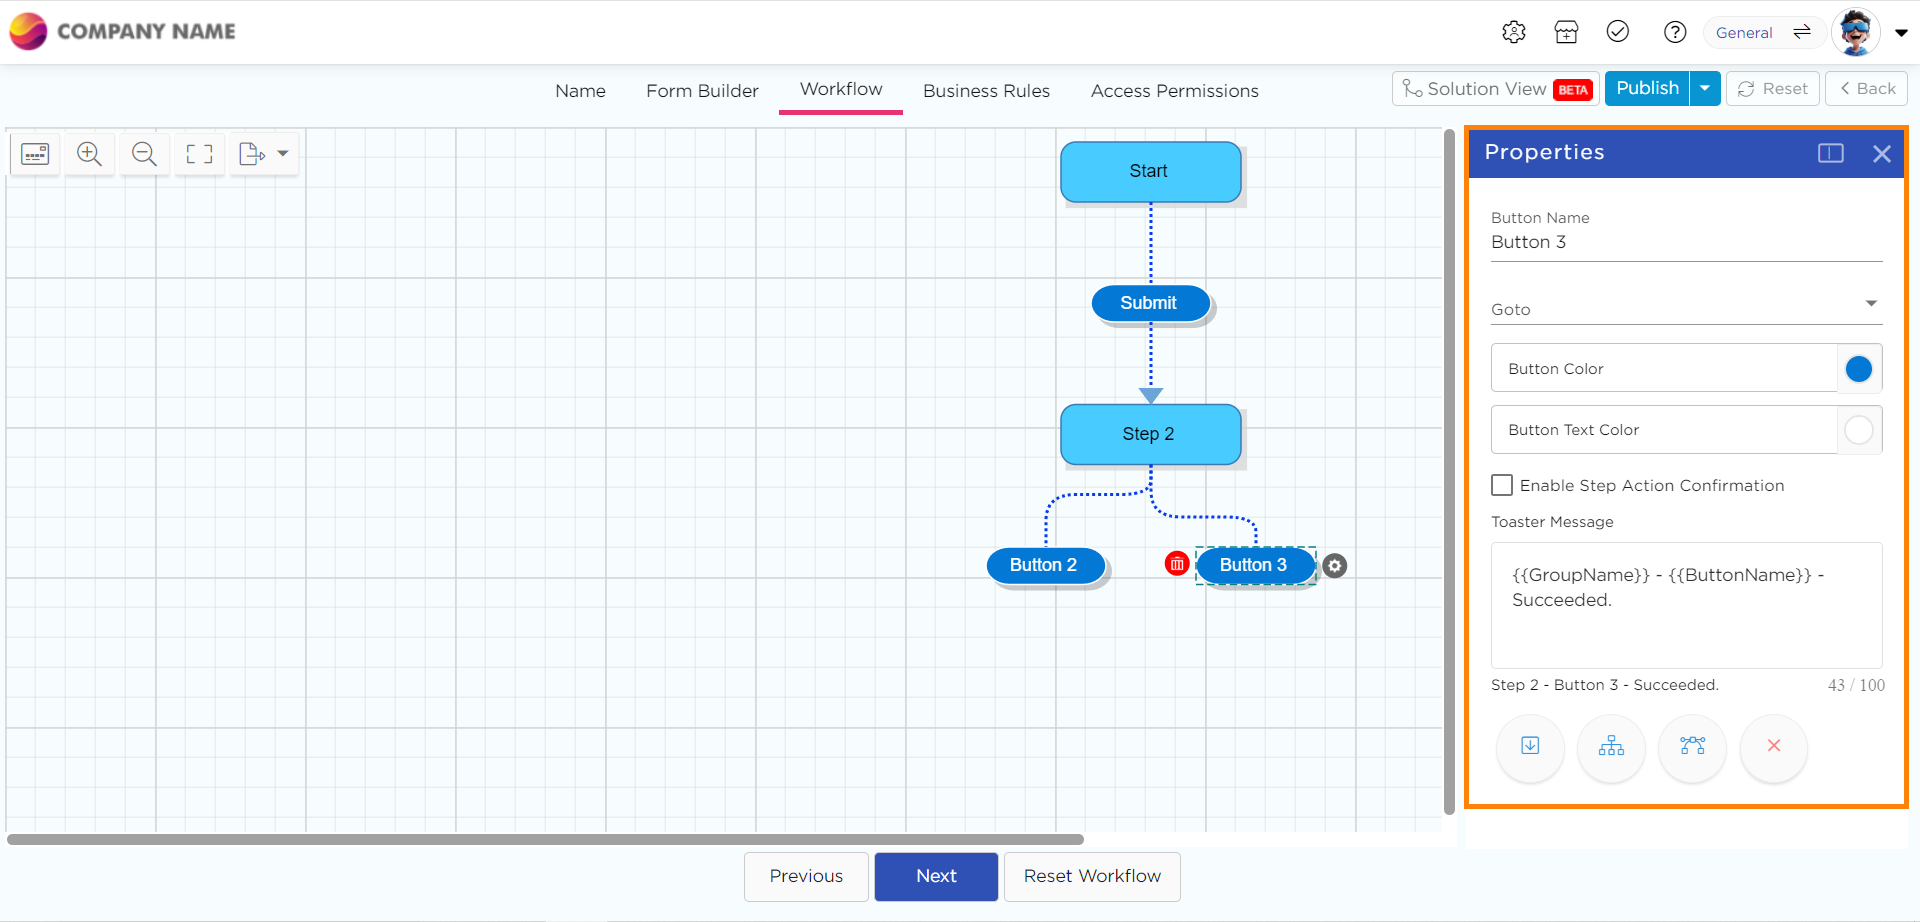
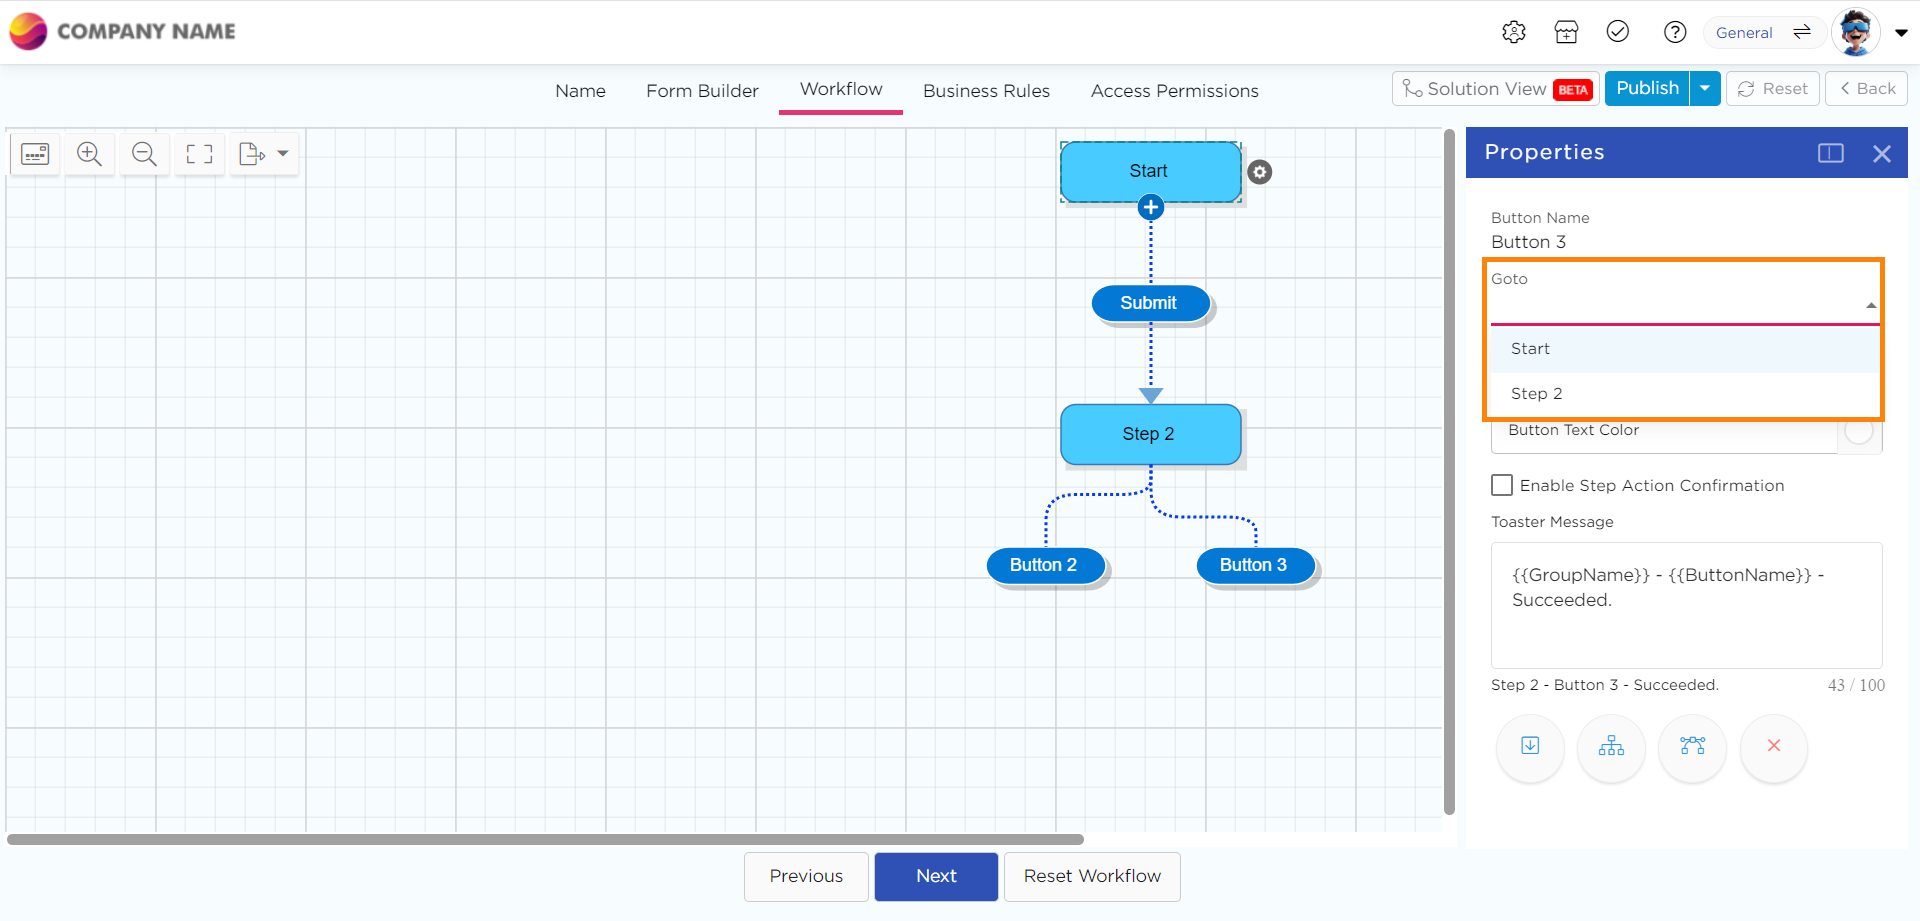
You can see a Go to drop-down in the Properties It is to define the next step that the process should flow after current step (to Terminate or another step).
Add Terminate Step
To add the Terminate step to an action button, click on the action button to open its properties.
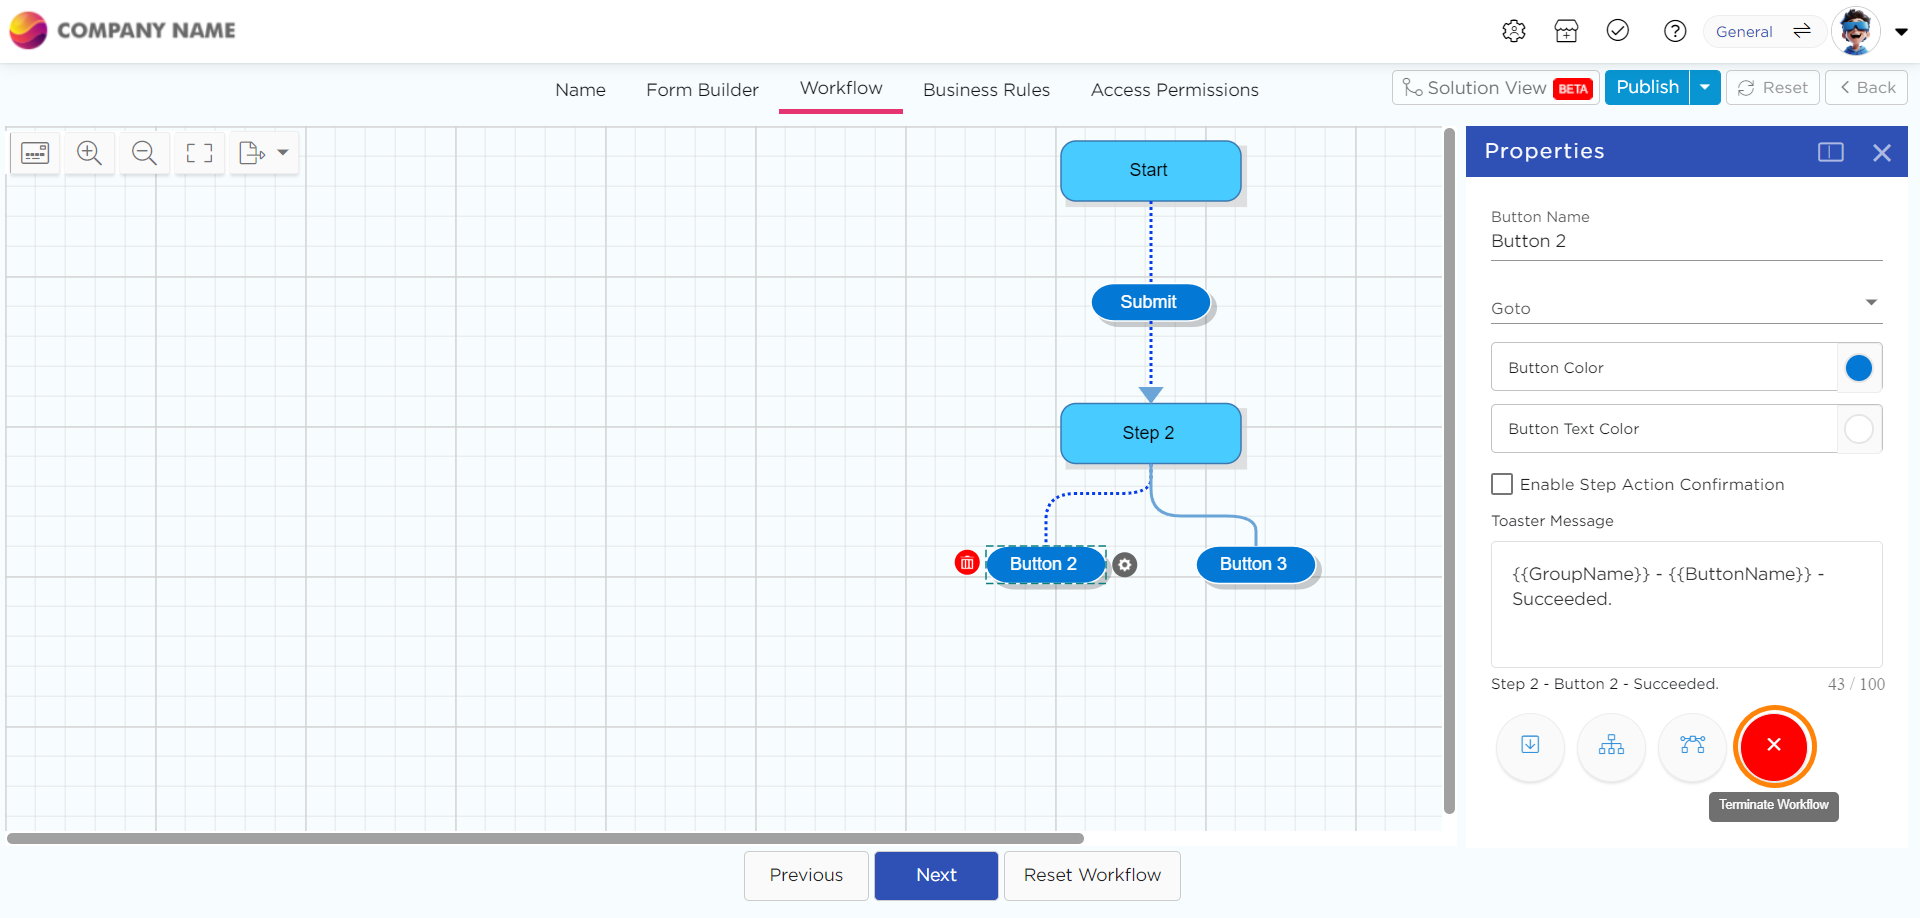
Click on the Terminate window icon.
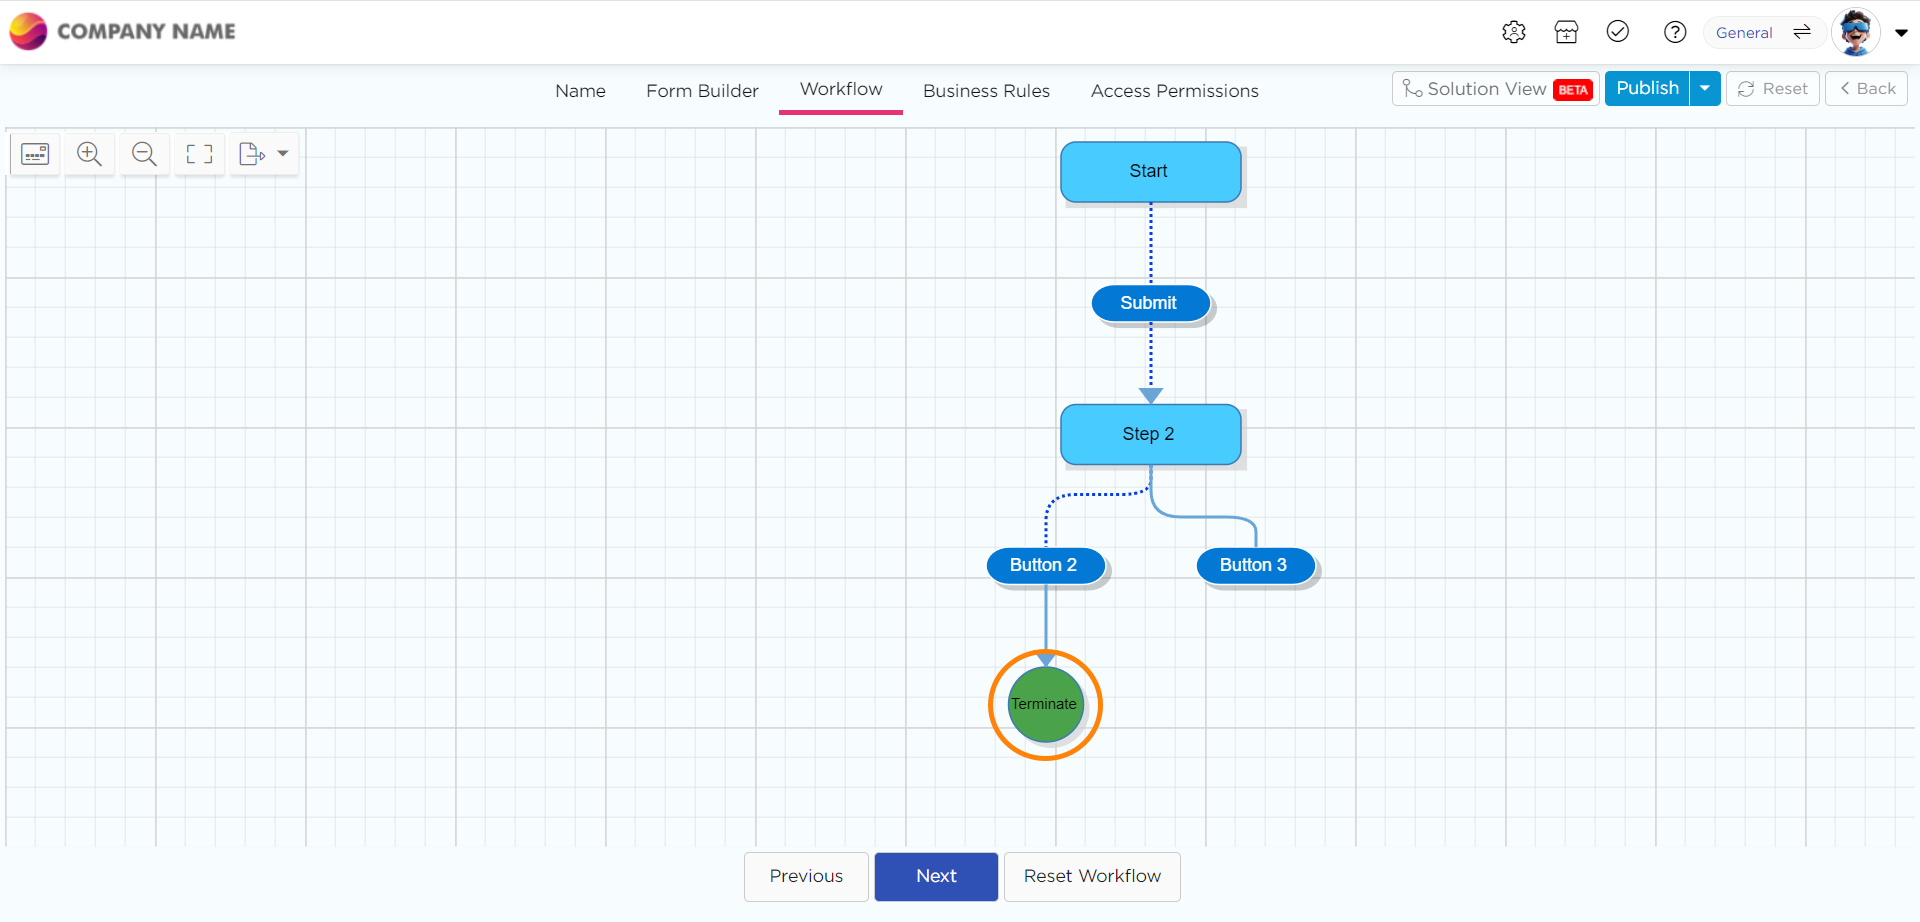
The Terminate step will add to the process step.
Similarly, you can select Terminate from Go-to to drop down in the Properties of the third action button.
NOTE
Terminate step bubble will only be visible once when you terminate a process.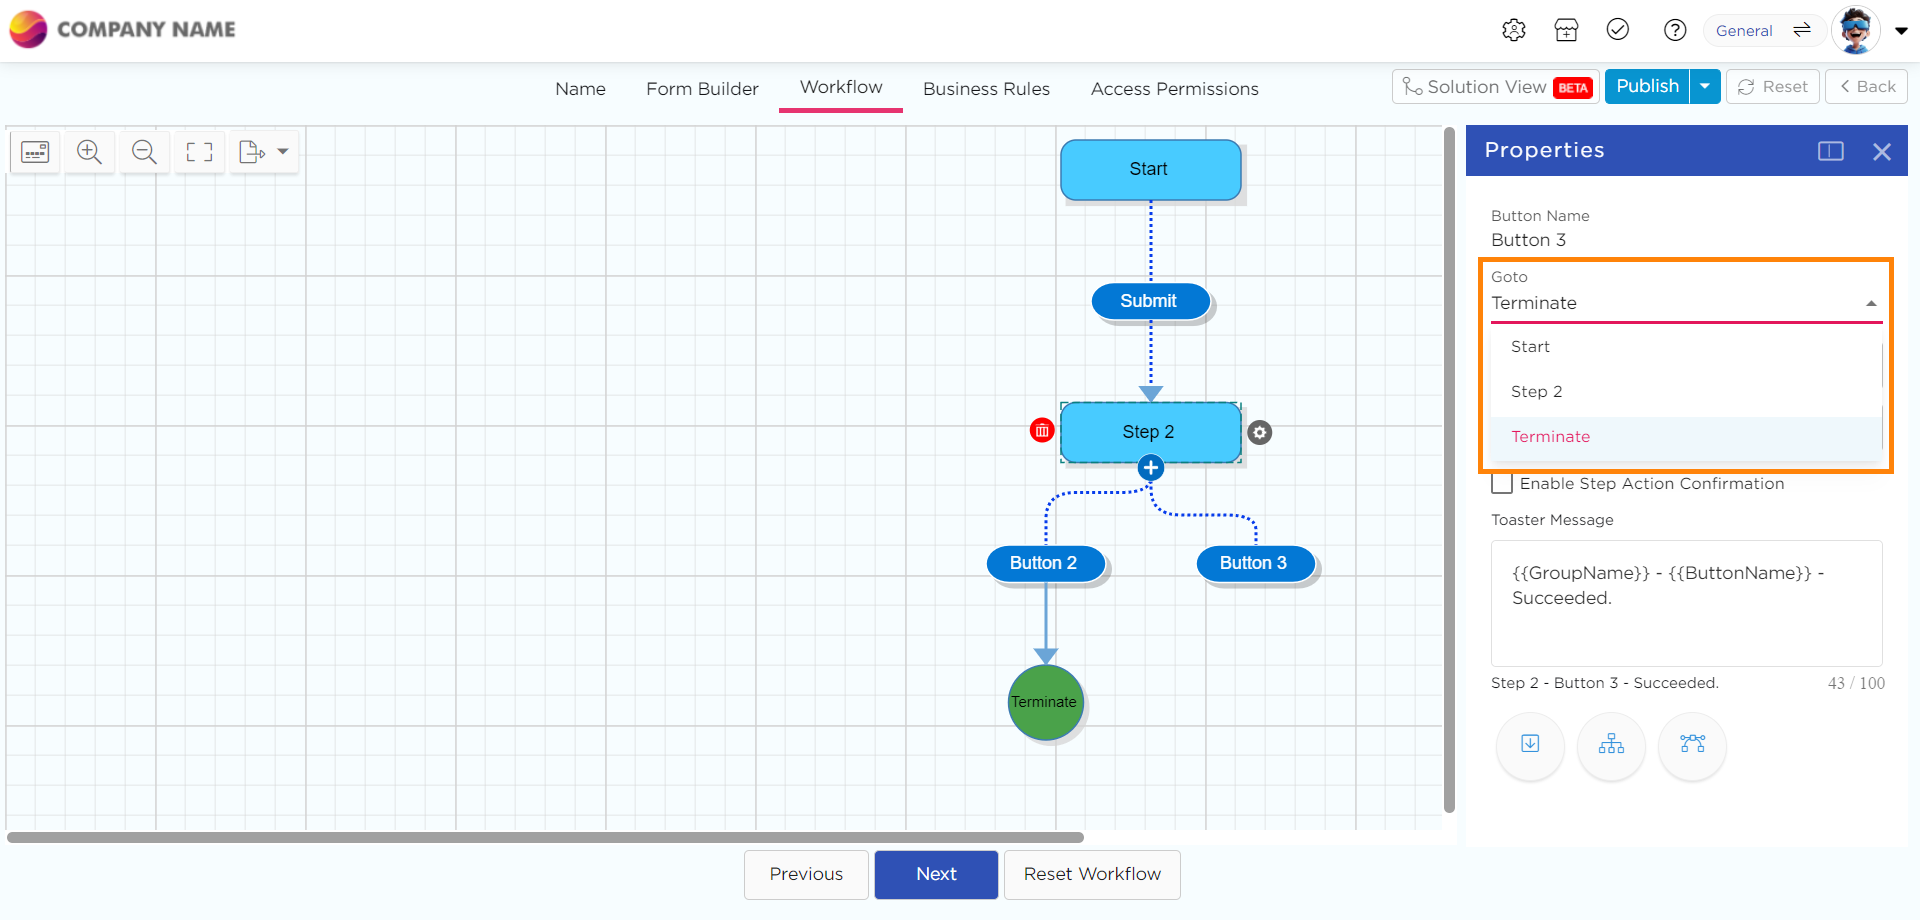
Delete a Step from the workflow
To delete any step in the workflow, click on the step that you want to delete.
Click on the Delete icon attached to the step.
Click on the YES button in the confirmation pop-up to delete the step.
Conditional Workflow
The conditional step in the workflow works based on a condition. If the given condition returns True, it executes the workflow steps for that condition.
NOTE
As of now, platform doesn't support conditions on Grid elements/Subform elements.
Click on the Conditional step button in Start action button properties.
The conditional step will add below the submit action button.
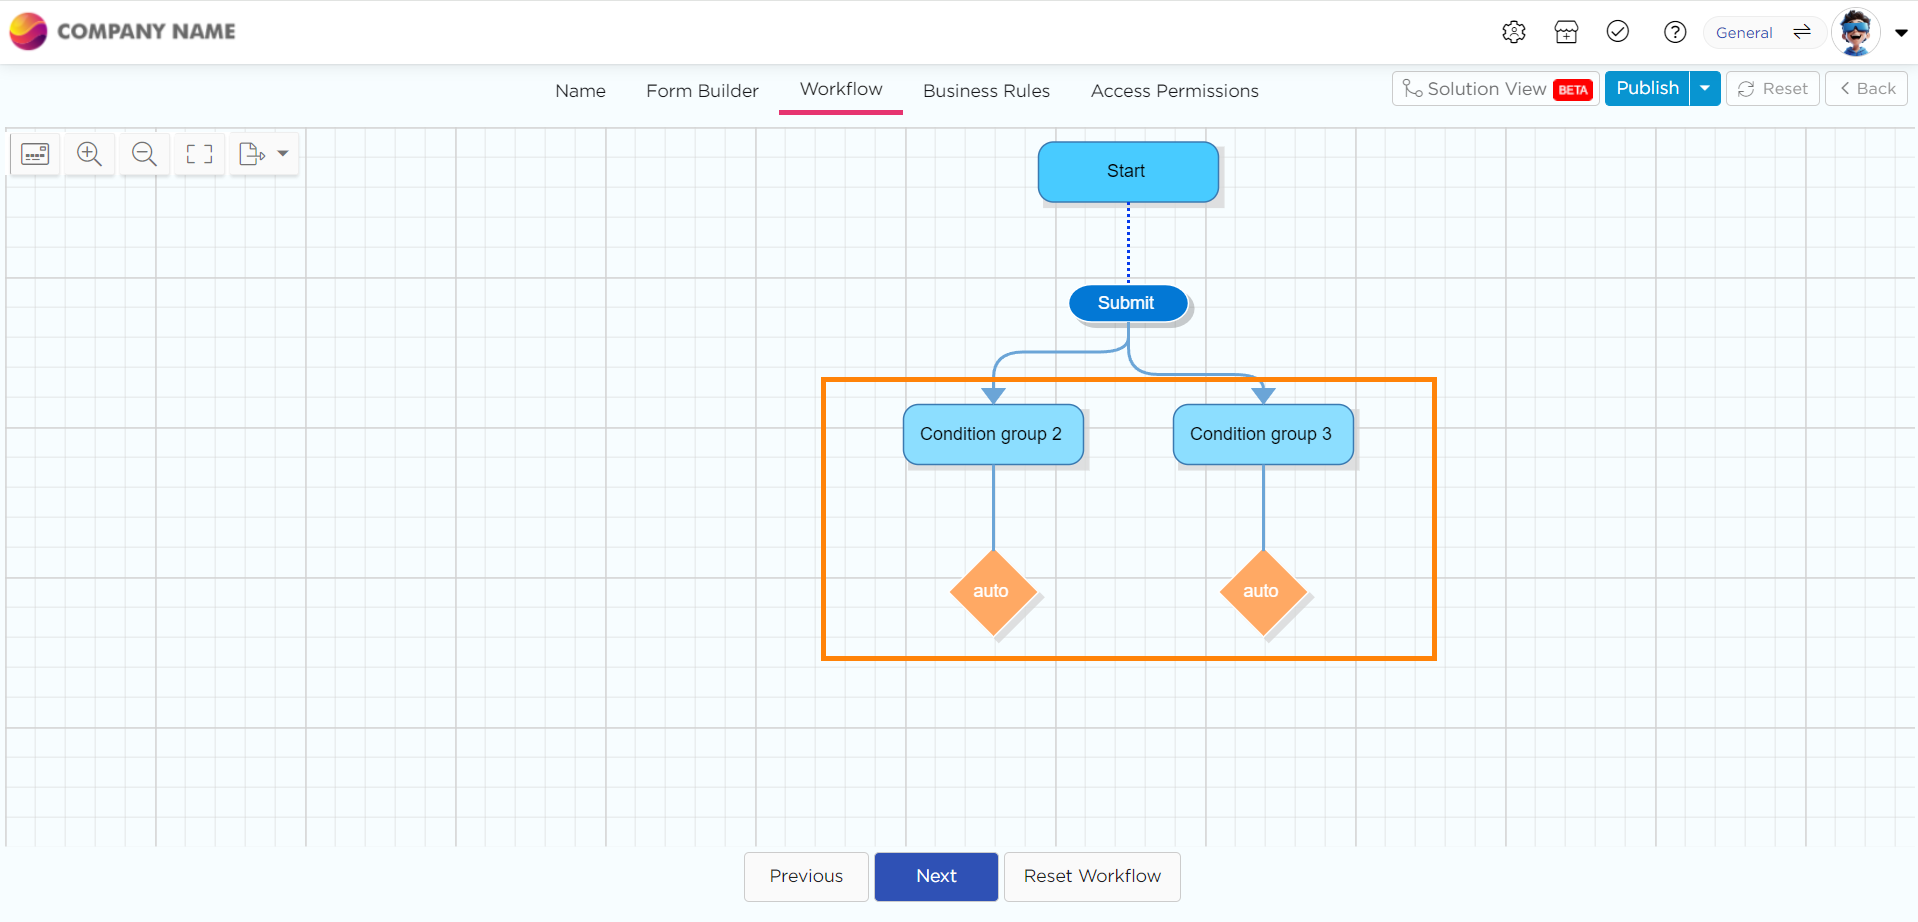
Click on the Condition group 2 step.
A pop-up window will display on the screen in which you can define conditions for that conditional step in the workflow.
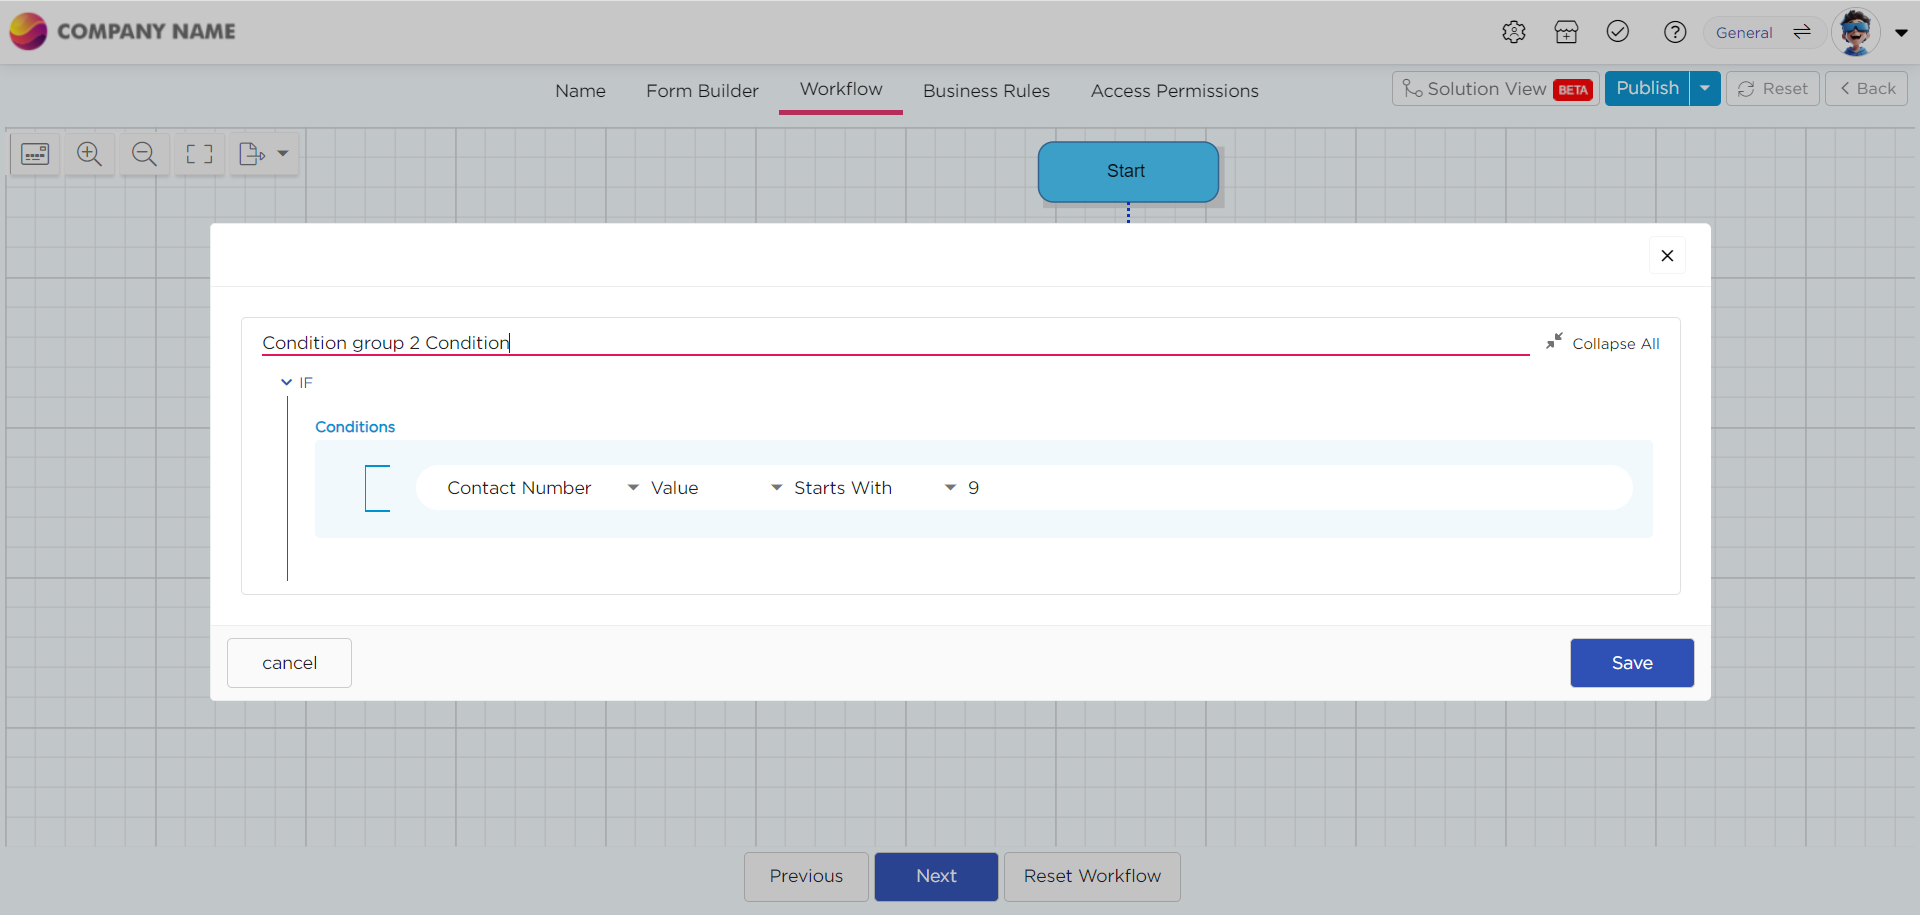
Provide a valid name for the condition in the Name text box.
Click on the Element drop-down, and select an element on which you want to create a condition.
You can add as many conditions as you want by clicking on the + icon button according to your requirements.
NOTE
Refer to the Business Rules step, Rule with a single condition and Rule with multiple conditions, for more details.
- After defining the conditions, click on the Save button to save the conditions.
- Click on the condition group 3 step in the workflow to define its conditions and follow the same steps as you did for condition group 2 and click on the Save.
- Click on the auto-decision step for the first condition group.
- A Properties window for the auto action step opens on the screen.
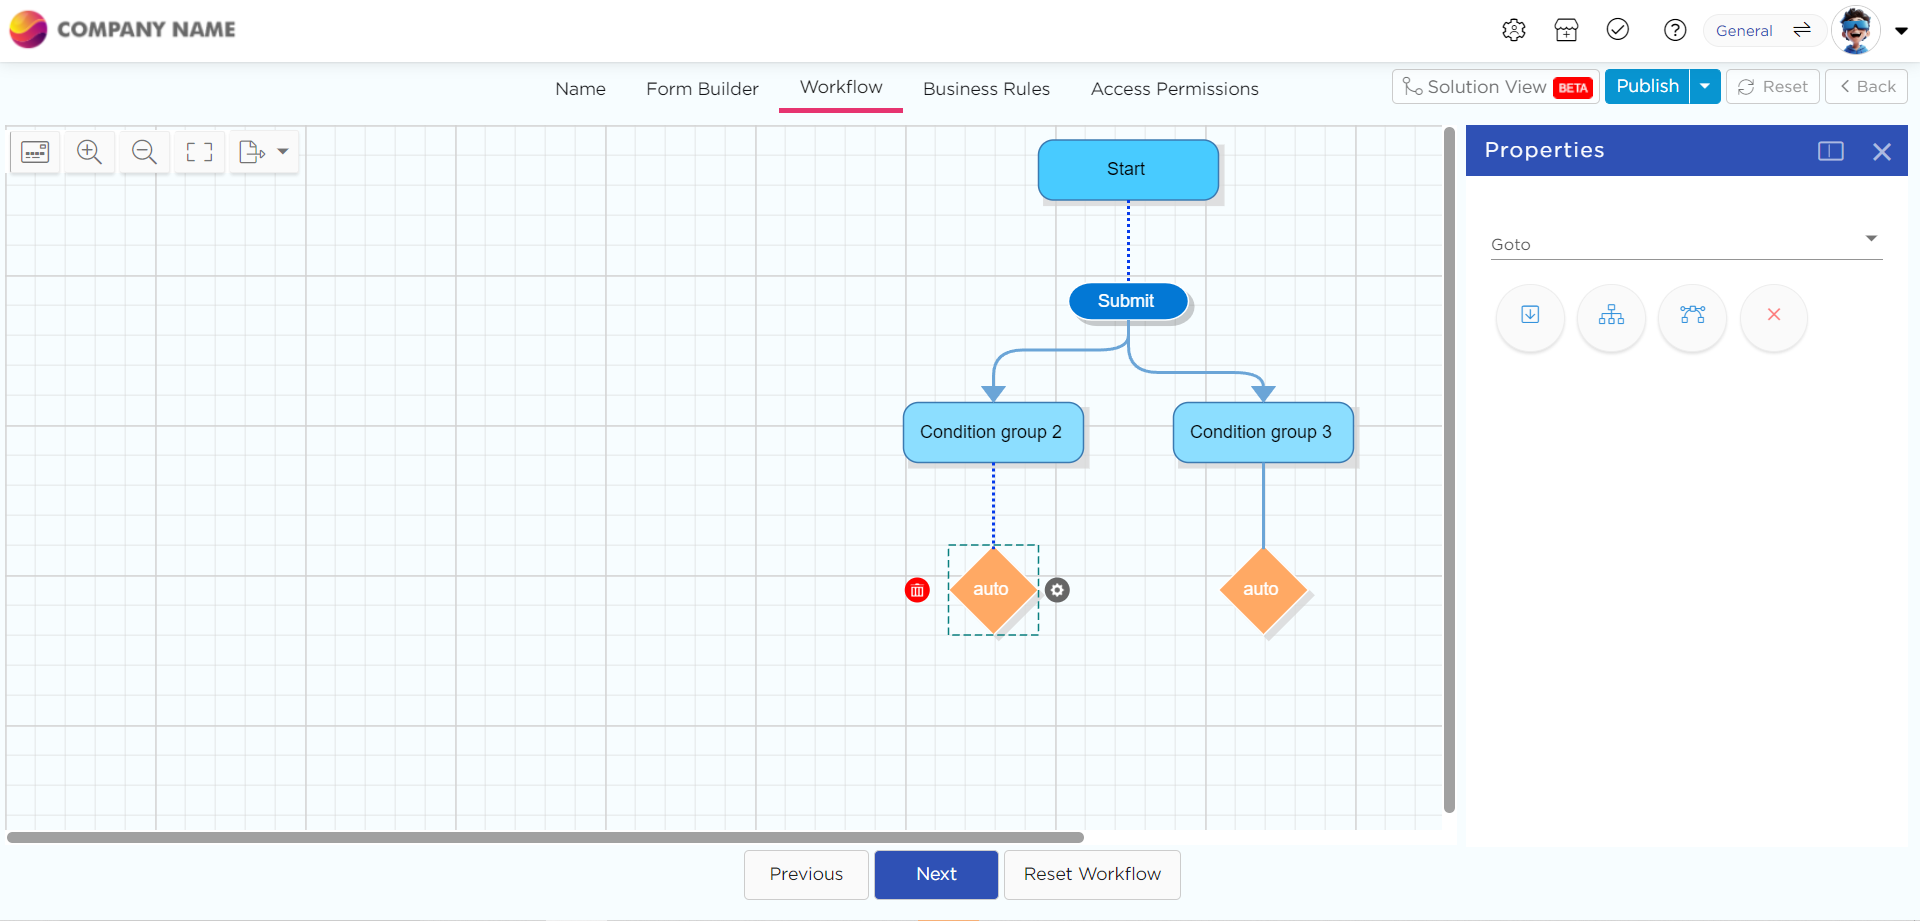
- Define the properties, which is the same as defining the action button's properties while creating a sequential step in the workflow.
NOTE
When you add a conditional step, platform will add only two conditional steps by default. If you want to add additional conditional step, follow the same process as adding a conditional step, i.e., click on the Action Button and select the conditional step, the third conditional step will add to the workflow.
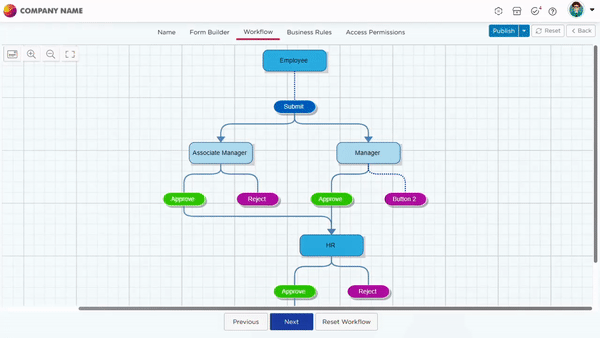
Parallel Workflow
You can create a Parallel workflow step to execute multiple tasks at the same time parallelly.
Click on the Submit action button and in its properties, select Parallel Workflow icon.

A parallel step adds below the start action button.
Define the properties for each Workflow step.
You can manage the tasks and the elements aligned to the parallel step action through the section permissions to Add a Record in the application.
The final step triggers and executes it after completion of all the parallel tasks.
The final sequential step will initiate when all the parallel steps gets completed.
NOTE
In parallel workflow steps when an action button is set to terminate the flow. Then, with the help of Terminate Other Pending Parallel Workflow Steps option, citizen developers can provide the people responsible for executing the parallel workflow steps with the authority to independently terminate the complete flow, restricting the flow moving to the next step, regardless of the actions taken by others involved in the parallel workflow. This will provide greater flexibility and control to the individuals involved in parallel workflows, ensuring they can take decisive actions without being restricted by the decisions of others. It empowers them to streamline the workflow based on their unique circumstances and judgment.
EXAMPLE
Scenario: Imagine a team of three colleagues working on a collaborative document editing project. Each colleague has the authority to review and approve a section of the document. Once all three colleagues completed their reviews, the document would automatically move to the next step, regardless of their individual decisions.
However, with the power of Terminate Other Pending Parallel Workflow Steps option each colleague can independently terminate the entire document editing process if they believe changes are needed before progressing. This means that if any one of the colleagues decides to reject the document, the entire project halts, giving them the authority to ensure the document meets their standards before moving forward.
Outcome: This option provides greater control to the colleagues involved in the document editing project. They can take decisive actions to ensure the document aligns with their expectations, without being restricted by the decisions of others. It streamlines the workflow based on their unique circumstances and judgment, guaranteeing that everyone is on the same page before proceeding.
Properties of workflow steps
Each step in the workflow has the properties, as given below.

1. Step Name-Text Box:
This field is to set a name for the workflow step.
2. Actor Type Drop-down:
This field is to select the type of actor (i.e., user, role, initiator, manager, etc.) for the workflow step.
VIP NOTE
If you select Actor Type as Any One, the app-form transforms into an Guest Record (Guest Link), and attains universal access capability. As a result, anyone with the app's link can access the app and perform transactions.
The Guest Record/Link feature can employ the User Functions and brings a sense of democratization within Quixy when creating user functions.
So, anyone with Quixy’s guest record (especially useful for employing user functions) can create a user, deactivate a user, and assign or remove a user role in Quixy without being a part of Quixy.
For example, assume a company has a website and wants to allow their customers to sign up for the Quixy portal via a self-registration form embedded within their website. So that their customers can sign up for the portal through their website and access the Quixy portal to view their orders, status, and so on.
In situations like the one described above, it's possible for a business entity admin to create a guest app in the Quixy platform and put it on the main website. In addition, the admin can now set up guest app functions so that when a guest fills out the form, an account and role will be set up so that the customers can access the Quixy portal right away.
3. Select Actor Drop-down:
This field is to select the Actor, i.e., if you select the Actor Type as User then you will find email ids of all the users present in that workspace. If you select the Actor Type as Roles then you will find all the roles (HR, Manager, CEO, etc) present in that workspace.
4. Task Message-Text box:
This field is to set a task message to the process step. This task message would display along with the task in the Tasks page.
5. Auto Execute Type:
If you want any process step to get executed automatically without any manual intervention, use this property. There are 3 auto execute types:
None: Choose this option if you don't want the process step to auto execute.
Terminate: This option is to terminate the process step automatically.
Action: This option is to perform an action automatically.
For example, if an employee submits a leave request, the manager process step has two actions that the manager can perform, i.e., either approve or reject.
With Action option, you can make the platform to perform either of the actions automatically.
When you select the Action option, platform will ask you to select the Action Button in the Auto Execute Action drop-down.
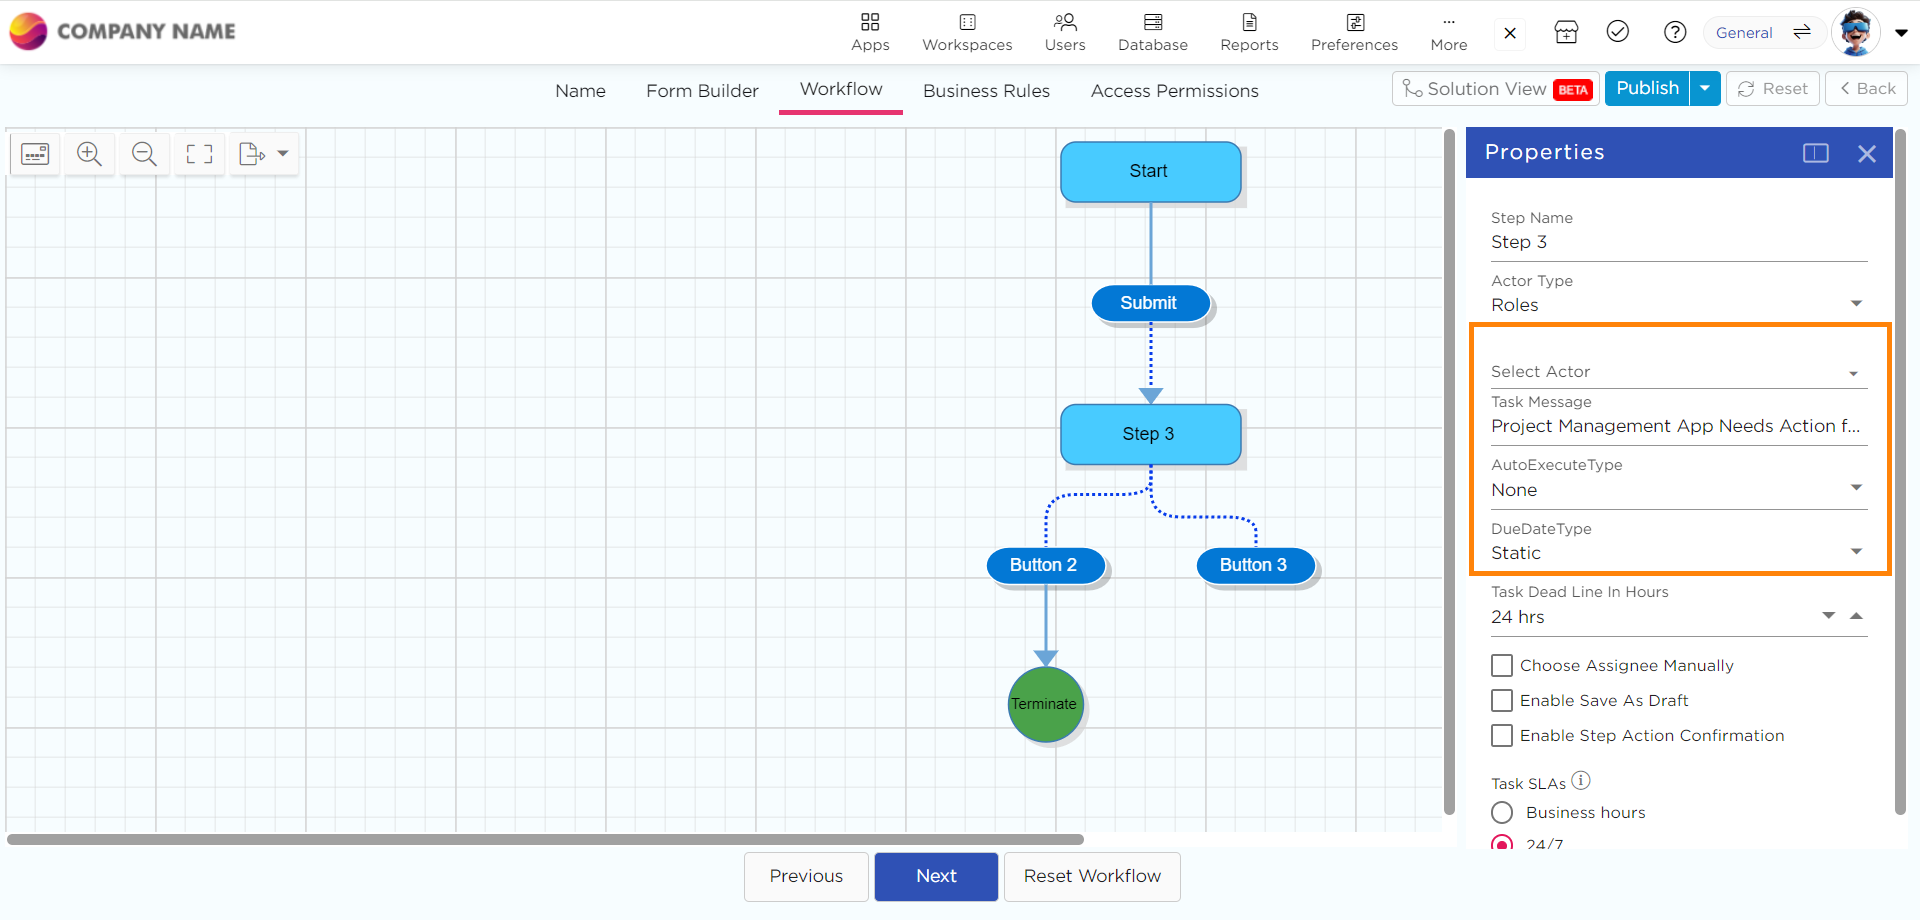
6. Due Date Type:
This field is to decide task's due date type for a process step. There are two due date types:
Static: This option is set the task's deadline time in hours.
App Data: This option is to set the task's deadline time dynamically using a date field from the app.
7. Task Dead Line in Hours:
This field is to set the deadline time for process step's task. The task should be completed with in the give deadline time.
8. Choose Assignee Manually:
Check this option if you want to manually assign the successive step's task to a user after completing a step. After completing the current process step, a Choose Next Step Assignee pop-up displays on the screen, you can select the user in this pop-up.
For example, in a scenario, where an employee wants to choose the manager manually to approve his/her leave application.
The pop-up has Select Assignee(s) field in it, which will show a list of users belong to that particular workspace.
You can select only one or more assignee.
Click on the Save , so the task assigns to the selected assignee.
9. Enable Save as Draft-check box:
If you check Enable Save as Draft for any workflow process step, the user will have an option to save the data as a draft that can be resumed later.
The user will have a Save as Draft along with the other action buttons in the app while adding record in the app to perform the task.
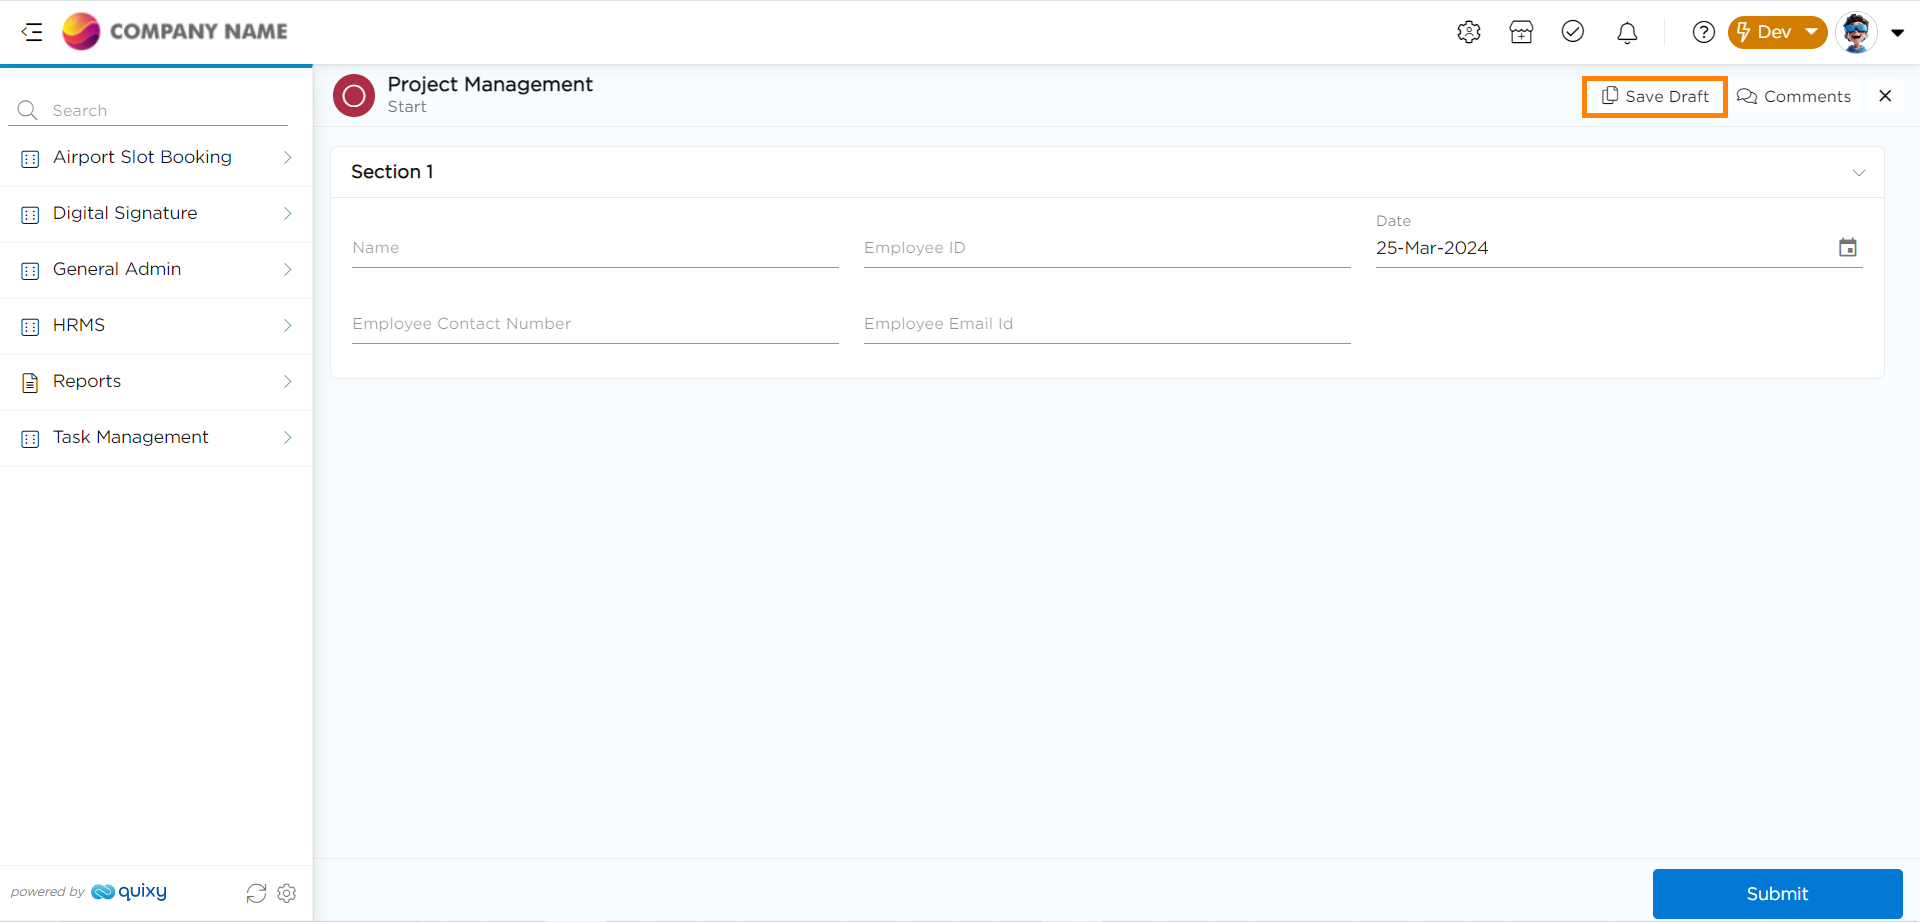
Click on the Save Draft button to save the data in drafts.
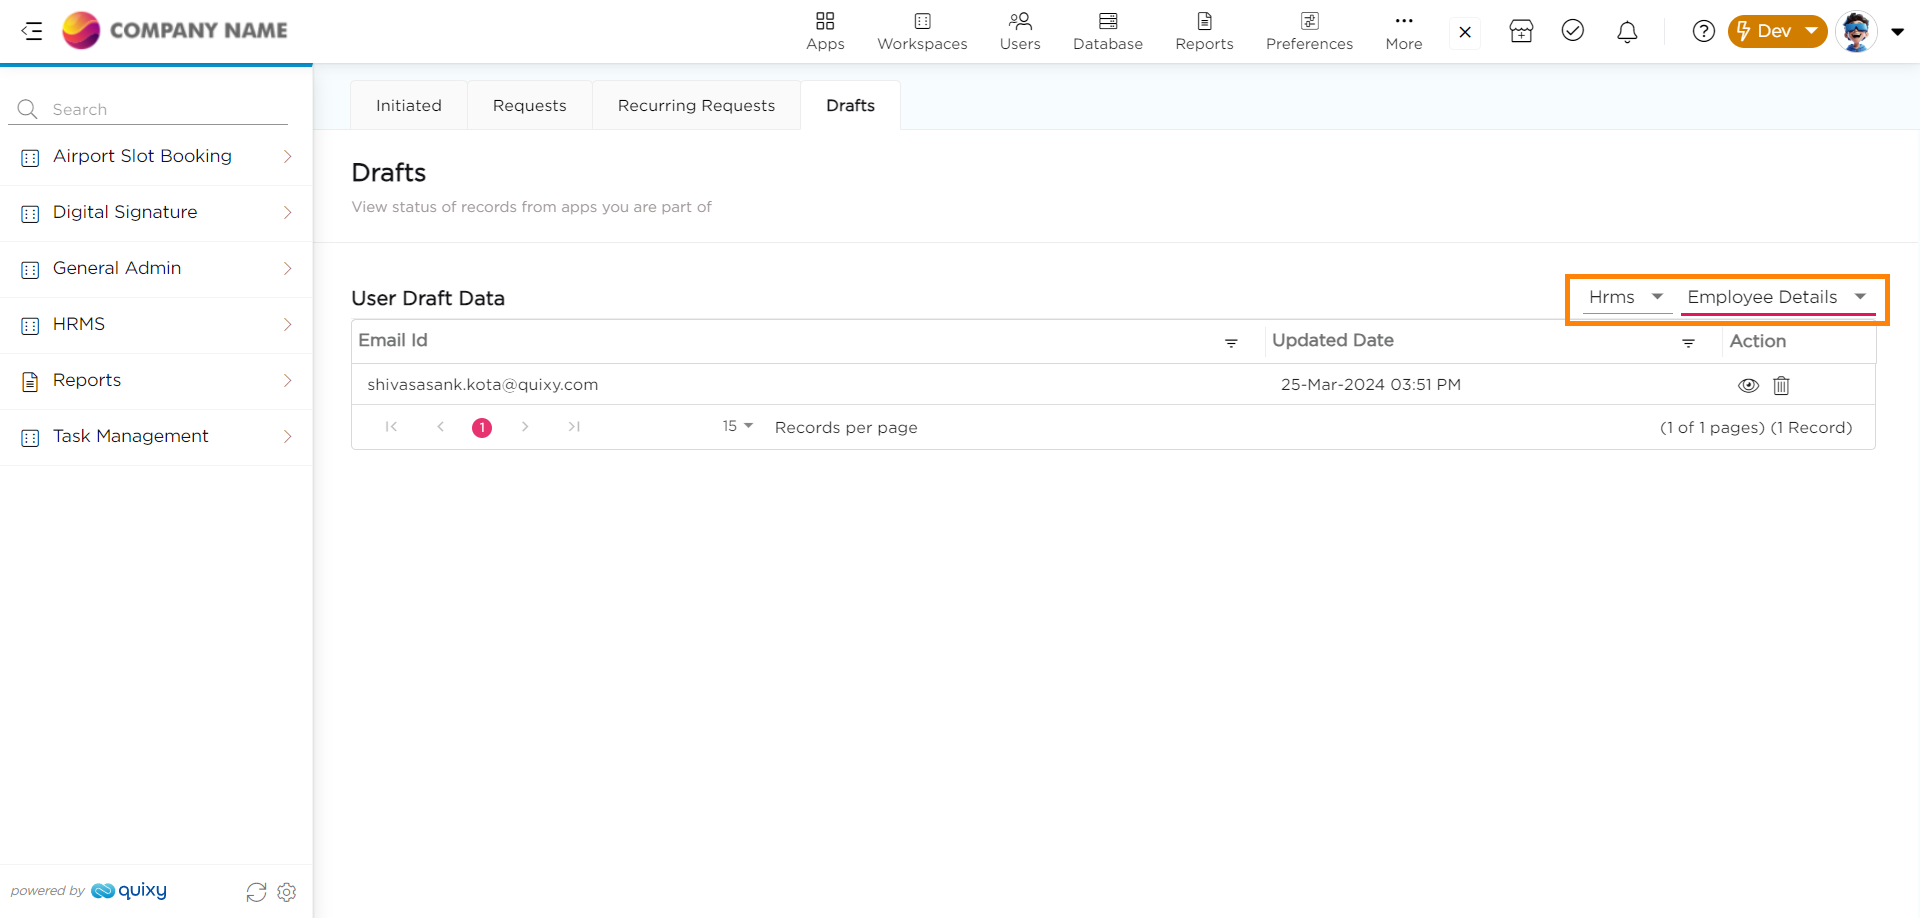
To see the draft data, Go to User Profile > My Activities.
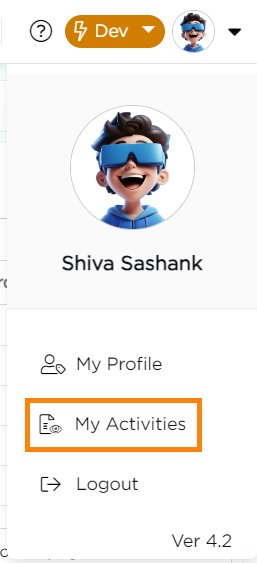
In My Activities page, navigate to Drafts section.
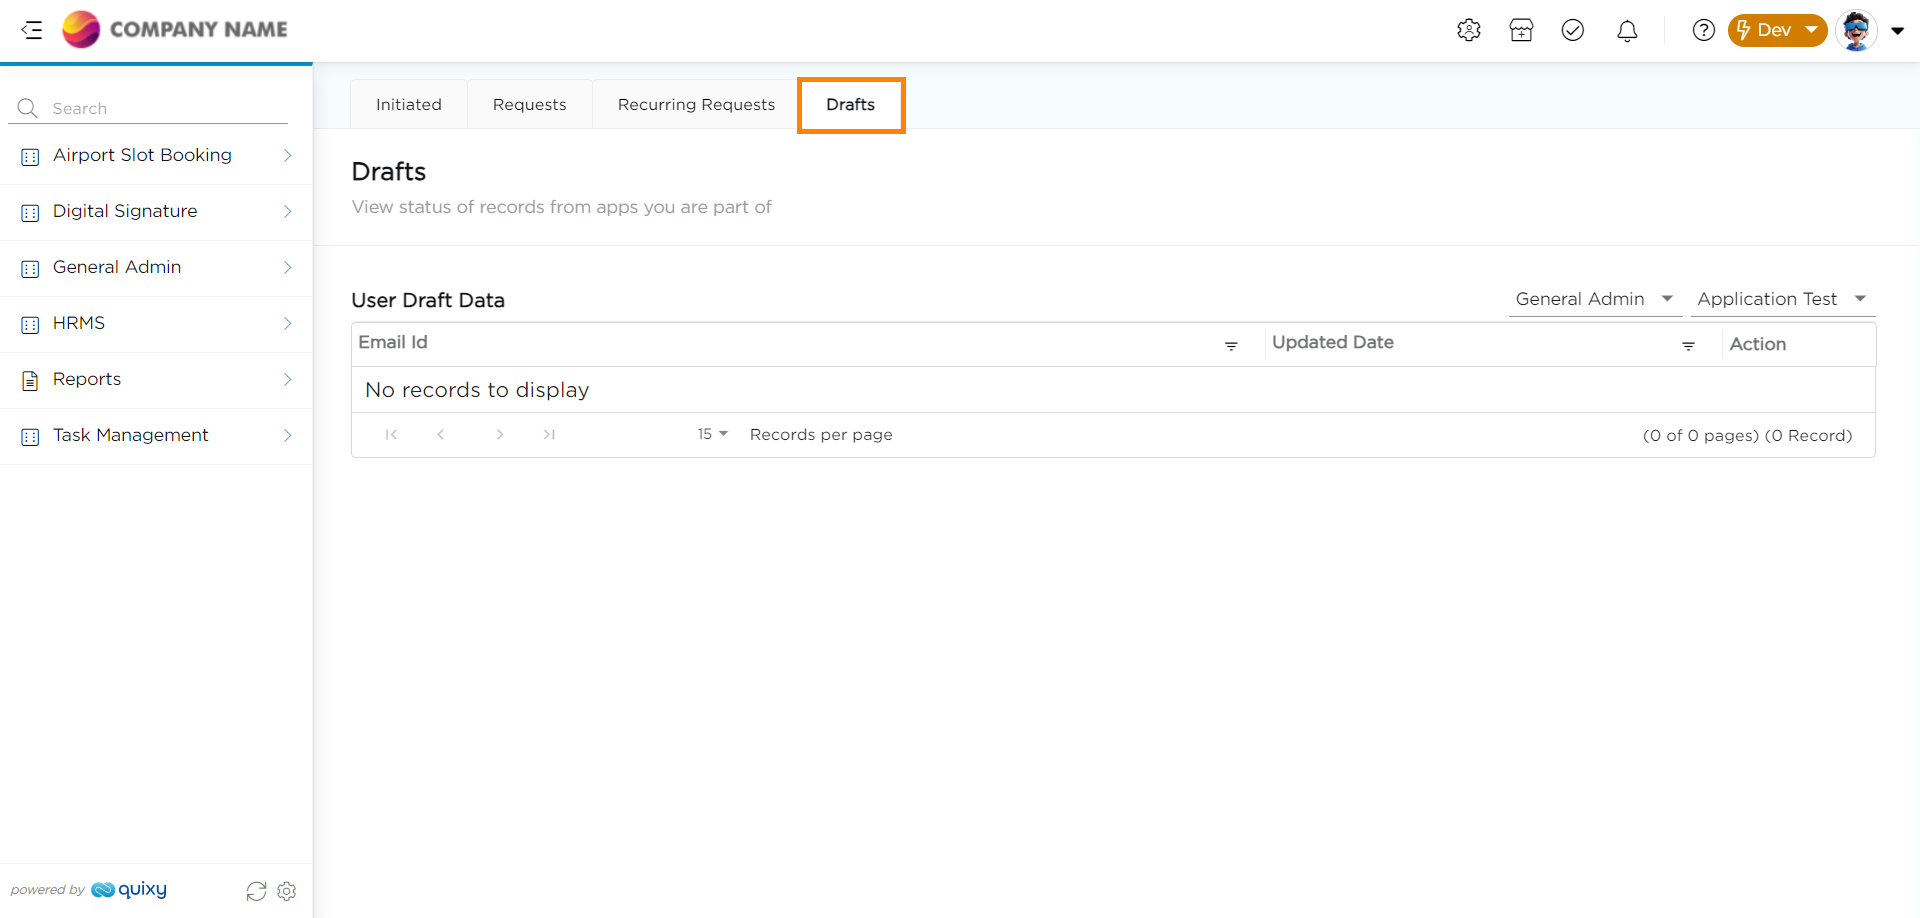
In Drafts page, select the Workspace and App, you will be able to see the draft data.
10. Enable Step Action confirmation-check box:
Use this option, if you want the platform to ask for a confirmation before submitting a record in the app or completing the process step.
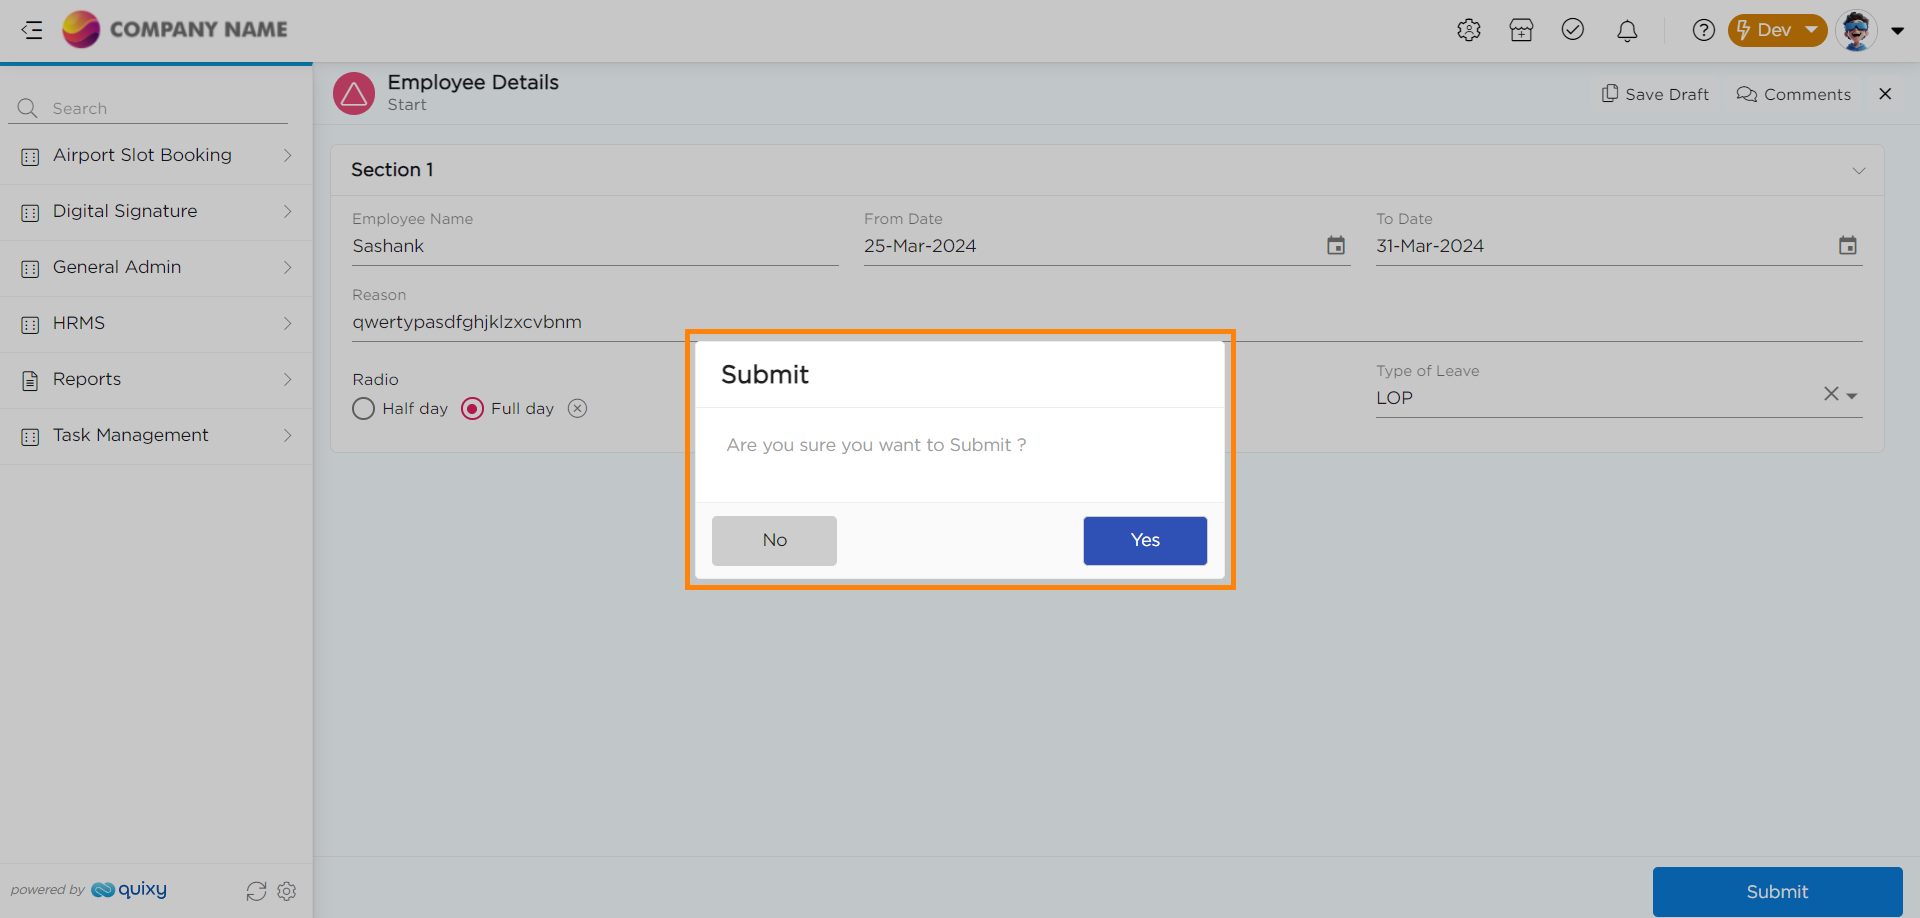
Click on the Yes to go to the next step.
11. Workflow-Level Notification Settings
At the workflow level, notifications can be customized for specific steps to ensure users receive only essential alerts, preventing notification overload while keeping critical updates intact.
Optimizing Notifications in the Leave Approval Process
A busy HR department is constantly flooded with notifications—every step in the leave approval process triggers an alert, creating email clutter, distractions, and missed critical updates. Employees complain about excessive notifications, while managers struggle to focus on truly important updates.
To restore efficiency, the HR team decides to refine the notification settings at the workflow level, ensuring that only essential alerts are sent while eliminating unnecessary ones.
Refining the Notification Flow
Employee Submits a Leave Request
Since the request automatically moves to the next step, notifications are disabled to prevent unnecessary alerts.
Manager Review
Enable "Task Created" – Notifies the manager that a new leave request is awaiting review.
Enable "Custom Notification" – Sends a rejection message to the employee if the request is denied.
Disable "Task Completed Initiator" – Prevents the manager from receiving notifications about actions they performed.
HR Approval
Enable "Task Completed" – Notifies the employee once HR approves the request.
Disable unnecessary notifications to avoid redundant updates.
Final Acknowledgment
Disable notifications entirely – Since the process is now complete, no further alerts are needed.
Steps to Configure These Notification Settings
To implement these changes, follow these steps:
Navigate to Workflow → Select Step → Properties.
Check the "Enable Notifications" box for the notifications you want to activate.
Customize the settings as follows:
Select: Task Created, Custom Notification, Task Completed.
Unselect: Task Completed Initiator and any redundant notifications.
Click Save & Publish to apply changes.
By implementing these refined notification settings, the HR team successfully eliminates clutter, ensuring that employees, managers, and HR professionals only receive the notifications that truly matter.
12.Task SLAs
This feature allows the users to communicate to the Quixy platform that it should perform certain activities like calculating the time to send the task escalations, reminders, perform auto execution, calculate deadline time and turnaround time only in business hours (Office working hours).
You can configure this feature at app level (i.e., the configuration will be applicable to all the workflow steps in the app) or workflow step level (i.e., the configuration will be applicable only to that particular workflow step) when creating an application in Quixy.
You can choose the Task SLAs to be generated only in Business Hours (i.e., Employee working hours) or 24/7 (i.e., any time in a day and any day in a week).
Learn more about Configuring Task SLAs....
Click on the Next after finishing the workflow process.
Now, you will land on the Business Rules page, which the Fourth step in the application building process.
Was this article helpful?
