A Sequential Workflow represents a linear progression of tasks, where each step follows the previous one in a defined order. In this type of workflow, the process moves step-by-step from initiation to completion—each action or approval must be completed before the next step begins.
A Sequential Flow connects steps in a straight line. There are no branches or parallel actions — making it simple and easy to manage.
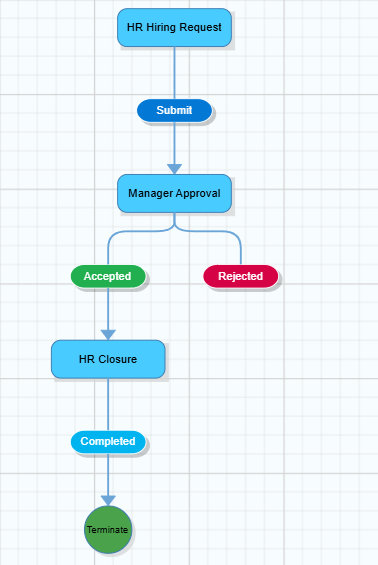
¶ Configuring a Sequential Workflow
Follow these steps to configure a sequential workflow in your application:
- Navigate to the Workflow Builder of an application.
- You’ll see a default first step — usually the Form Submission step. This is where the process begins.
- Click on the Step Action button and select Sequential Workflow to add the next step.
- The new step links to the previous one to define the order of execution.
- Give steps a clear name (e.g., Manager Approval or Finance Review) for easy identification.
- Assign the steps to the relevant user or role responsible for performing that task.
- Rename the step action — for example, Approve, Reject, or Send Back.
- Customize behavior, notifications, and rules for each step and step action.
→ Learn more about Workflow- Step Properties
→ Learn more about Workflow- Step Action Properties - Repeat the process to add more steps as per your workflow requirement.
- Once all steps are defined select the final workflow step action and terminate the flow
- Click Save to finalize your configuration.
Note
- You can add, remove, or reorder steps anytime based on process updates.
- You can combine Sequential, Parallel, and Conditional flows within a single workflow to match complex business processes.