.png)
Payments Gateway
- 3 Minutes to read
- Contributors


Payments Gateway
- 3 Minutes to read
- Contributors
Article summary
Did you find this summary helpful?
Thank you for your feedback!
A payment gateway is a merchant service offered by an e-commerce application service provider (PAYTM/Razor Pay/IOB) that authorizes credit card or direct payment processing for e-businesses, online retailers, bricks and clicks.

Quixy is providing Payment Gateway Integrations for seamless online transactions from Quixy apps. Payments can be made directly from the Quixy platform for account receivable use-cases. This feature's sole purpose is to collect money based on the requirements.
NOTE
In Quixy, payments can be processed through either PAYTM, Indian Overseas Bank, State Bank of India or Razorpay gateway; however, gradually, we will bring in the other gateways such as CCAvenue, PayUMoney, etc., as well.
IMPORTANT
For Example:
Consider a scenario in which an organization needs to collect money from their customers when they place an order using Quixy app. The organization administrator can turn on the Payment Gateway Integration using Paytm account and enable PGI integration in the app workflow to collect the money from Customer. The collected amount will reflect in the Organization's Paytm account automatically.
How to configure Payments Gateway?
TIP
If you want to see the Payments Gateway feature work, either for testing or for live transactions, you must have a few things in place (listed below) before proceeding to the configuration section.
Note: Listed below are the two levels in the Payments Gateway configuration process. Taking PAYTM as an example.
- You should have a PAYTM Merchant Account. (Do you know why? , you will need details like Merchant ID, Merchant Key, and Website Name later in the configuration, which will be provided to PAYTM Merchant Account by PAYTM)
- To initiate a transaction, create a Quixy app. The app must include four mandatory data capture fields: Transaction Amount (Number), Currency (Text or Dropdown or Checkbox), Customer ID (Text or Number), and Order ID (Text or Number).
Additional fields can be added if you want to keep track of the transaction's response and save it in a database for future reference, such as the Transaction ID, Status, Response code, and Response message.
Once you have the above two, you are ready to move on to the configuration.
Configuration Level 1
- Head over to Admin Menu -> Preferences -> Payments Gateway.
- You will land on the Payments Gateway page, click on Add to configure the payment gateway.
- On the configuration page, give a Name for the configuration and select the Type as Paytm.
- In two different sections, Production Details and Staging Details, the platform will ask for your Merchant ID, Merchant Key, and Website Name.
NOTE
Definitions of Production Details and Staging Details sections:
Production Details: This section is meant for live transactions.
Staging Details: This section is meant for test transactions. (later in the article you would understand the use of this section)
- Obtain the Merchant ID, Merchant Key, and Website Name from Paytm and provide the details, as shown below and Save the configuration.

Configuration Level 2
NOTE
You should have an app built by now, as advised at the start of the configuration process, in order to continue with the app's further configuration.
- Head over to Manage Apps Page and View the app.

- On the app summary page, go to Events tab-> Integrations -> Add Integration.
.png)
- Select the Integration Type -> Payment Gateway.

- Platform will navigate you to Payment Gateway Integration page.

NOTE
On the Payment Gateway Integration page, turn-on the Staging switch, if you wish to perform only test transactions. Your content goes here.
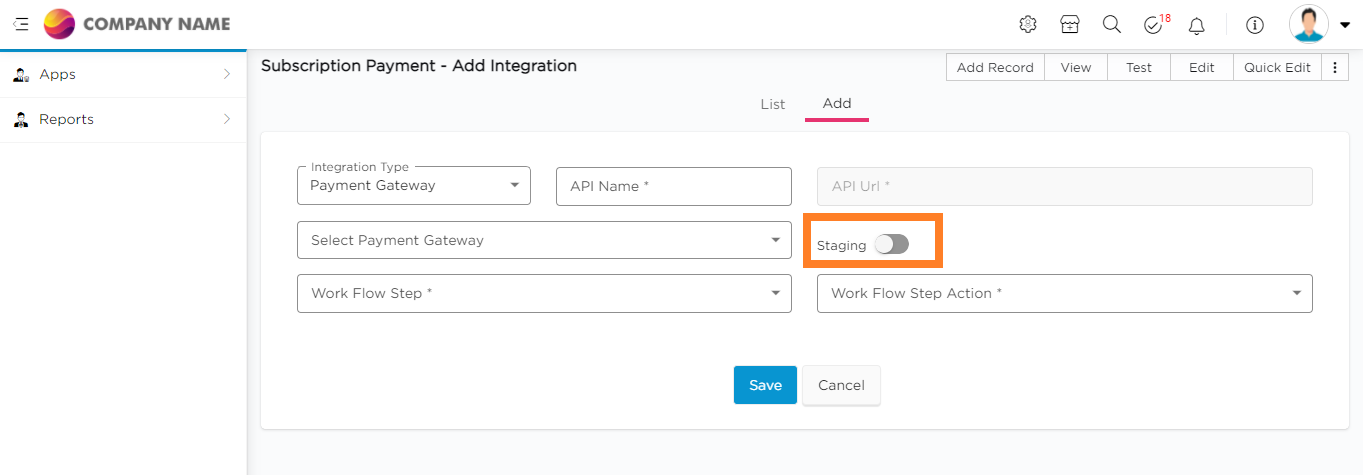

- Next, Select Payment Gateway.
- Once you choose the Payment Gateway, the platform will immediately fetch the API and allow you to map the data capturing fields.
- Select the Workflow Step and Workflow Step Action; the transaction will begin after clicking the action button.

- Next, map the fields in Element Mapping and Response Mapping (If you need the API response in return) sections.

- Once the mapping is done, Save the Integration.
- You will find the saved integration, on the integrations list page.

Now that you've completed the setup process, you're ready to conduct a live transaction or a test transaction.
NOTE
This is for the end-users who pay the money. Our Payments Gateway feature considers the last two digits entered as 'paisa', which is the sub-unit of the Indian rupee. For example, if you want to enter an amount of 120 rupees, please enter it as '12000' in the payment field. Similarly, if you want to enter an amount of 50 paisa, please enter it as '50'. Here are a few more examples to help clarify:
- If you want to enter an amount of 75 rupees and 50 paisa, please enter it as '7550'.
- If you want to enter an amount of 10 rupees, please enter it as '1000'.
- If you want to enter an amount of 25 paisa, please enter it as '25'.
Was this article helpful?
