¶ Feature Enhancements
Public Dashboard
Description:
Administrators create the Dashboard template and save it as a public dashboard.
Administrators can give access permissions to particular executives and then scan download and use the dashboard.
How to Use the Dashboard & its Benefits
Create Public Dashboard:
- Login with Organization Administrator credentials.
- On the homepage/Dashboard page click on Customize Dashboard icon.
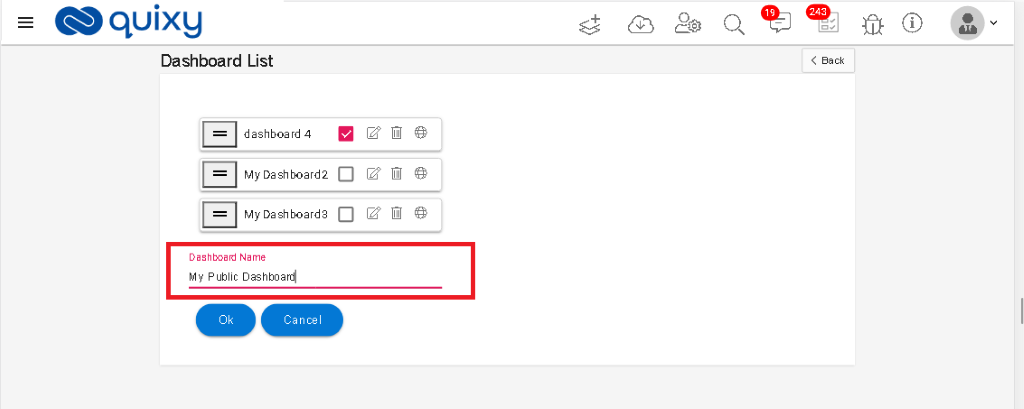
- The dashboard list page is displayed.
- Click on Add New Dashboard button.
- Enter Dashboard Name and click on OK.
6. The New Dashboard page is displayed. Click on Add Panel.
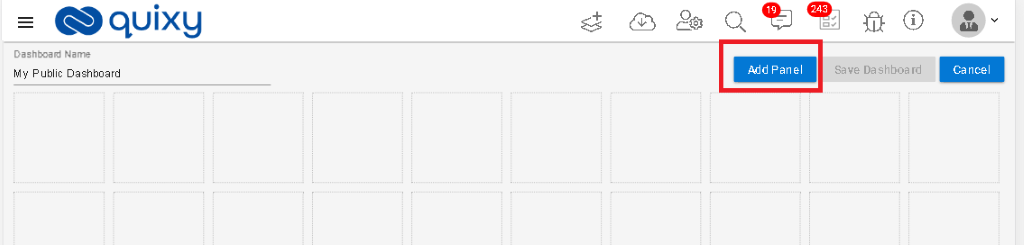
7. Add Panels based on your requirements.
8. Click on Save Dashboard.

9. The dashboard is saved and a success message is displayed.
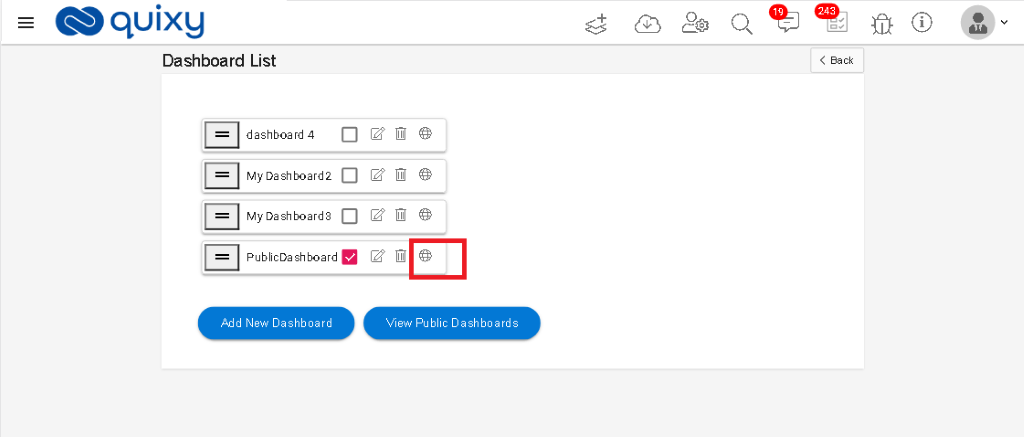
10. Open the Dashboard list page by click on the Customize Dashboard icon. The new dashboard is then displayed in the list.
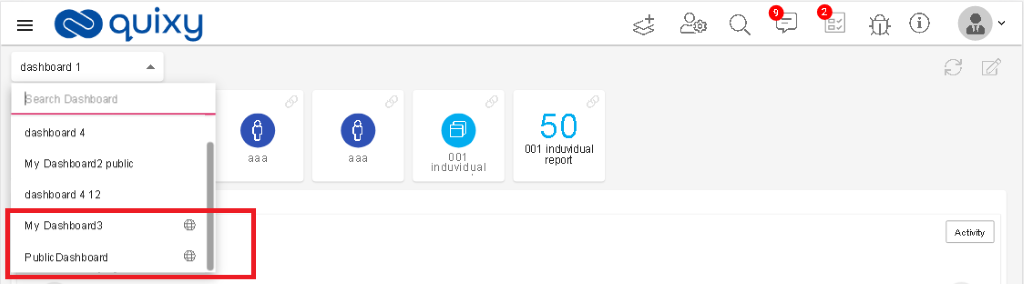
11. Click on the Public Dashboard icon (

)to save the dashboard as public.
12. Public Dashboard popup is displayed.
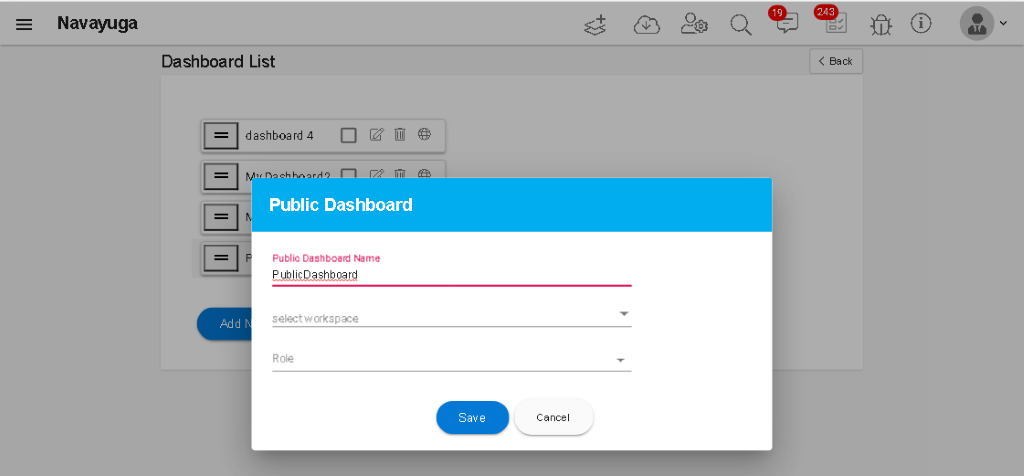
13. Select Workspace and select Roles for which you want to give access to the dashboard.
14. Click on Save to save the dashboard as Public.
15. The dashboard is saved as Public and a success message is displayed.
16. Login with the User credentials which has access permission of the Public Dashboard.
17. Click on the Dashboard drop-down and you can view the Public Dashboards which have the access permission to the user.
Download Solution from App Store with Help Text Document
Description:
Users can download the solution from the app store along with the help text for the solution.
Benefits and Usage:
- Login to Quixy application.
- Click on the Download Solutions icon from the header.
- The solutions page is displayed. Select the solution and Click on the selected solution to download it.
- The solution is opened. Click on the Download icon.
- Download Solution popup is displayed. Click on Yes to download.

- The solution is downloaded and a success message is displayed.
- Open workspaces page by click on the Admin menuà workspaces.
- Add the Workspace admin.
- Add users to the workspace.
- Login with the credentials which have access to the workspace.
- Click on Add record, select Workspace, and select app to add record.
- The app is opened in add record mode.
- The app name is displayed with the help icon.

- Click on the help icon (

- ) to open the help text for the app.
Comments by users/participants in the App
Description:
Users can add comments at any step of the workflow with tag users for that workspace. When a response sent by the particular user notification is received to the commented user.
How to Use
- Login to Quixy.
- Open an app in Add record mode to add a record.
- You can see that there is a comments icon is displayed on the top right corner of the app.
- Click on the Comments icon (

- ).
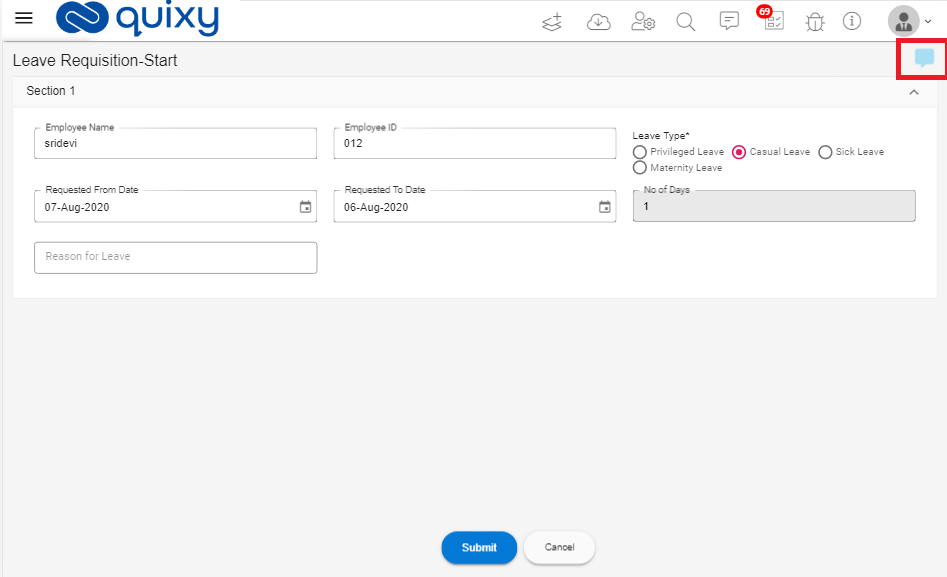
- The comments box is displayed.
- Users can type and send comments at any point in the time in the workflow.
- Users can attach files with the comments.
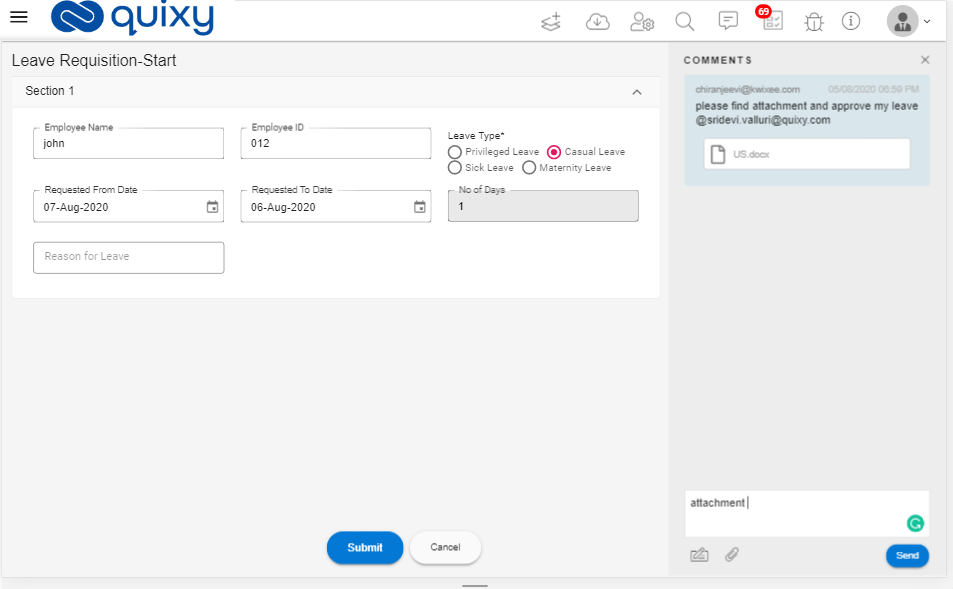
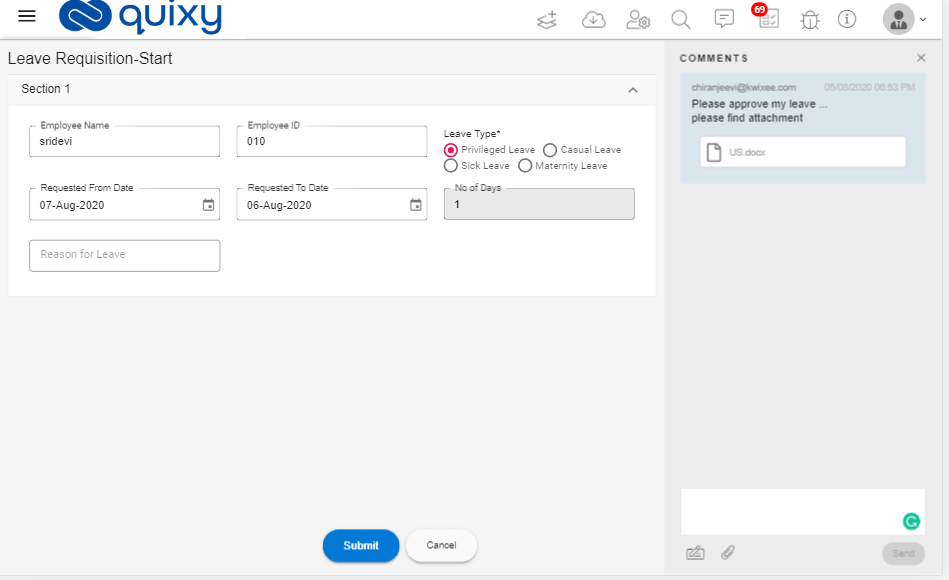
- Once the user adds comments and completes the step, a notification is sent to the respective role/user/actor.
- When the respective user logs in, an application notification (

- ) is displayed.

- After clicking, the notification tasks page is displayed as shown below.
- Click on the task from the grid then the app is displayed as follows.
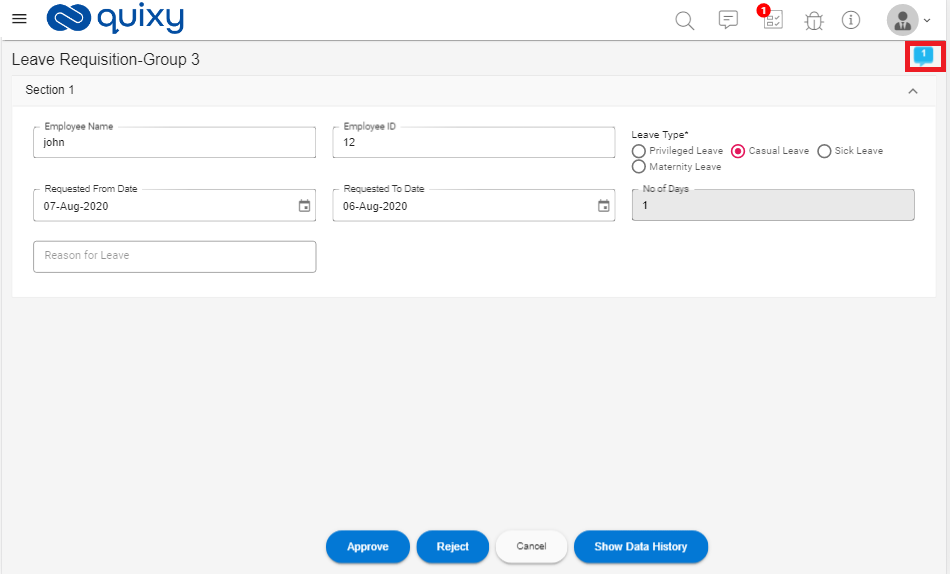
- One can see that the comments icon is displayed with the number of comments.
- Click on the comments icon.

- The comments section is displayed. The user can view the previous comments and can send a reply.
Report Filters UI changes
Description:
As of now filters displaying in a popup, now we display the filters on the corner with a dropdown view.
Benefits and Usage:
- Login to Quixy.
- Open a Report. You can see that there is a Filter icon button on the right side corner of the page.
- Click on the Filter icon (

- ).

- Filters dropdown is displayed. Add the filters based on your requirement.

- Click on Search to save the filters to save filters and the report is displayed based on the filters.
Multiple users have access to the 'super admin' functionalities with privileges that are given by the super admin
Description:
To manage all Organization admin activities until now users have been using only Organization admin credentials.
Now Super admin is able to create users and give access to the users based on the user type to manage all admin activities.
Benefits and Usage:
Super admin can give access to different users to do the Organization admin functionalities.
For example,
he can give access to create, edit,… of Knowledge Base activities to Knowledge Admin.
Refresh Token
Description:
Refresh token feature is implemented in our platform.
Benefits and Usage:
Each time the User logs in to the platform, a new token is generated which remains unchanged until the user logs out from the session.
Customized views to be maintained per user in Grid Reports
Description:
Users can save the reports view based on his requirements.
Benefits and Usage:
- Login to Quixy.
- Click on Reports Menu item from the left menu.
- Select the report and click on the view icon to open the report in view mode.
- Users can create a custom view by the below steps.
- Click on Columns.
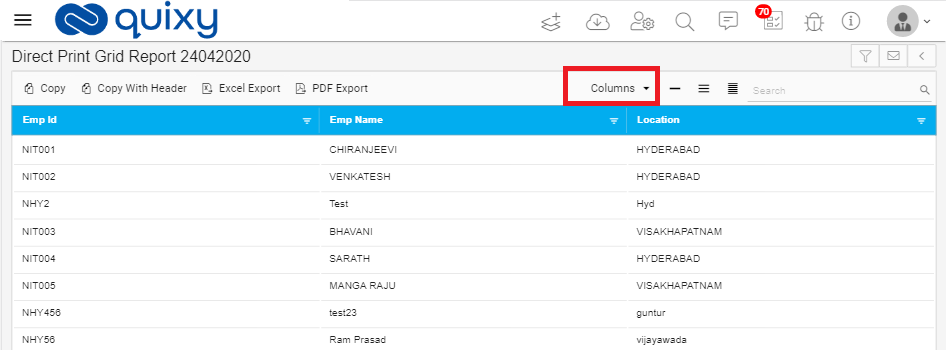
- Select the required columns and click on OK.

- Click on Save icon (

- ) on top right corner of the report.
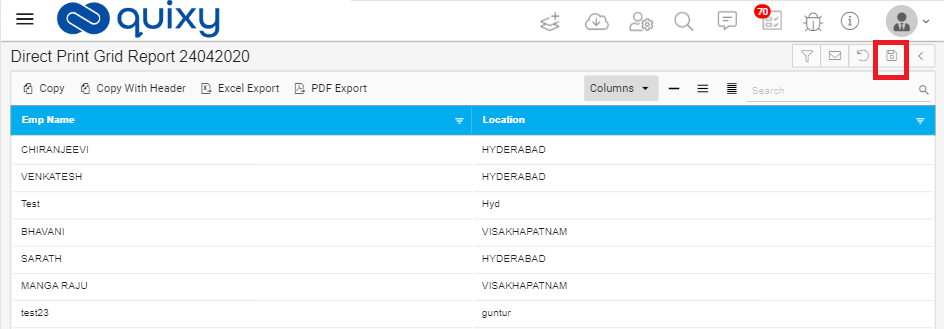
6. The view is saved and a success message is displayed.
7. Show Default Screen Switch is displayed at the top of the report.

8. If the switch is enabled then default view of the report is displayed.
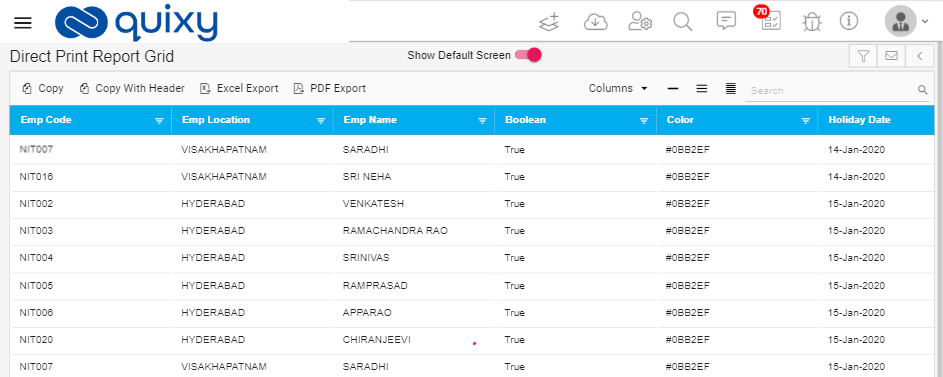
9. If the switch is disabled the view created by the user is displayed.
Email Notifications with action buttons
Description:
User can send Email notification has links with action buttons.
Benefits and Usage:
- Login to Quixy.
- Create an app with multiple workflow steps and each step have multiple actions.
- When the app completes the first step then an email notification sent to the respective user.
- The Email contains action buttons with links to perform the task.
References: Qxy-4109
The task is terminated after it crosses due date
Description:
If the task due date is over then the task is automatically completed.
Benefits and Usage:
- Login to Quixy.
- Create an app with multiple workflow steps.
- In the workflow step, select Auto Execute Type as Terminate.

4. Select Due Date Type.

5. Publish the app. The app is automatically completed once the deadline is crossed.
Report an Issue by Quixy End-User
Description:
When using Quixy application if end users can have any problem then the user can report that issue with details. To report issues in the Quixy header Issues icon is added.
Benefits and Usage:
- Login to Quixy.
- You can see that there is an Issues icon in the Quixy header.

3. Click on Issues icon (

). The issues page is displayed.
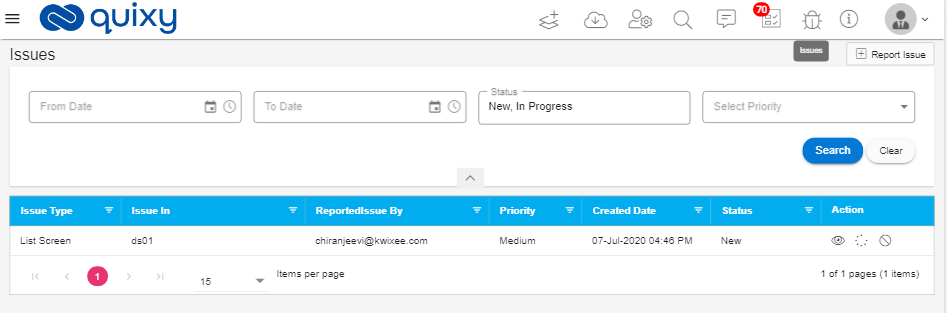
4. In Issues page already reported issues are displayed in the grid.
5. In the Actions field, you can see that view, In Progress, Reject Closed icons.
View: To view the reported issue.
In Progress: If the issue is in progress state then it is displayed.
Reject: To reject the issue user clicks this icon.
Cancel: If the user wants to cancel the issue then click on this icon.

Create Issue
- To create/add new issues, open issues page.
- Click on the Report Issue button (
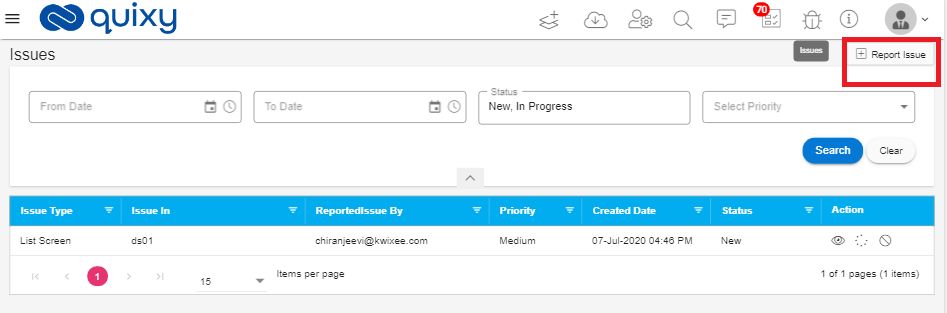
3. Report Issue page is displayed.
4. Enter all the details in Report Issue page.
5. If issue type is App then the page looks like below.
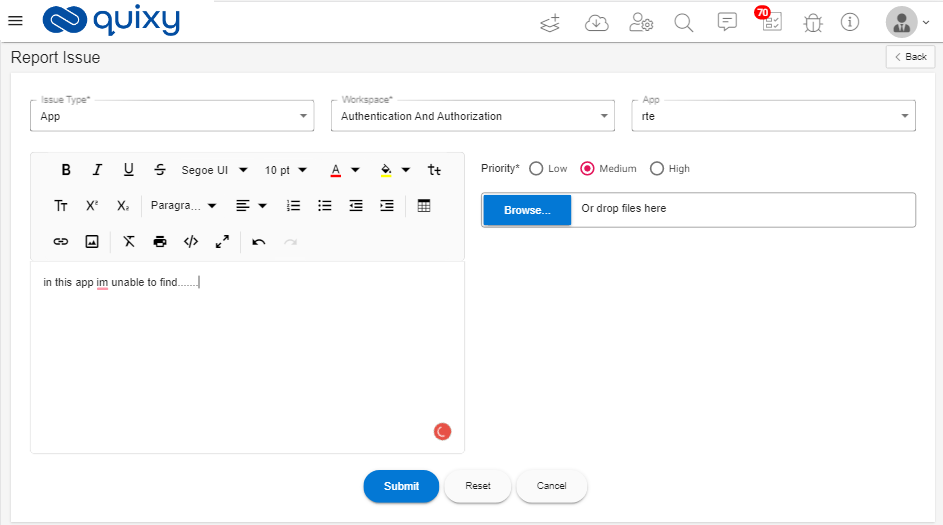
6. If issue type is List Screen then the page looks like below.
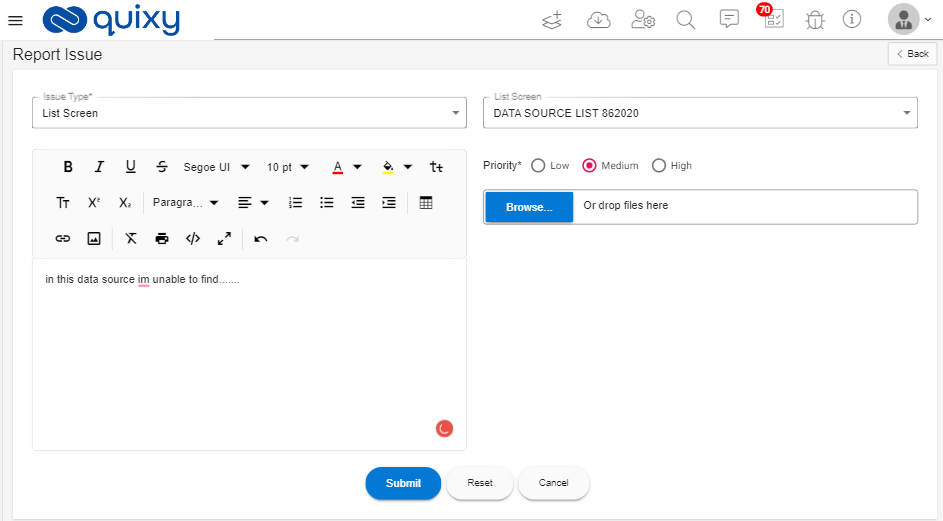
7. Click on the submit button. Then the issue is saved and added to the issues grid.
Provided Email Server Sending option at the organization level
Description:
We added an email sending option at the organization level.
Benefits and Usage:
- Login to Quixy.
- Click on AdminMenu, click on Preferences from the admin menu.

3. The preferences page is displayed. Click on Notifications.
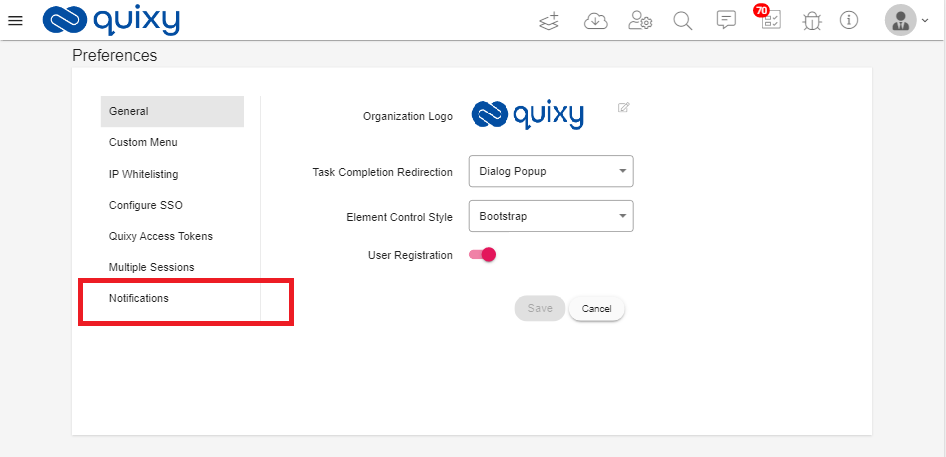
4. The notifications page is displayed.

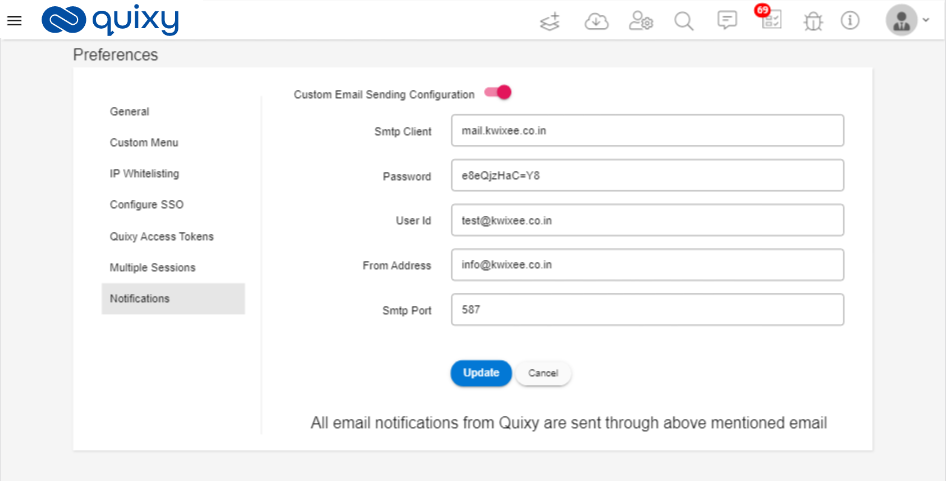
5. Enable Custom Email Sending Configuration switch. The page looks like below.
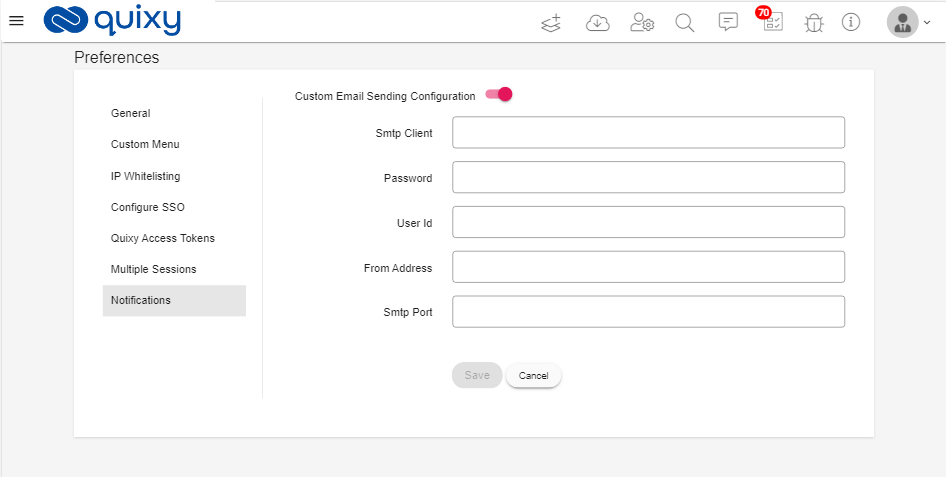
6. Provide valid information to set up an email server.
7. The configuration is saved.
8. Create an app and publish it.
9. Open the app in view mode. Click on 3 dots option and Click on Notification.
10. Configure task notification and enter email id.
11.Click on the Save button.
12. Open Add Record page of the app.
13. Enter valid data and click on the Start button.
Report Control added in App Form builder
Description:
The report is added in advanced elements of the form builder, so the user is able to add a report as a form element.
Benefits and Usage:
- Login to Quixy.
- Click on Create App icon to create an app.
- Open the Form Builder page.
- Click on the Advanced tab.

5. You can see that Report element is added in the below of the form elements.

6. Drag and drop the Report element to the form.
7. Click on the Report element, the properties are displayed on the right side.
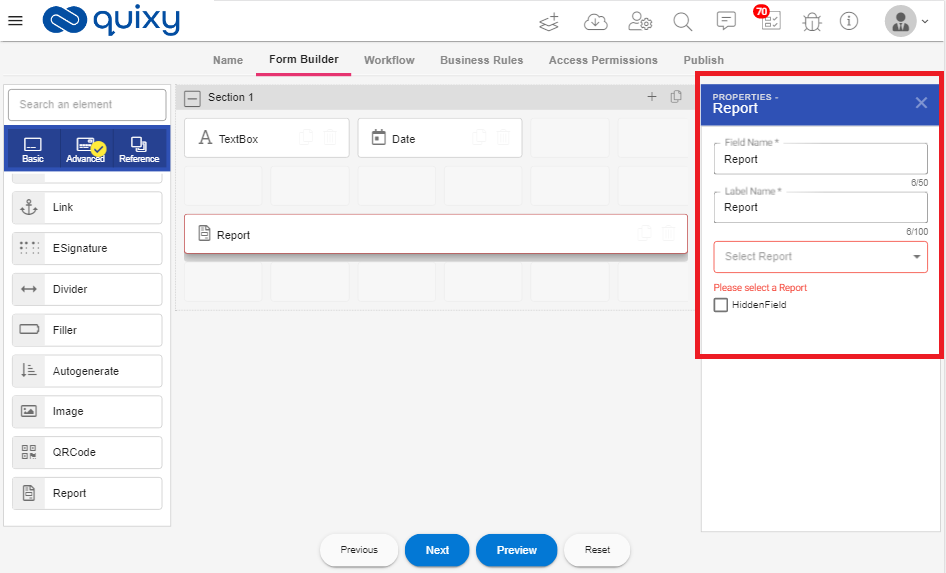
8. Users can select the report from the Select Report to drop-down from properties.
9. When select the report Element Mapping button is displayed in the Properties window.

10. Click on Element Mapping, to map the form elements to report.
11. Element mapping popup is displayed.
12. Map the form elements to report elements.
13. Click on Save.
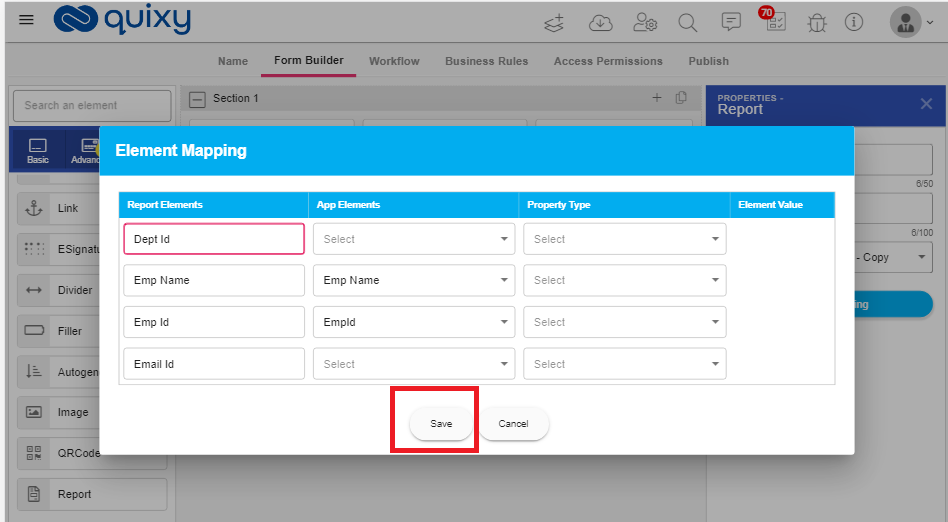
14. Publish the app.
15. The Report reference is added to the app.
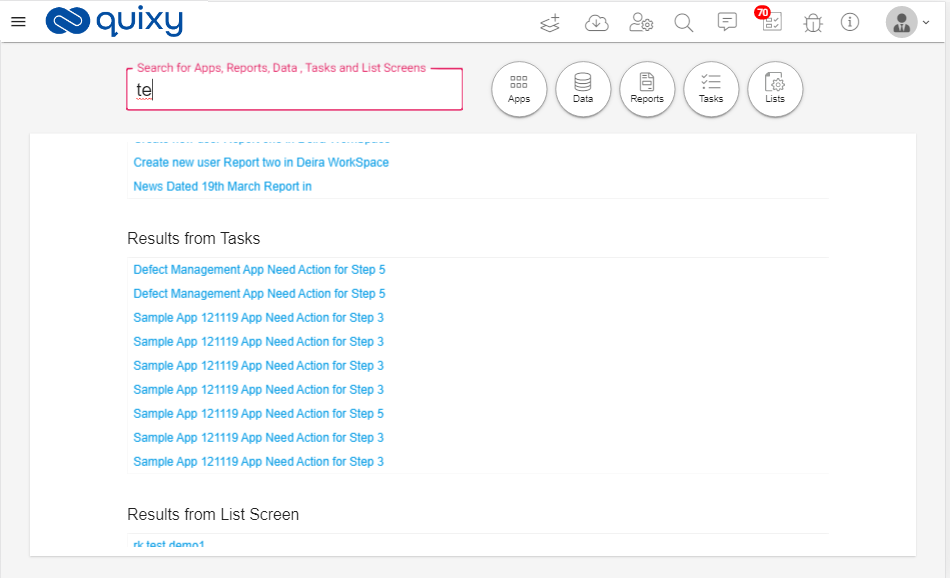
Show list screens in search for user
Description:
In Global search, Lists are added.
User can search List screens also along with Apps, Reports, Data tables, Tasks.
Benefits and Usage:
- Login to Quixy.
- Click on the Search icon.
- User can see Lists are added.

4. When Users enter the text in the search box then corresponding to the app, data tables, tasks, reports, and list screens are filtered and displayed.
Improvements
Use Form Elements as Place Holders in SMS templates
Description:
Users cansend SMS with the Form elements as place holders in messages.
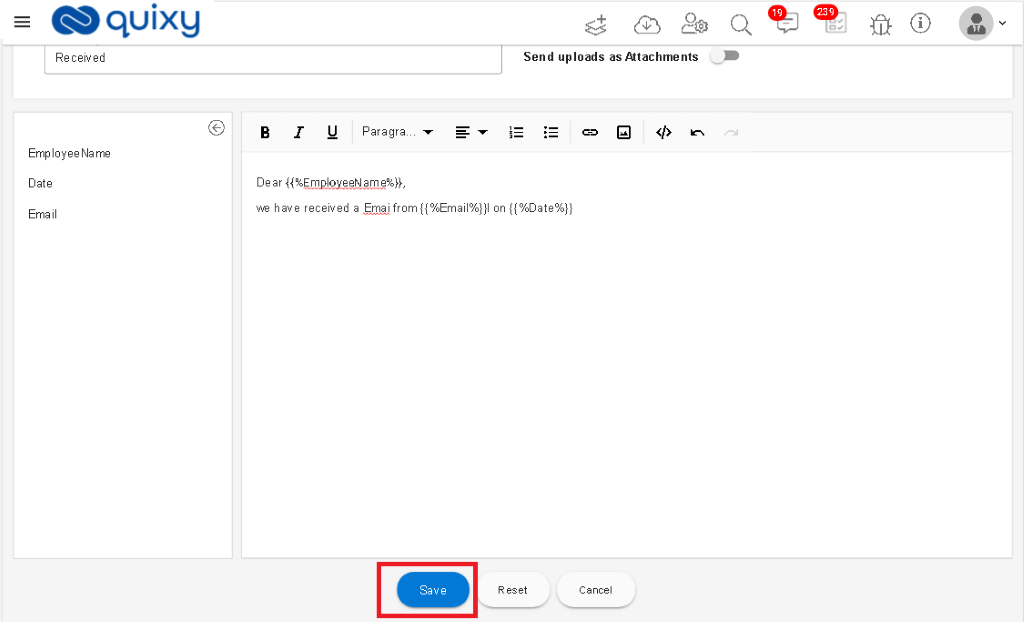
For example,
The User can send an SMS to the mobile number with the information of a particular customer in the placeholder.
The message is sent to the customer as follows:
“Dear Customer, your call with mobile number +917348928848 regarding the product Solar Panels has been recorded at 07.07.2020 11:57 PM. Our customer support executive will reach out to you soon and find the best way to resolve your queries or complaints.”
In the above example Mobile Number, Product Name, Date is the place holders that are placed in the SMS.
Benefits and Usage:
- Login to Quixy.
- Create an app with the required form elements and publish the app.
- Open View app page.
- Click on the 3 dots menu.
- Click on Notifications.
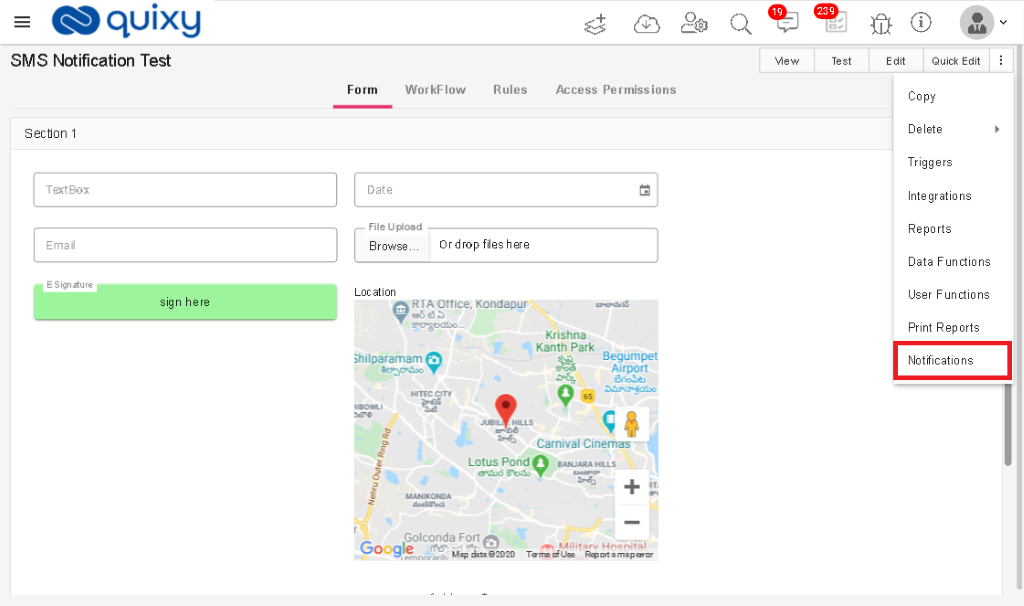
6. The notifications page is displayed.
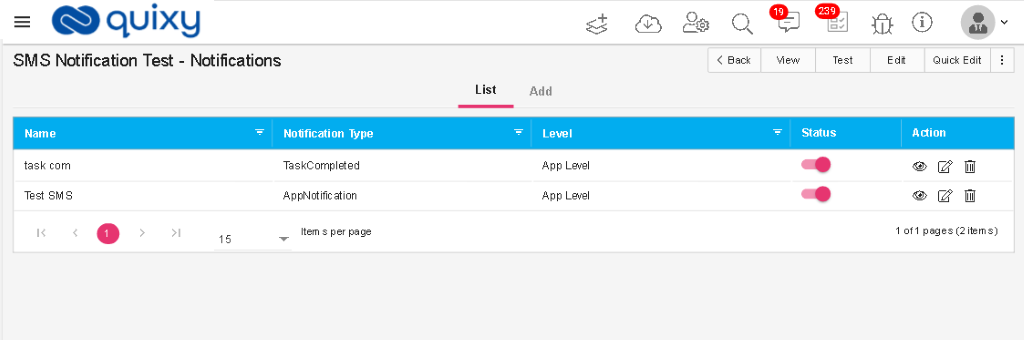
7. Click on Add tab to create a new Notification.
8. Enter valid data into fields.
9. To create the SMS body, click on the field which you want to put on SMS.
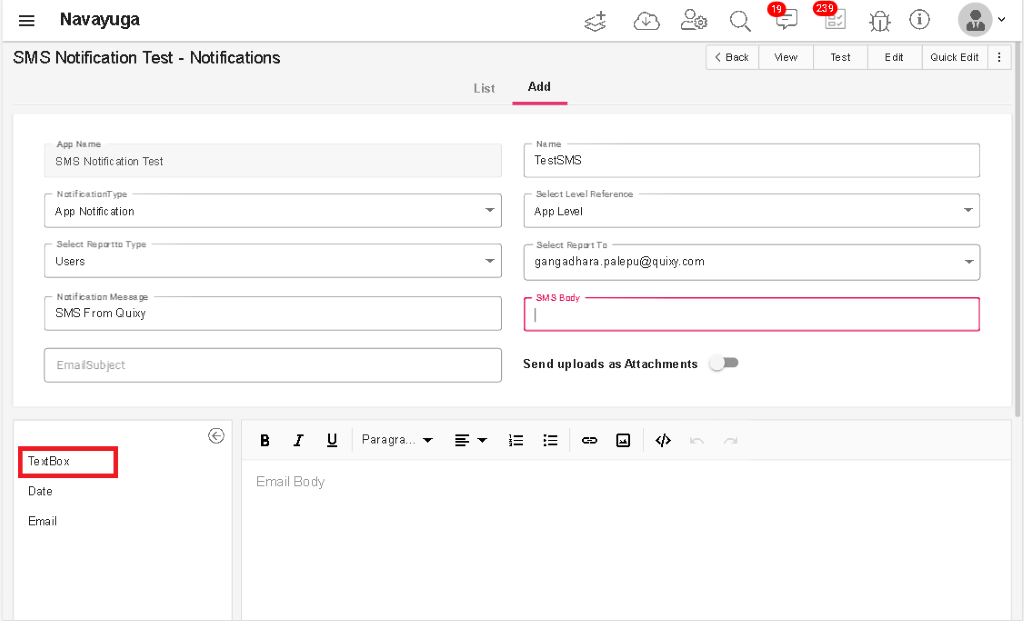
10. Click on the SMS Body field then the field is displayed in the SMS body field as shown below.
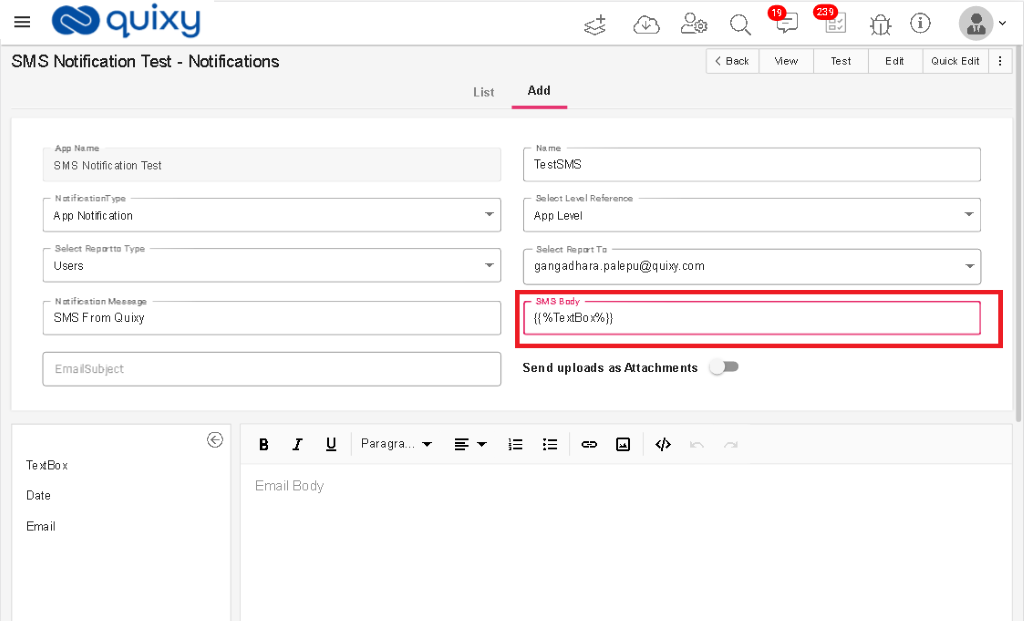
11. Enter the required SMS body with the place holder’s fields.
12. Click on the Save button to save the notification.
13. Notification is saved and a success message is displayed.
14. Add Record to the app which you created.
15. Once the app is submitted then the SMS will be sent to the respective user with the SMS body you created.
Filters With multiple conditions
Description:
Users are able to create Report filters with multiple conditions.
For example:
If user need to see the data in reports logged from 20-5-2020 to 15-6-2020 then the users areable to create multiple conditions in report filters.
Benefits and Usage:
- Login to Quixy.
- Click on Admin Menu.
- Click on Manage Reports.
- The data source List page is displayed. Click on All Reports.
- Data Source Reports List page is displayed.
- Create any type of report (Grid/Individual/Pivot/Chart/Complex) based on your requirements.
- Open the Report.
- Click on Filters icon.

9. Create filters with multiple conditions.
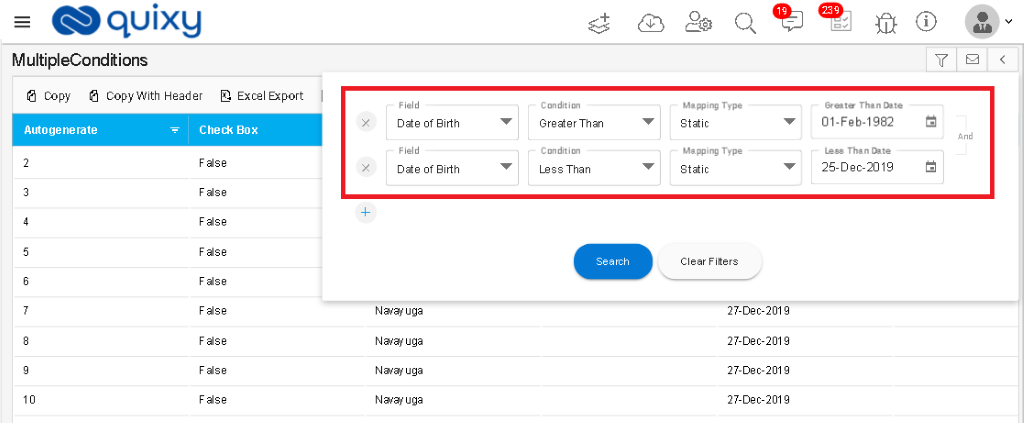
10. Then Report is filtered based on the conditions in Filters.

In the grid, checkbox selected and deselected on single
We enhance the feature of selecting/deselecting the checkbox in the grids
Benefits and Usage:
User can select/deselect the checkbox directly from the grids
Grouped Fields show side-by-side In Pivot Report
In previous, in pivot reports Grouped fields are displayed in drop-down now we displayed Grouped fields are displayed side by side.
Benefits and Usage:
In Pivot report Grouped fields are displayed side by side then the users effectively use the output report for their operations.
Triggering tasks on Start Date Defined in Internal API
Users can create a task by using create task screen / Internal API and he can set the Start Date for the task. Then the system generates the task and sent notification to the assignee.
UI changes done for Refresh button for Dashboard Reports
On dashboard Reports, the refresh button is displayed above the report in center previously.
Now we display the refresh button in the corner of the dashboard report.the dashboard report
Back Navigation is added to Report Mapping chart reports in Dashboard and List Screen
- On the dashboard, For Chart Reports and List Screen back navigation is added.
- For workflow step action Goto step back navigation is added.
List permissions are added after business rules for List screen creation
Description:
- Previously if we need to add a static column then the user needs to click back to add list permissions.
- Now User can create a List Screen by choosing and mapping collections.
- User clicks on Next after defining conditions, then system displays Static columns, Actions, Business Rules and Permissions as side by side tabs.
- User can click on any tab to define dynamically, then displays that tab configuration screen.
If SSO or AD is enabled for an organization Change password is not available
If SSO or Ad is enabled for any organization, For that organization, we hide the change password options to the users.
Save as Draft button is added in publish app page if organization limit reached message
When an organization reaches its maximum apps then we add Save as draft option to the app on the publishing app page.
In Conditional Workflow- validate unique name for conditions in the workflow
Previously we are not checking the names of the conditions in the workflow, Now we added the unique validation for the names of the conditions.
Benefits and Usage:
User can give a unique name for each condition of condition workflow.
Custom Menu configuration screen - Show unassigned apps / reports / list screens
When Users try to create custom menu users can see the reports, apps, and list screens information which is not added previously to the custom menu.
Benefits and Usage:
- Login to Quixy.
- Click on Admin Menu and click on Preferences.
- The preferences page is displayed. Click on Custom Menu.
- Click on Create button to create/edit the custom menu.
- Click on Un-Assigned

6. Unassigned apps, list screens, reports are displayed in the grid as shown below.

E-signature field in data-source and document report
Now the user can add the E-signature field to the data source and the User can create document reports using the e-signature field.
External login providers UI changes
UI enhancements are done for external login pages.
Business Rules - map Calculate output to another field
Enhanced business rules by adding a calculated field.
Users can select the calculated field in business rules and can map that field to other app fields.
Edit Data table-Field Label Name changes
In Edit Data table Select Workspace Name changed to Workspace.
App publish properties- help text message
In the publishing app page, the user can view the help text message for the Available Offline checkbox when mouse over the ‘i’ icon.
App view - Business Rules
In-App view page UI enhancements done for business rules.
In Grid Report - Adjust Column Width
Users can view only selected columns instead of all columns in the grid report to Adjust Column Width.
Fixes
Few Minor Fixes have been resolved.
- ).