¶ New Features
¶ Data Security - Encrypt data and store in database
Description: Data security means protecting digital data, such as those in a database, from destructive forces and from the unwanted actions of unauthorized users, such as a cyberattack or a data breach.
Enhanced the Data Security feature in Quixy to secure user’s data from unauthorized users.
Benefits and Usage: User Data is secured from unauthorized users and cyber-attacks. The user data is encrypted and stored in data base.
¶ Security - Restriction of API calls at organization level
Description: We limit the number of API requests made by each user, per organization instance.
User of one organization not able to access API calls of other organization. Within the Organization only user can access API calls.
Benefits and Usage: Restriction of API calls from Users of other organizations.
¶ Report Builder - Grid - Ability to adjust column widths of a grid
Description: By this feature user can able to adjust column width of the grid in Reports list and view report pages of Grid report.
Benefits and Usage: User can adjust the column width of the grids based on requirement.
- Create report by enable the Adjust Grid Column Width check box.
- When view the created report, user able to adjust column width by mouse over on the column border.
¶ QR Code in Complex Report & Individual Report
Description: User can be able to add QR code to all elements in Individual Reports and Complex Reports except File Upload Element.
Benefits and Usage: For All the elements except file upload element in Individual report and Complex Reports user can be able to add QR code functionality to the elements.
QR Code - Individual Report
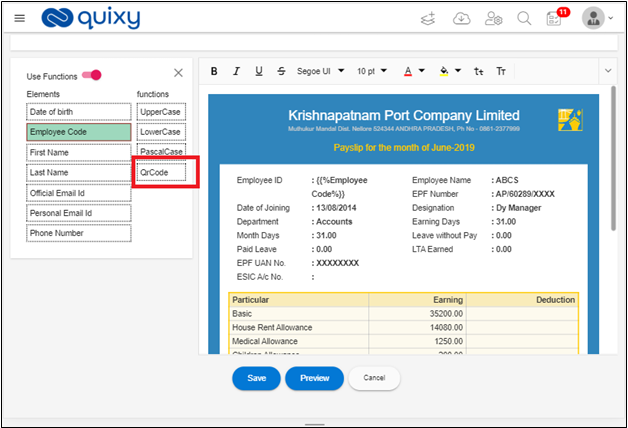
- In Create Individual Report after selecting the Report Template enable User Functions switch.
- Click on the element. The system functions for the selected element are displayed.
- You can see that QR code functionality for the selected element is displayed as follows.
Note
QR Code System function is for all the elements except the file upload element.
4. Place the Element in the Rich text Editor where you want.
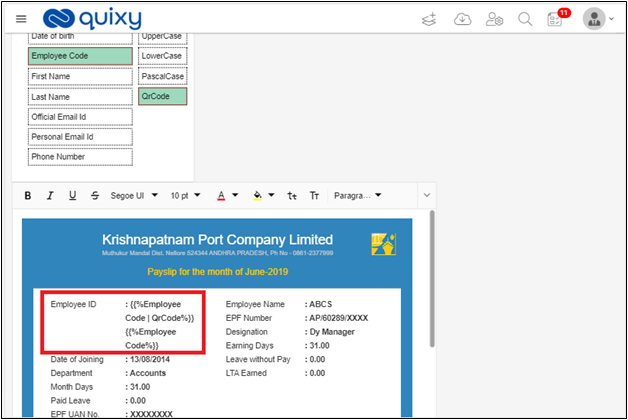
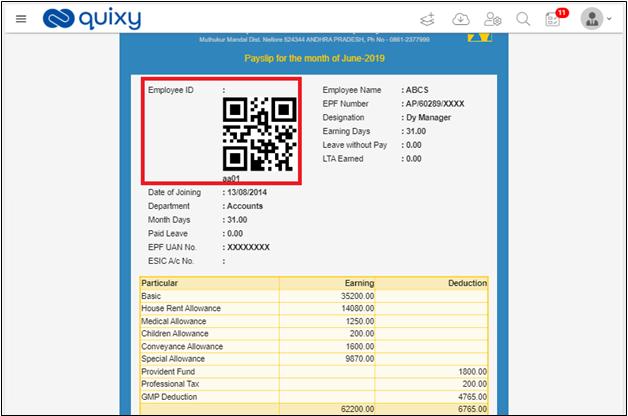
5. Click on Preview button to see the QR Code for the element.
6. QR Code is displayed for the elements you placed as shown below.
7. Click on Save button.
¶ QR Code – Complex Reports
- Open Create Complex Report page.
- Select a Data Source.
- Click on from element/ functions section, you see that QR code is displayed for the selected element.
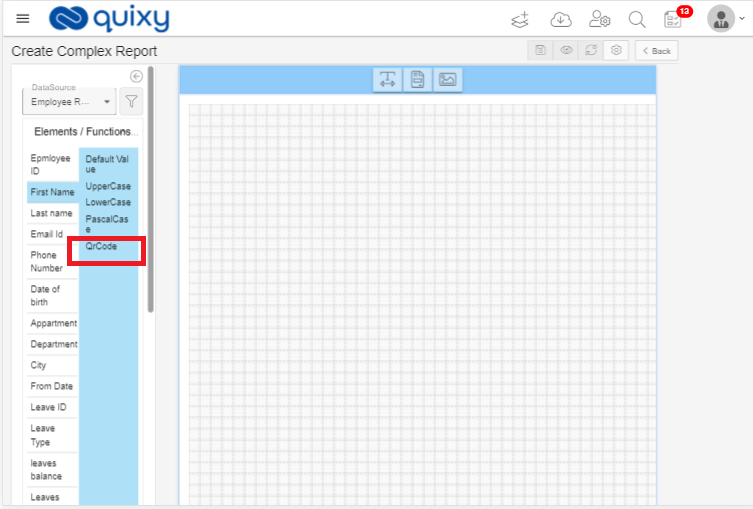
4. QR code is displayed in reports which are placed in complex report.
¶ In Reports need dynamic implicit filters on date fields
Description: Dynamic filters are added to the date fields of reports to filter the dates based on the user requirements.
Benefits and Usage:
- User can able to filter the data in Reports based on the filter added to the Date fields in reports.
- If user filter dates for Today in report, then based on Date filter today date records only displayed in reports.
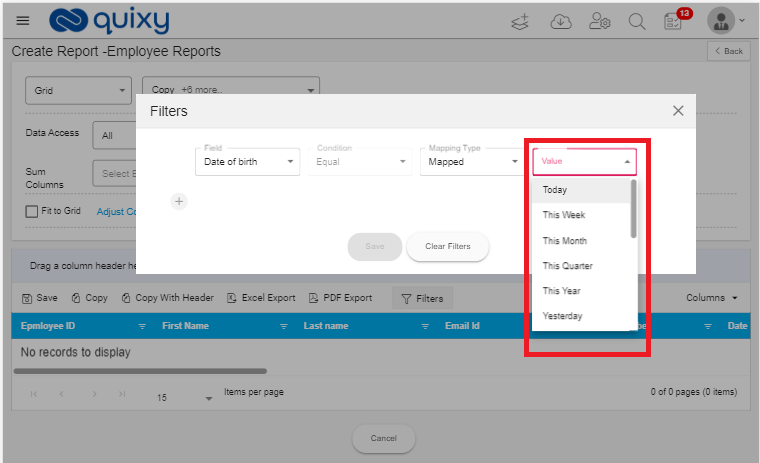
- Similarly, user can able to filter date fields for the following options.
- This Month, This Year, Previous Year, Last 7 days, Last 30 days, Last 3 months, Last 6 months, Last 12 months, etc.
Usage:
- Open Data Source Reports page.
- Click on Create Report.
- Select Report Type as Grid Report and select Data Source.
- Click next and click on filters.
- Select Date element from Field. The Value field displays the date compare options.
- Save the Report with the Date filter.
- Open the report in view mode, the report displays the report based on the date filter.
¶ Complex Report - Page Numbers
By using this we can be able to use page number element on complex report pane and we can be able to add page numbers in Header/footer of complex report.
Benefits and Usage:
- User can be able to add page numbers to Herder and Footer by adding page number in page settings.
Usage:
- Open Create Complex Report page.
- Click on Page Settings icon. Page settings window is displayed.
- Enable Header / Footer.
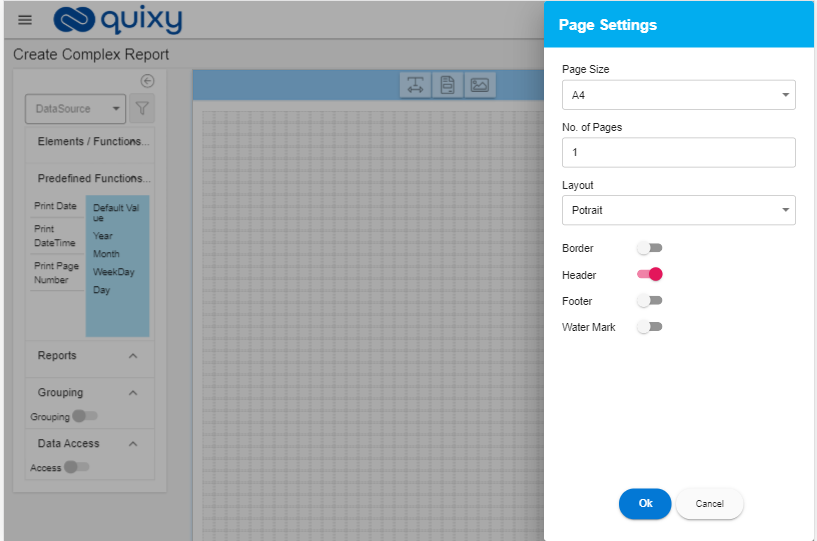
- Header/Footer is added to the complex report.
- You can place the Page Number to herder/ Footer.
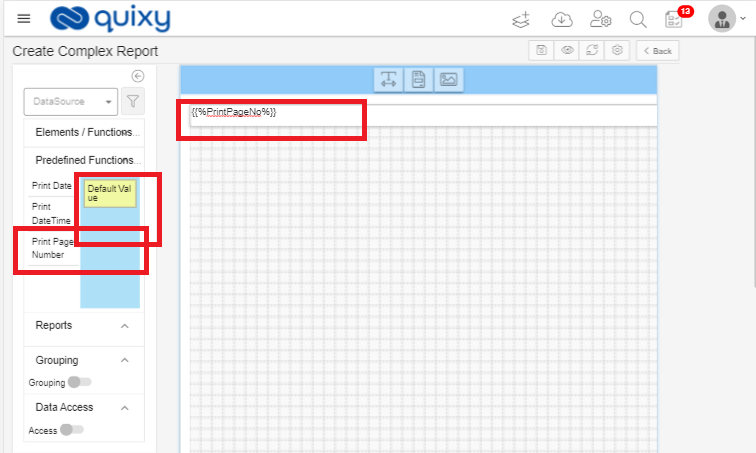
- When you view the complex report page numbers are displayed in the herder/ footer.
¶ Conditions in Internal API - Triggering based on a condition
By this feature Internal APIs are executed based on Conditions. If the Condition is satisfied then only the internal APIs are triggered.
Description:
- If the rule is defined then the internal API has to be executed only when the rule is satisfied for that specific workflow step and action otherwise it should NOT execute.
- If no rules are defined then the internal API should be executed on workflow step and action.
Benefits and Usage:
- On Create Internal API page to add Rule click on Add Rule button. The Add Rule option is displayed as shown below.
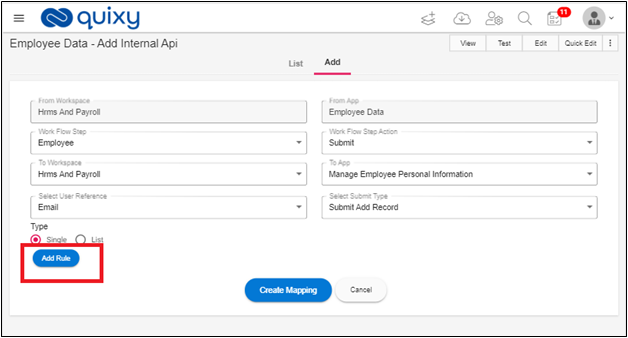
2. A popup is displayed to add conditions.
3. Click on the Element drop down you can see that all the elements in the app are displayed.
4. Select the element base on requirement and create the condition. The page looks like as shown below.
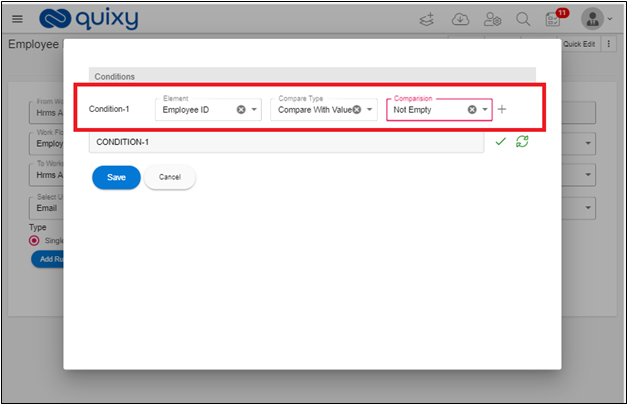
5. Click on + icon, new row is added for condition.
6. Click on Save button to save the Rule. The rule is saved, and popup is closed.
7. In Internal API page Update Rule and Delete Rule buttons are displayed. After added the Rule the create Internal API page is looks like as shown below.
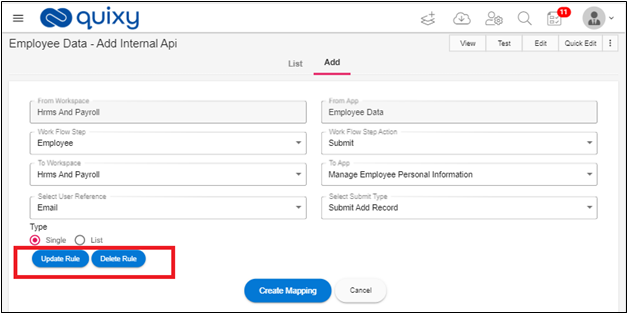
8. Click on Update Rule to edit the rule which is already added.
9. Click on Delete Rule to delete existing Rule.
10. Create Mapping based on your requirements.
11. Save Internal API. The Internal API is saved and a success message is displayed.
12. The Internal API is Triggered only if the given condition is True.
¶ CR’s
¶ Charts - Enhance the feature to show Negative values in charts in negative section
Previously The charts not displaying negative values in negative side and positive values in positive side.
Now we change the feature to display the negative values in negative values section and positive values in positive values section.
Description:
- In Chart Reports, negative values are displayed in negative section of the charts.
- Here, for X-axis -negative values are displayed below and for y-axis -negative values are displayed left side.
¶ Back button feature - List Screen
Previously if the User is in List screen and open Individual Reports page, clicked back button then the page redirect to Report Records page.
In Enhanced feature, If User Opens Individual reports from List Screen and click on Back button then the screen navigates to List Screen.
Description: If back button is used in individual report, then system should check for the source whether it is from list screen or not. If it is from list screen, then it should navigate back to list screen otherwise system should open report records screen.
¶ In role screen show a report to see list of associated users, apps (step), reports for each role
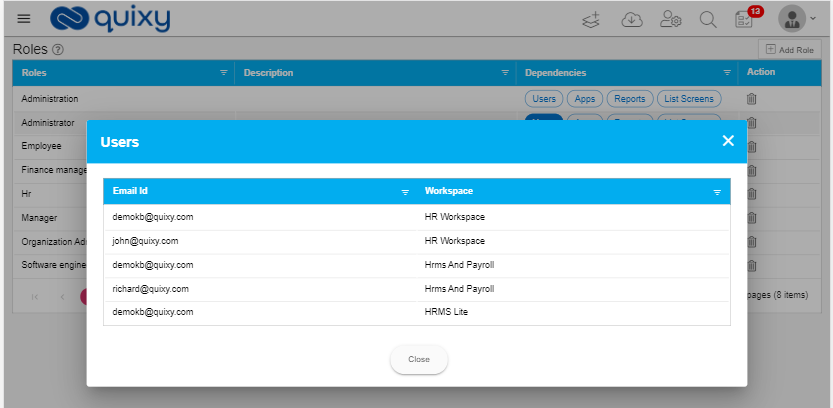
Description: By this feature user can able to view the list of users in Roles screen when click on the Users corresponding to the Role in the grid.
Benefits and Usage:
- Open Roles page clicks on the Users from Dependencies field corresponding to the Role.
- The Users which have assigned to the Role are displayed in popup.
¶ List Screen - In data-source last step provide option to resize column width in grid preview
Description: By this feature user can able to adjust column width of the List screen.
Benefits and Usage: User can adjust the column width of the list grid based on requirement.
- Create report by enable the Adjust Grid Column Width check box.
- When opens add record mode for the list screen, user able to adjust column width by mouse over on the column border.
¶ FIXES
¶ Multiple Charts – drill down
- Issues in View Report of Multiple Charts.
¶ Direct Print– Workflow step
- Workflow step direct Print, in edit workflow step action workflow selected data is not displayed.
- While Updating direct Print Function, it shows Name Already exists.
¶ Chart
- chart drill down, back navigation is not working.
- In Charts Export Pdf, the full chart is not displayed for view mode.
¶ Direct Print Report– Pivot Report
- In Direct Print Report, Pivot Report Data is not displaying.
- Login Page is displaying when submit record from direct print report for Grid report.
- After submit, 2 new windows open for direct print report for grid, individual and pivot reports
¶ Data Source List Grid – Add record
- In Add Record of Data Source List Grid. Uploaded file is not viewed for file upload element.
¶ Data Table
- While adding multiple records to the data table with file upload element, file count is not updated when you add a record or delete record from the data table.
- While editing the record of data table, in edit we are not able to upload files.
¶ Add Record - app
- While adding records to the app, date formats for date fields are displaying in wrong format in the list.
¶ Internal API
- While editing internal API, if we change workflow step action then it shows loading symbol in the page.
¶ Knowledge Base Article Creation Issues
- Knowledge base Article Creation, UI changes.
- Hyper Links are not opening in help desk articles view.
¶ Report Filters
- In Report Filters for Date Fields, filters are not working for given conditions.
¶ API – Create Task
- In newly created task default columns are not displaying in view mode of task.
¶ Chart Reports
- Chart Reports in Report Mapping, report elements are not displayed for view.
¶ Custom Menu
- Custom Menu List Column issues.
¶ Data Table – view File Upload element
- In View data table, uploaded .png file view is not working.
¶ List Screen
- In List Screen submit Record data source action is not working if app ha reference element in it.
- In List Screen, updating Data Source action is not working. It displays Action name already exist while edit data source action and update.
- In List Screen, the list screen the record which has hide action in list permission the record is showing for the logged in user.
- In List Screen Data Source Actions Print workspace selection issue.
¶ Organization Logo
- We are unable to update Organization Logo.
¶ Web App
- In Calculate Element for string concatenation, null value is displaying.
- In Grid Day diff, Month diff, Year diff date functions not displaying Zero if the difference value is zero.
- In Business Rules, edit Formula is not displaying when Rule is expanded.
- In List Screen, user help documentation which is already created is not displayed in List screen grid.
- Report Name and Report Type columns displaying same data in Reports Popup when clicking report button against Project Manager in Roles Screen.
- In View Data Source Report, when click on export Pdf QR Code is not displaying.
- Issues in Date Element for Grid - hours difference, minutes difference, Month Off, day off, year off calculations are not working properly.
¶ Complex Report
- If we have more than one report in complex reports, Reports are overlapping.
- Image updating is not working in complex reports.