Get function allows a data table to share its information with an application. It can be thought of as a way for the data table to push its data into the application or for the application to fetch the available information from the data table. This functionality simplifies the user experience when working with repetitive data in an application.
Example
Imagine you have a data table that stores customer information, such as names, addresses, and contact details. You also have an application that needs to access this customer information for various tasks, such as processing orders or generating reports. Instead of manually entering the customer details into the application each time, the Get function allows the application to retrieve the relevant information directly from the data table.
¶ How to add Get Function?
- Go to the main dashboard and click on Admin Menu → Database → Data Tables.
- Choose a data table for which you want to create Get function and click on Manage Functions corresponding to that particular data table.
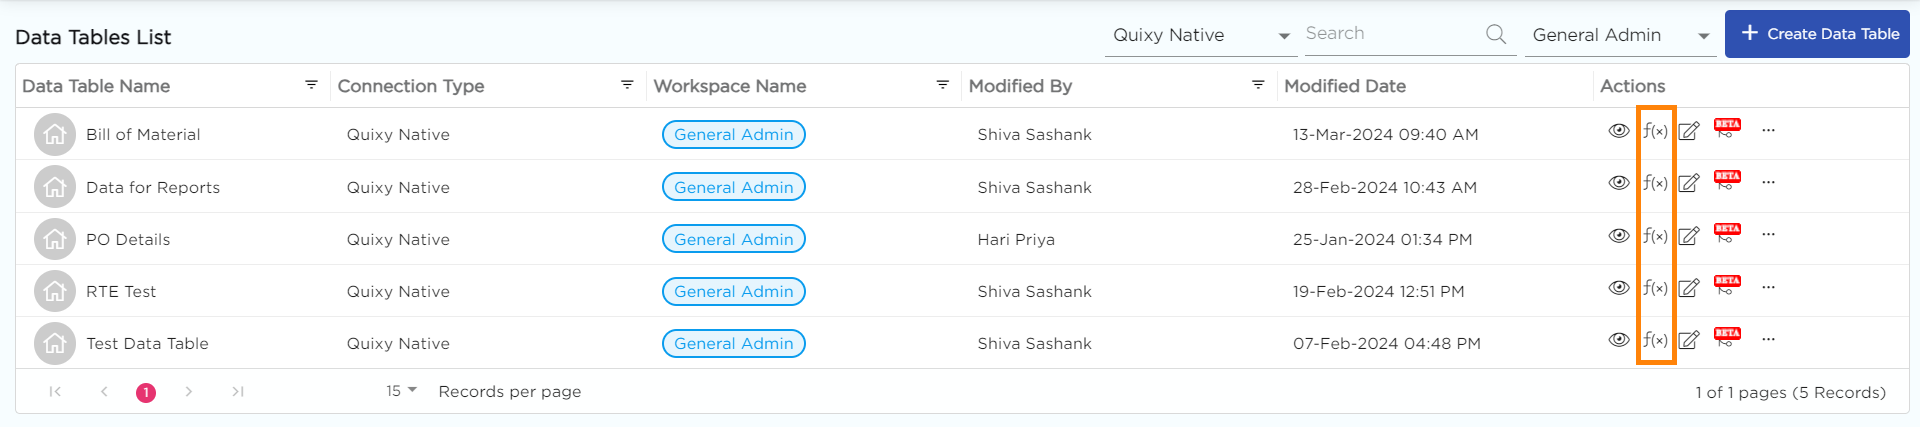
- Click on the Add New Function button to create a new function.

- Select the Get radio button.
- Provide a valid name to the Get function in the Name field for its identity.
- Choose between the Individual, Cascade, and Anyone radio buttons to define the behavior of the input fields in the application.
Individual: This option allows each input field to operate independently within the app, regardless of the number of available input fields. Users can interact with each input field to select values without relying on or validating against other fields. However, the output values corresponding to these fields will not be fetched until all input values have been selected.
Example
Consider an app for customizing a t-shirt. The app presents separate input fields for selecting the color, size, and material of the t-shirt. As users choose options in each field, the selections are displayed in drop-down menus. However, the final price of the customized t-shirt will not be shown until the user has selected values for all three fields (color, size, and material).
Cascade: Cascading dropdowns are like a chain reaction in your app's input fields. When you select a value in one dropdown, it triggers a series of changes in the next dropdowns. For example, let's say you have a dropdown for selecting a country. Based on the country you choose, the next dropdown for selecting a city will only show cities from that country. This process continues for as many levels as you need. Importantly, once the selected value in the first cascade-based dropdown selection is changed, the rest of the cascading-based dropdowns related to the first one will be updated accordingly to the newly selected value.
Example
Suppose you have input fields for Continent, Country, and State in a sequence. If a user selects "Asia" in the Continent input field, the Country input field will load and display all countries in the Asia continent (such as India, Pakistan, Bangladesh, etc.). Similarly, if the user selects "India" in the Country input field, the State input field will load and display all states present in India.
Anyone: This option allows each input field to operate independently within the app, regardless of the number of available input fields. Users can interact with each input field to select values without relying on or validating against other fields. Importantly, the output values corresponding to these fields will be fetched even if only one input value is selected. As users continue to select additional input values, the specificity of the output values becomes more narrowed down.
Example
Imagine an app designed for purchasing cars, which retrieves car details from data tables. The app includes input fields such as "Car Company," "Car Type," and "Car Color," as well as output fields such as "Car Name," "Car Type," "Car Color," "Launch Date," and "Car Price."
If the user selects only the "Car Company" as input, the app fetches and displays the output details for all cars associated with that particular car company, including various car types, colors, launch dates, and prices offered by that company.
If the user chooses only the "Car Type" as input, the app retrieves and presents the output details for all cars of that specific type, including different car models, available colors, launch dates, and prices within that car type category.
However, if the user selects "Car Company," "Car Type," and "Car Color" together as input, the app provides specific output details about a particular car that matches the selections. This includes information about the car's name, type, color, launch date, and price, tailored to the chosen combination of car company, car type, and car color.
This design allows users to explore and retrieve relevant car information based on their preferred levels of specificity, whether they want to browse all cars from a specific company, explore a particular car type, or narrow down to a specific car by considering company, type, and color together.
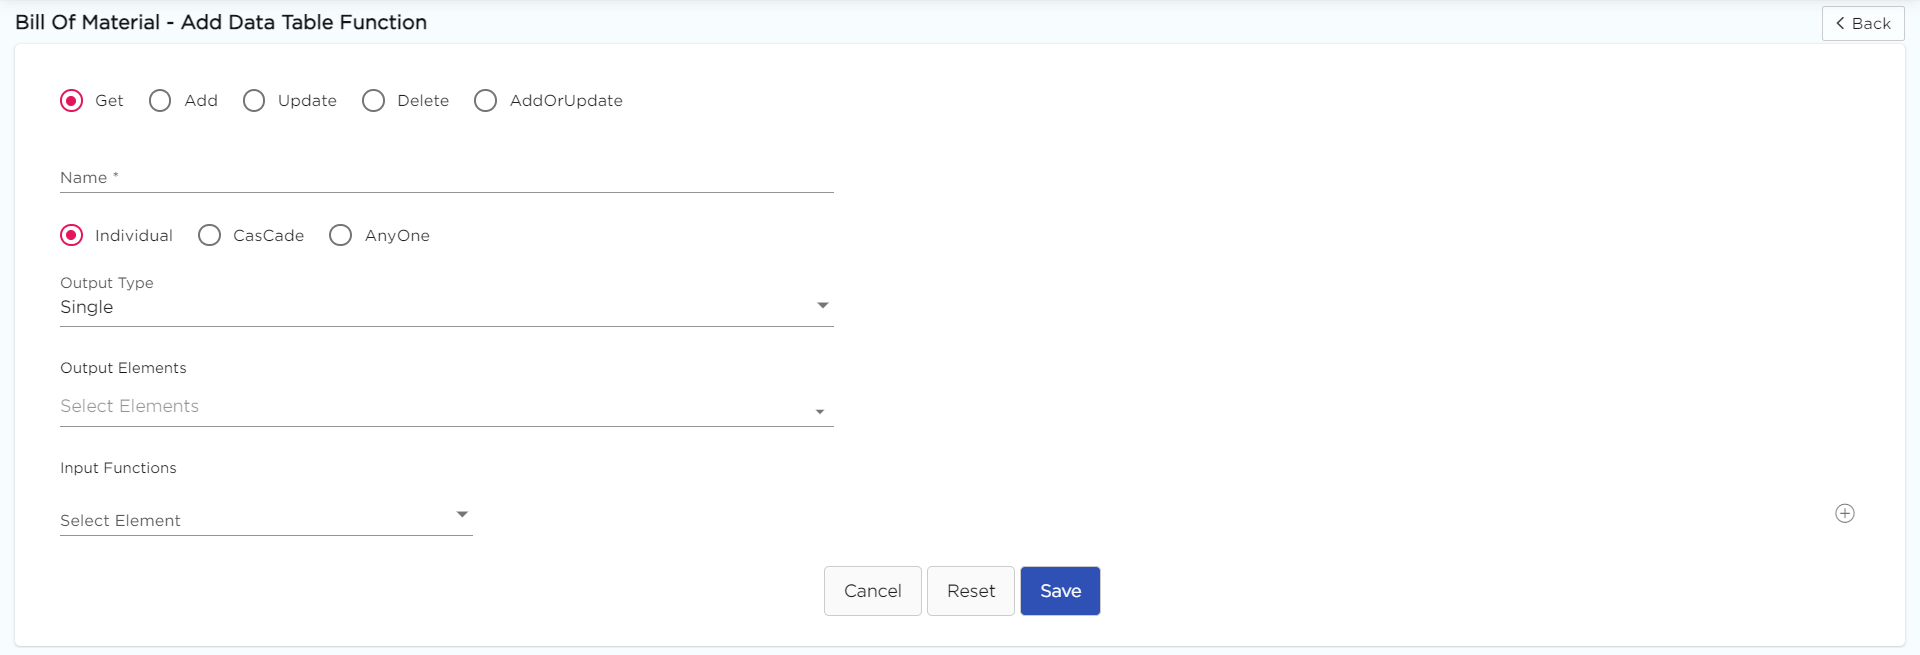
- Output Type drop-down options which define the structure of the output data; select an option from the drop-down.
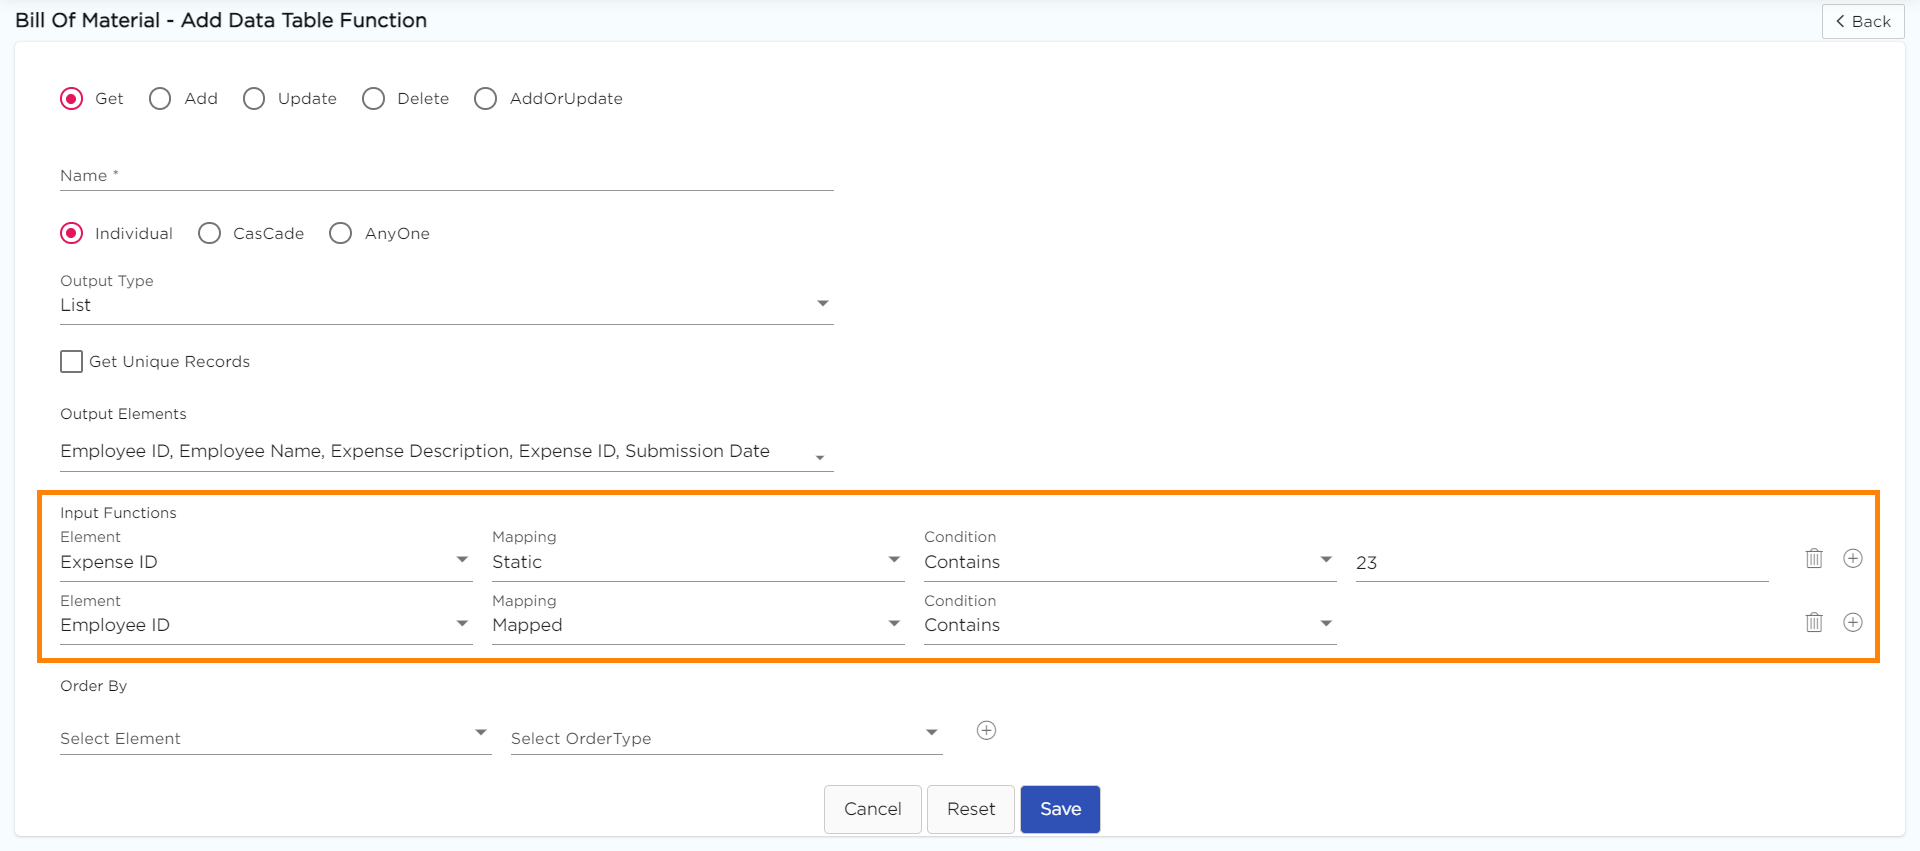
- List: It retrieves the data from the data table in the form of a list (i.e., grid), refer to the image below.
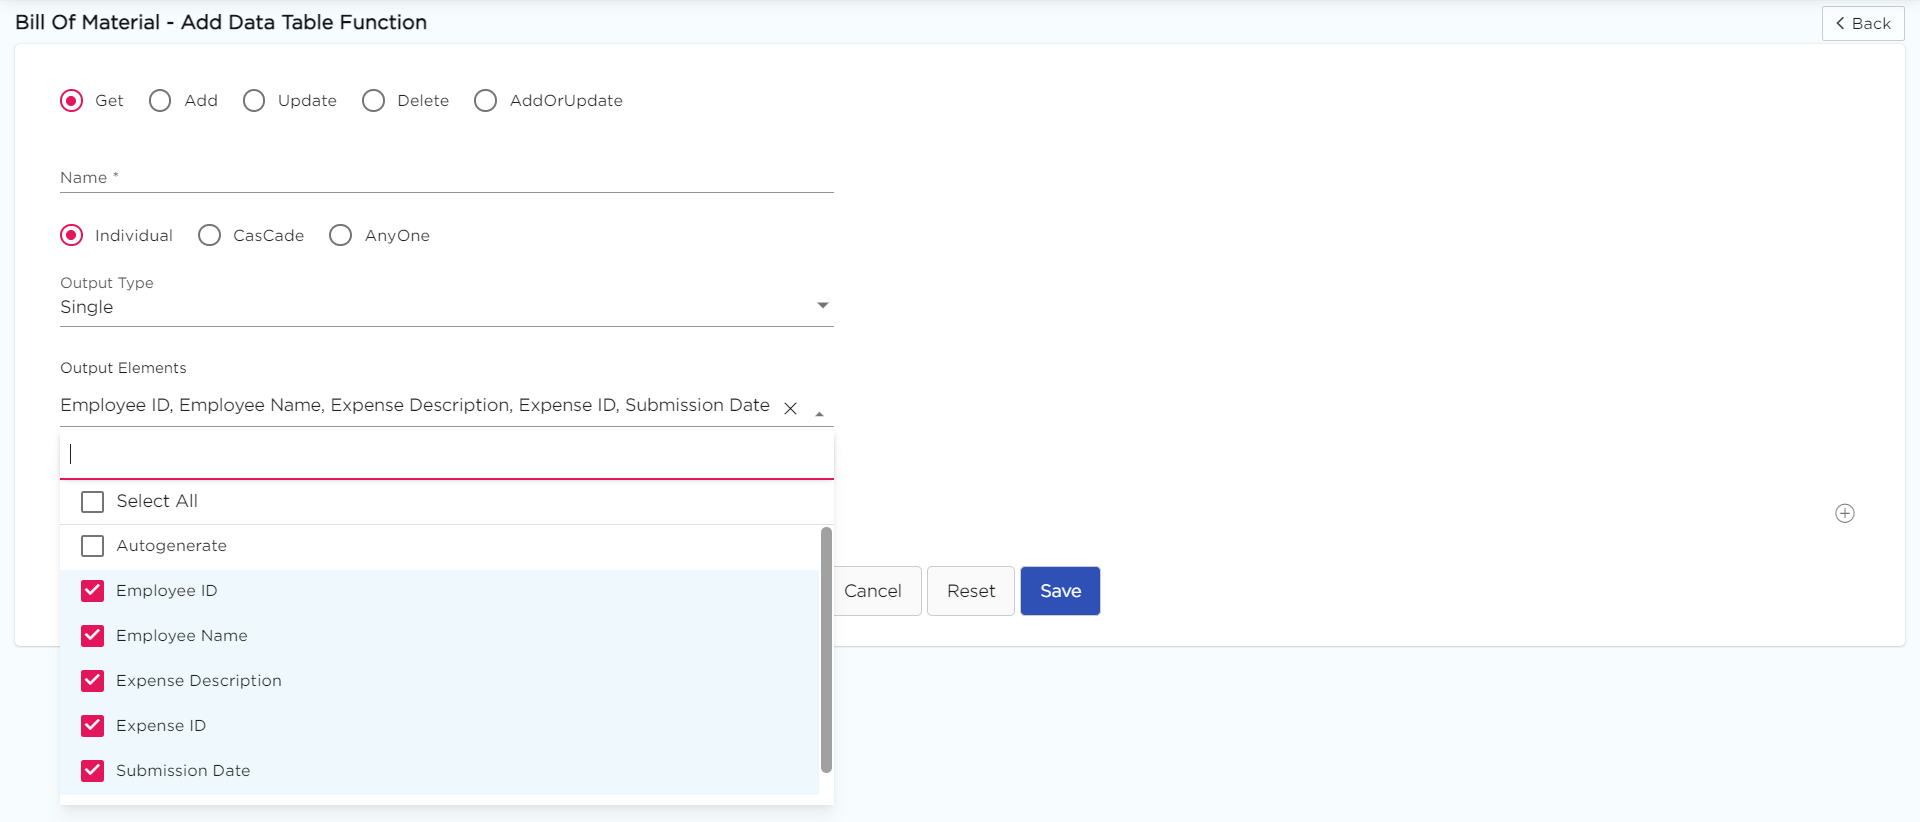
- Single: It retrieves the data from the data table as single element fields, refer to the image below.
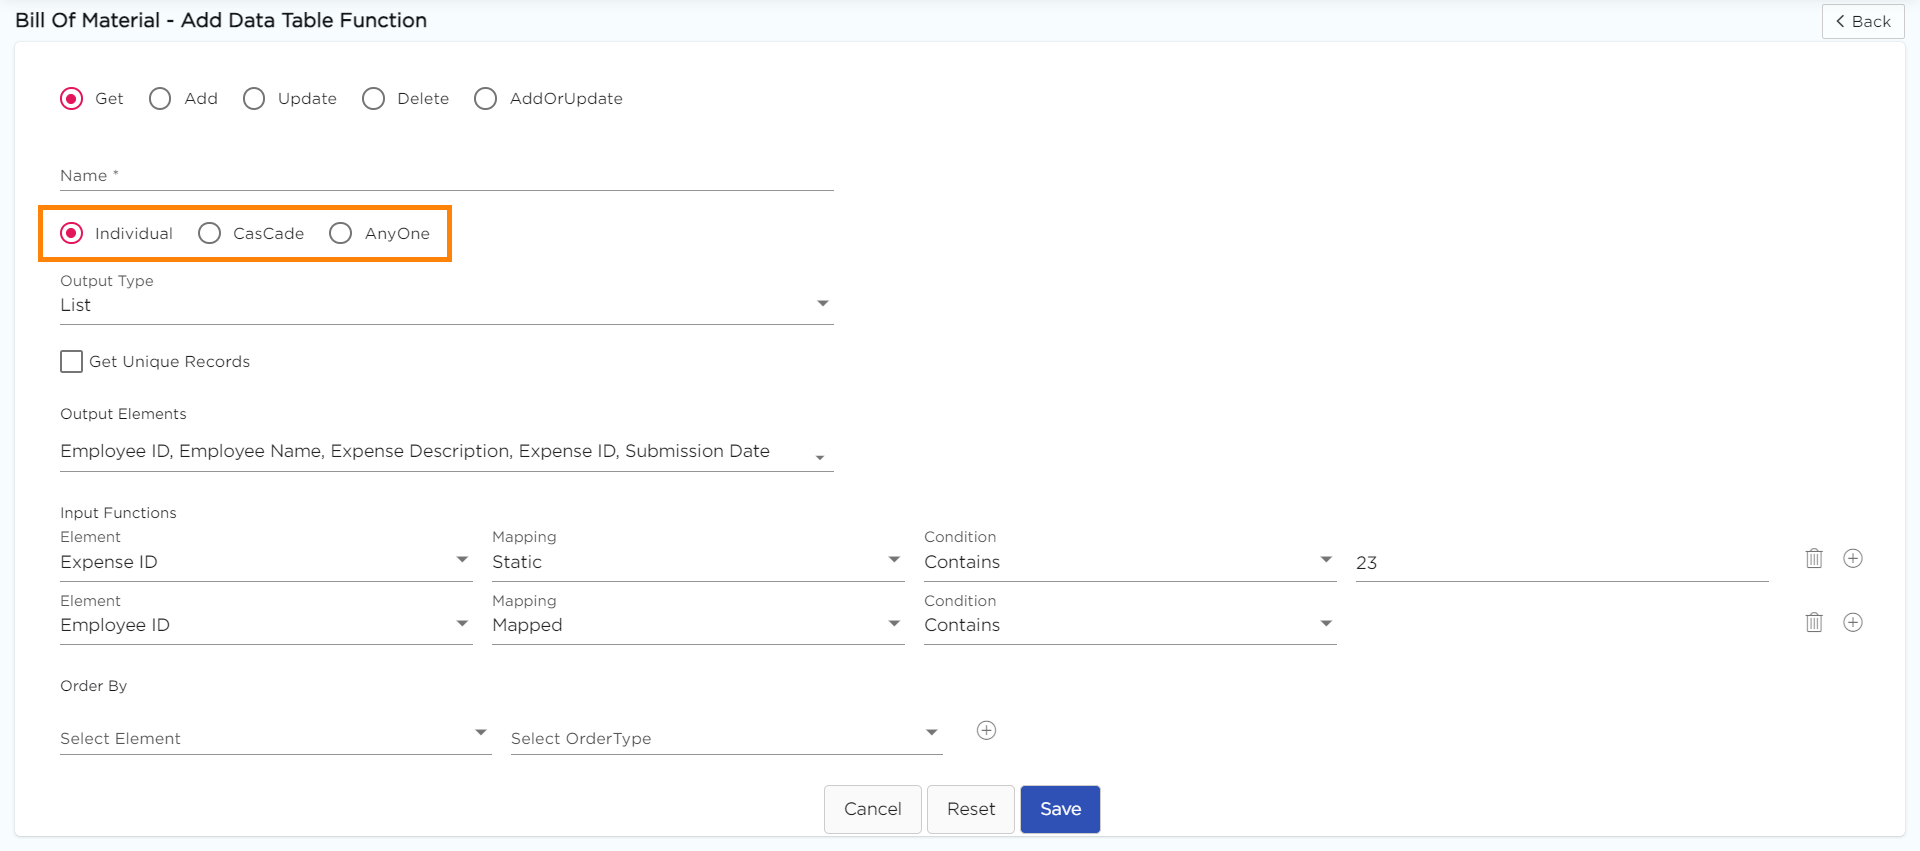
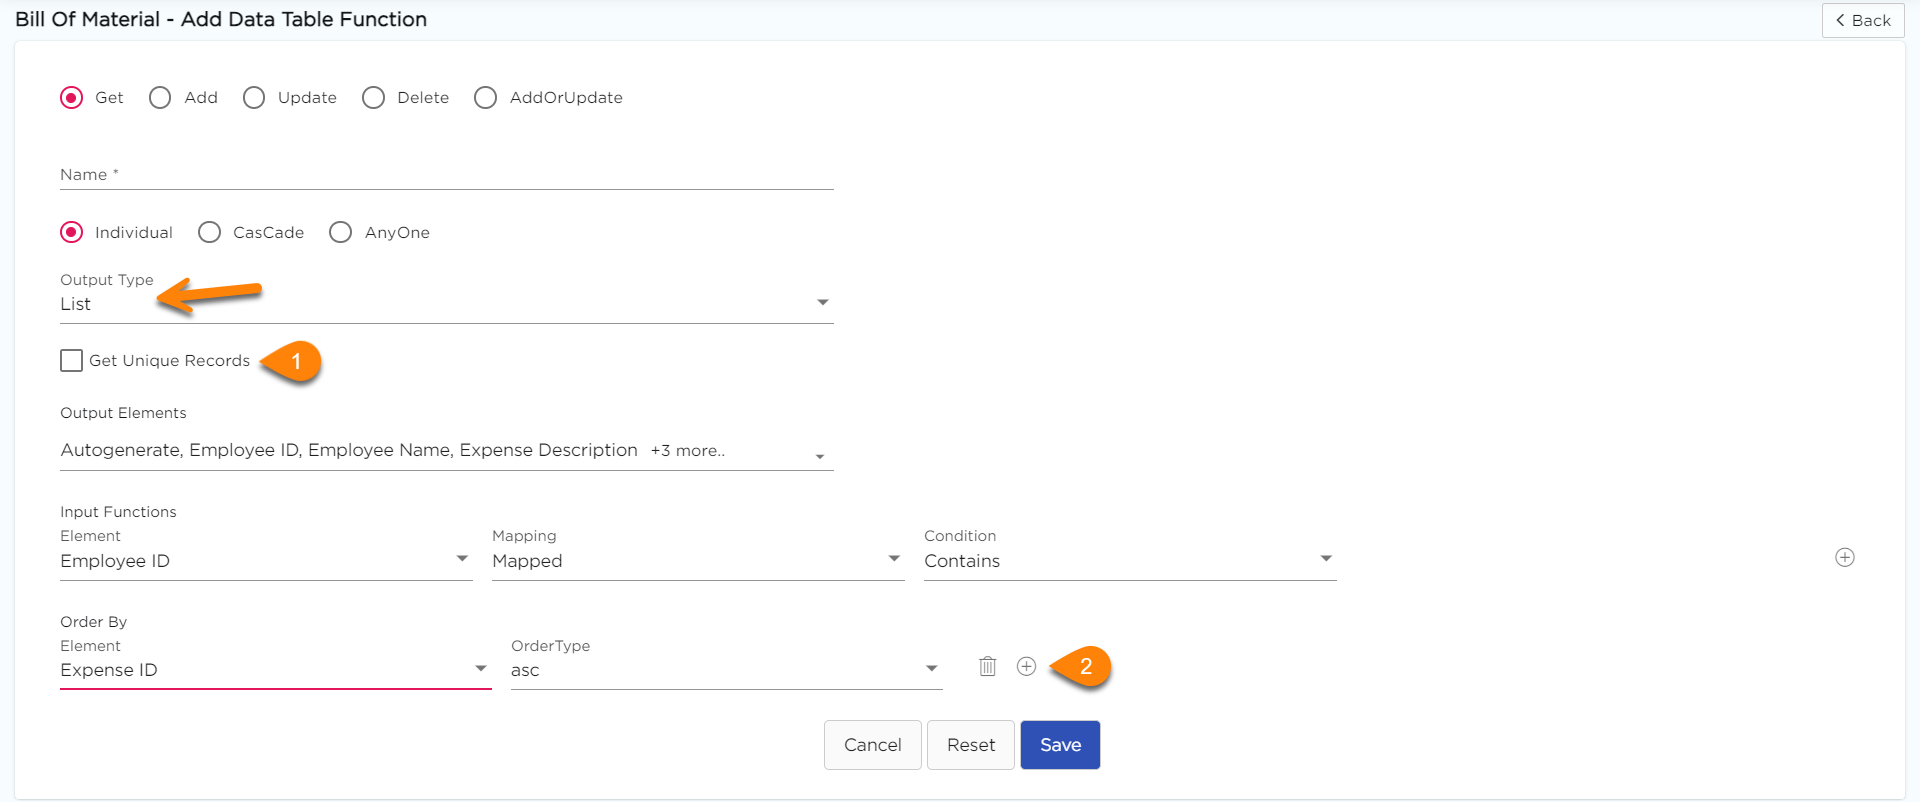
- If you select Output Type as List, the following fields will display on the screen.
- Get Unique Records: This option allows the platform to display only unique output values associated with that particular input field neglecting the duplicates (If any).
- Order by Section: This option allows the platform to ensure the output data is arranged in either Ascending or Descending order. However, to order the output data, selection on the output fields is mandatory.
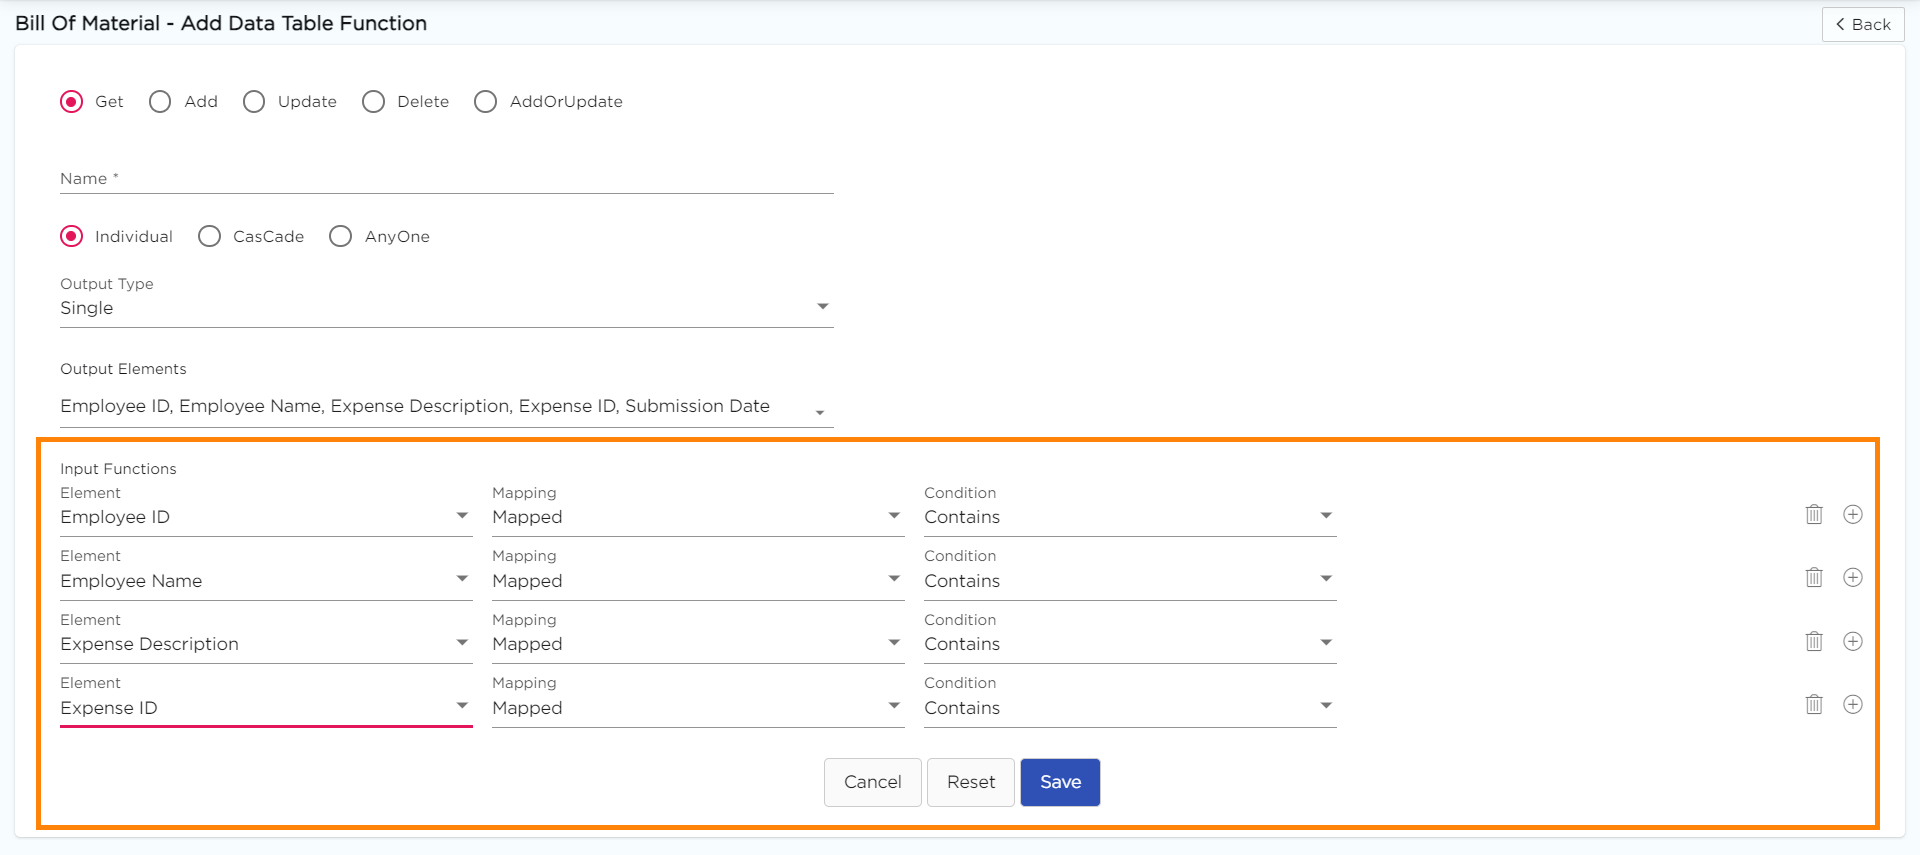
- Click on the Output Elements drop-down, and it will show a list of data fields available in the data table; select the data field that you want as output.
- Upon clicking on the Input Functions, it contains the list of data fields available in the data table.
- The data field that you select will act as a Reference/Input Field to the Data Table, and it will retrieve data associated with it.
Important
If you select Employee ID as input value, data (i.e., employee name, phone number, etc.) related to that employee id will be fetched as output.
- Once you select the Input value, you will see the Mapping and Condition drop-downs displaying on the screen. The input fields are to be mapped and set the fitting condition, respectively.
- Click on the Mapping drop-down, and it will show two values Mapped and Static.
- Mapped: This option allows you to set the execution condition, and when the condition becomes true, platform will do the respective job of fetching the output values.
- Static: This option allows you to set a definitive value on the go and when the definitive value matches the value provided in the app, the platform will do the respective job of fetching the output values.
- Map the element to a condition from the drop down, or you can set a static value of what does it should consist of to proceed further.
- The Condition drop-down will have conditional values based on the selected field-type.
Important
If you select a Text field, you will have the below-given values.
Contains: This condition is applied when fetching data from a data table to an app. It becomes true if the value in the data table's text field contains the specified text. It checks if the selected text is present anywhere within the text field and returns the output for all the matched input.
Not Contains: This condition is applied when fetching data from a data table to an app. It becomes true if the value in the data table's text field does not contain the specified text. It checks if the selected text is not present within the text field and returns the output for all the unmatched input.
Empty: This condition is applied when fetching data from a data table to an app. It becomes true if the text field in the data table is empty, meaning it does not contain any value or text.
Not Empty: This condition is applied when fetching data from a data table to an app. It becomes true if the text field in the data table is not empty, meaning it contains some value or text.
Equal: This condition is applied when fetching data from a data table to an app. It becomes true if the value in the data table's text field is exactly equal to the specified text. It performs an exact match comparison.
Not Equal: This condition is applied when fetching data from a data table to an app. It becomes true if the value in the data table's text field is not equal to the specified text. It checks for inequality between the text field and the specified text.
Starts With: This condition is applied when fetching data from a data table to an app. It becomes true if the value in the data table's text field starts with the specified text. It checks if the text field value begins with the specified text.
Ends With: This condition is applied when fetching data from a data table to an app. It becomes true if the value in the data table's text field ends with the specified text. It checks if the text field value ends with the specified text.
If you select a Number field, you will have the below-given values.
Equal: This condition is applied when fetching data from a data table to an app. It becomes true if the value in the data table's number field is exactly equal to the specified number. It performs a numeric equality comparison.
Not Equal: This condition is applied when fetching data from a data table to an app. It becomes true if the value in the data table's number field is not equal to the specified number. It checks for numeric inequality between the number field and the specified number.
Empty: This condition is applied when fetching data from a data table to an app. It becomes true if the number field in the data table is empty, meaning it does not contain any value or number.
Not Empty: This condition is applied when fetching data from a data table to an app. It becomes true if the number field in the data table is not empty, meaning it contains some value or number.
Greater Than: This condition is applied when fetching data from a data table to an app. It becomes true if the value in the data table's number field is greater than the specified number. It checks if the number field value is numerically larger.
Less Than: This condition is applied when fetching data from a data table to an app. It becomes true if the value in the data table's number field is less than the specified number. It checks if the number field value is numerically smaller.
Greater Than or Equal To: This condition is applied when fetching data from a data table to an app. It becomes true if the value in the data table's number field is either equal to or greater than the specified number. It includes cases where the number field value is equal or numerically larger.
Less Than or Equal To: This condition is applied when fetching data from a data table to an app. It becomes true if the value in the data table's number field is either equal to or less than the specified number. It includes cases where the number field value is equal or numerically smaller.
If you select a Date field, you will have the below-given values.
Equal: This condition is applied when fetching data from a data table to an app. It becomes true if the value in the data table's date field is exactly equal to the specified date. It performs a date equality comparison.
Not Equal: This condition is applied when fetching data from a data table to an app. It becomes true if the value in the data table's date field is not equal to the specified date. It checks for date inequality between the date field and the specified date.
Greater Than: This condition is applied when fetching data from a data table to an app. It becomes true if the value in the data table's date field is later in time than the specified date. It checks if the date field value is chronologically after the specified date.
Less Than: This condition is applied when fetching data from a data table to an app. It becomes true if the value in the data table's date field is earlier in time than the specified date. It checks if the date field value is chronologically before the specified date.
Greater Than or Equal To: This condition is applied when fetching data from a data table to an app. It becomes true if the value in the data table's date field is either equal to or later in time than the specified date. It includes cases where the date field value is equal or chronologically later.
Less Than or Equal To: This condition is applied when fetching data from a data table to an app. It becomes true if the value in the data table's date field is either equal to or earlier in time than the specified date. It includes cases where the date field value is equal or chronologically earlier.
- Set the Input function condition for the element fields based on your requirement, i.e., Based on which condition you want to get the data from the data table.
- Click on the Submit button to save the Data function.