An add-on in Quixy functions as a plugin that extends the capabilities of artifacts such as Reports, References, and Views—essentially, anything built using a data source as the foundation. Add-ons are created based on a data source and are applicable only to artifacts that share the same underlying data source. Once an add-on is created, it can be utilized across multiple artifacts which are built on the same data source.
You can edit an add-on at any time; however, once it is integrated with an artifact, it cannot be deleted unless it is first detached from the artifact.
In this article, we will explore add-ons in greater detail, including their components, purpose, and the benefits they offer when integrated with artifacts.
¶ Why Use Add-Ons?
Add-Ons are designed to extend the functionality of artifacts without modifying the core data source. They offer a flexible way to introduce custom columns, rules, and actions to specific artifacts while keeping the original data structure intact.
- Customization Without Data Source Changes – Modify how data appears and behaves in artifacts without altering the base data.
- Artifact-Specific Enhancements – Apply additional logic, fields, or actions only to relevant artifacts, preventing unnecessary clutter in others.
- Better Data Management – Maintain a clean and organized data source by avoiding structural changes that could impact multiple artifacts.
- Increased Flexibility – Adapt artifacts dynamically by adding smart columns, automation rules, or actions as needed. Learn about them in the use case below.
Example
Suppose a List View needs a "Priority" column to categorize tasks, but the same column isn't required in Reports. Instead of modifying the data source and affecting all artifacts, you can create an Add-On that introduces the "Priority" column only in the List View, keeping other artifacts unchanged.
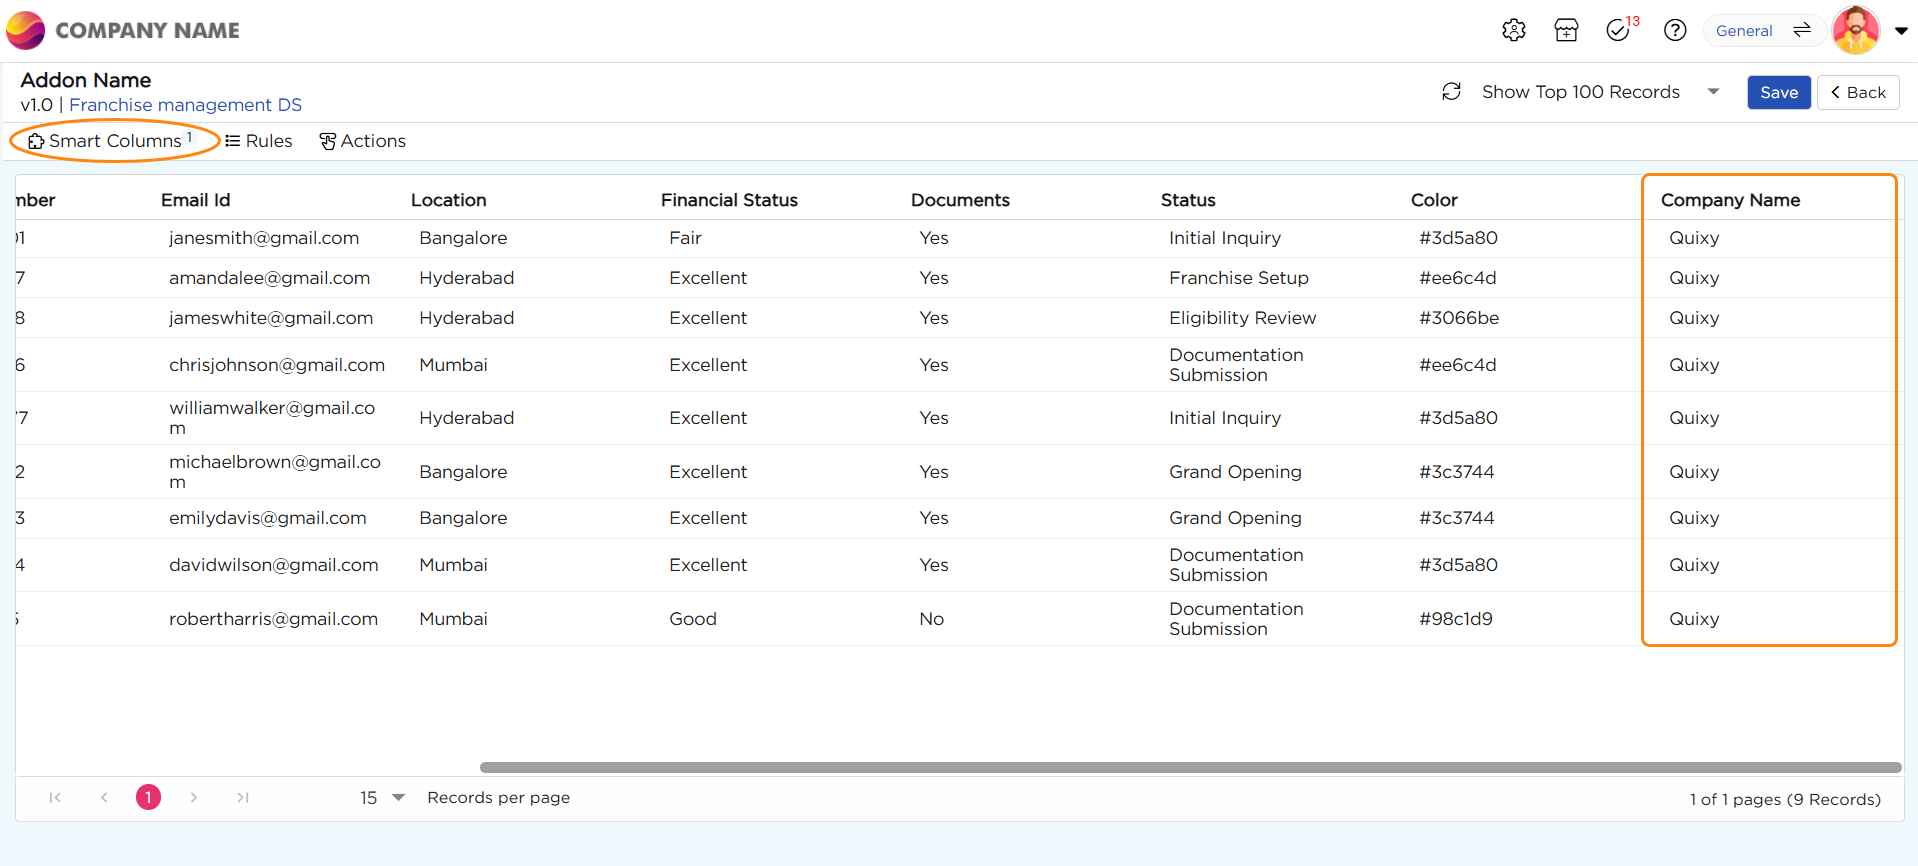
1. Smart columns: Smart Columns acts as additional fields/columns which carry static value data across the data source. These columns enhance the functionality of artifacts by providing consistent information without altering the original data source.
2. Rules: While a Smart Column starts consists of static values, it can truly become "smart" when Rules are applied. These Rules define the behavior of the Smart Column with conditional logic. For instance, a Smart Column can display varying outputs based on specific conditions in the data, making it a powerful tool for tailoring artifacts to meet precise business needs.
3. Data Actions: Data Actions are operations defined within an Add-On that enable specific interactions or modifications to data. These actions allow users to perform targeted tasks, such as updating, adding, or transforming data directly from the views without needing interactions from the multiple artifacts.

There are different types of data actions to perform different actions.
- Inline Edit: This action enables users to modify column data directly within the view, such as a List or Kanban. Changes made through inline editing are immediately updated in the associated data source, including tables, ensuring a seamless and efficient way to manage data without the need to navigate to a separate form or page.
- Open Add Record: This action let users to open an application in "Add Record" mode directly from the view itself, allowing them to create and submit new records directly. This functionality simplifies data entry by providing a straightforward interface for adding transactions or entries to the data tables.
- Open app as report: This action lets you see an application in a view-only mode. For an instance, if an employee’s payroll has more than 20 fields of information in an application, there is no need of showing those 20 fields in the view level, so instead of showing all of them in a view, this action lets you open that application with the detailed information of a particular employee and see those details in app format. It’s helpful when you want to see everything about something, like an employee's payroll, but don’t want to clutter the view with too much information.
- Open List View: This action lets you to access a specific List View (which defined by a CD) and see data displayed in a tabular format and perform any actions associated with that list view. This action is ideal for scenarios where users need to review detailed information or perform actions on a list view.
- Open Kanban View: Similar to the Open List View action works the same way, but it opens a Kanban View instead of a List View. This is helpful when you need to open another Kanban view.
- Open Report: Users can view specific reports (Grid, Pivot, Custom, etc.,) including all types of chart-based reports. This action allows users to access data-driven insights linked to a record, helping them make quick, informed decisions without needing to leave the context of the application.
- Print: Allow users to print the Report which is linked to the action.
- Submit Add Record: From the List View, users can directly submit a new record without navigating away from the current interface. This action streamlines the process of adding and finalizing records, making it quick and efficient for end-users to manage entries directly within their workflow.
Important
Data Actions are exclusive to views and cannot be used in reports or other artifacts, even if they are part of an Add-On.
¶ Configuring Add-Ons
- Go to the Admin Menu → Database → Data Sources.
- Select the desired data source where you want to create an Add-On and click on it.
- On the right-hand side, locate the Actions Panel and find the Add-Ons section.
- Click the "+" icon next to "Add-Ons."
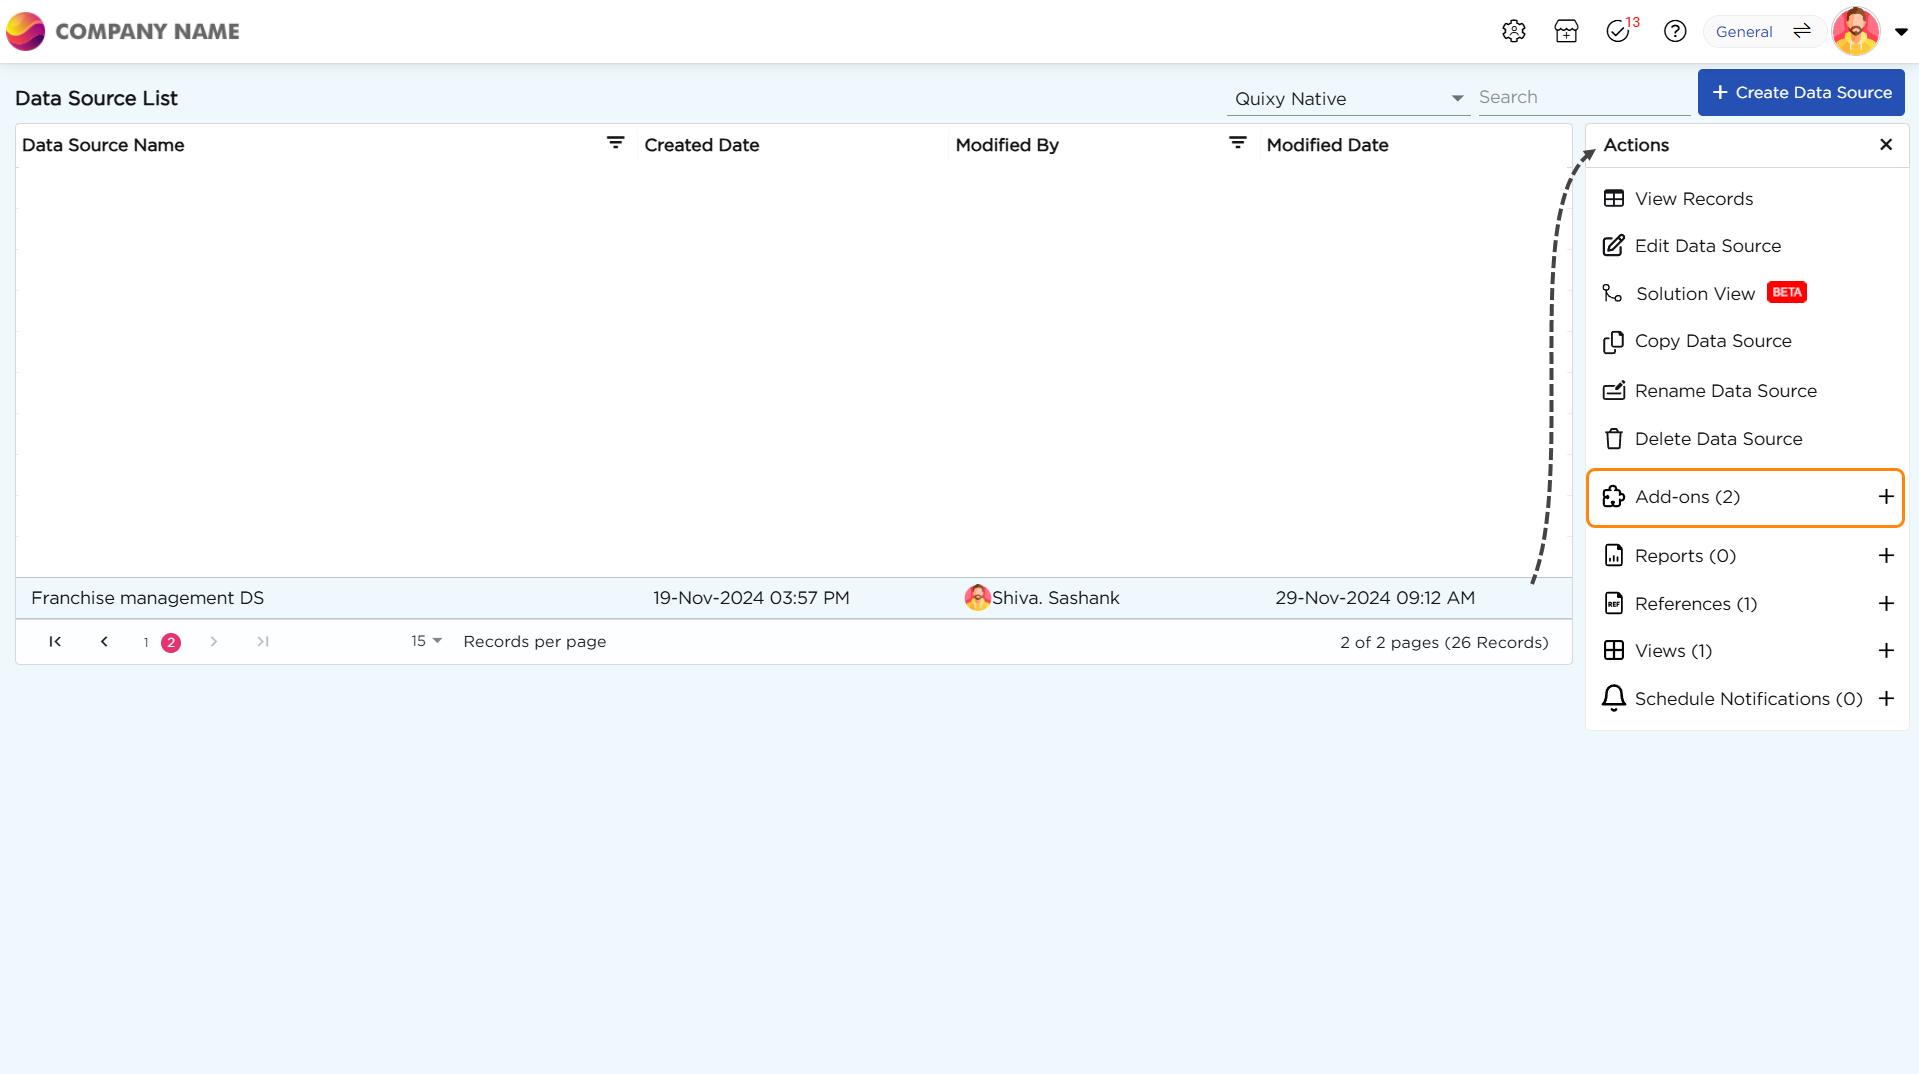
5. You will be redirected to the Add-On creation page to proceed with setting up your Add-On.
When setting up an Add-On, you have three key configuration options:
¶ Smart Columns
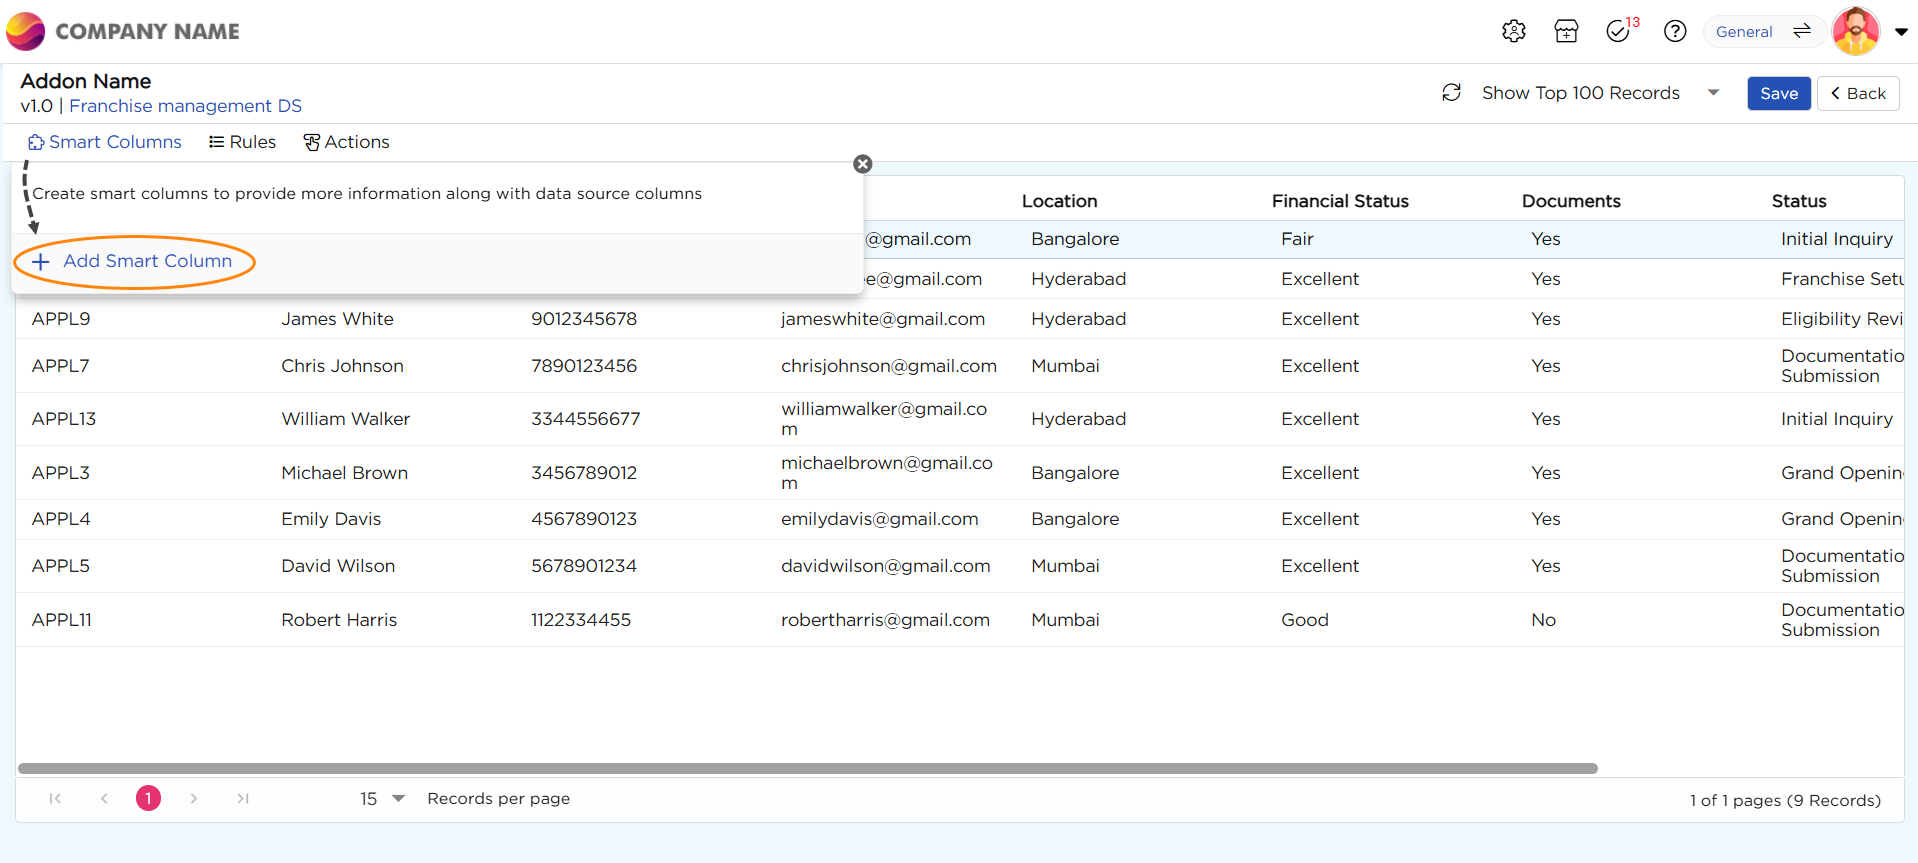
- Navigate to Smart Columns and select Add Smart Column.

2. A drop-down menu will appear, displaying the available field types, including:
- Boolean
- Calculate
- Date
- Date Time
- Email ID
- Number
- Phone Number
- Text
- Time
3. Let’s choose "Text" as an example. Upon selecting "Text," there are three options:
- Column Type: Element Type
- Column Name: Assign a name for the column.
- Value: Enter a value that remains the same for all rows.
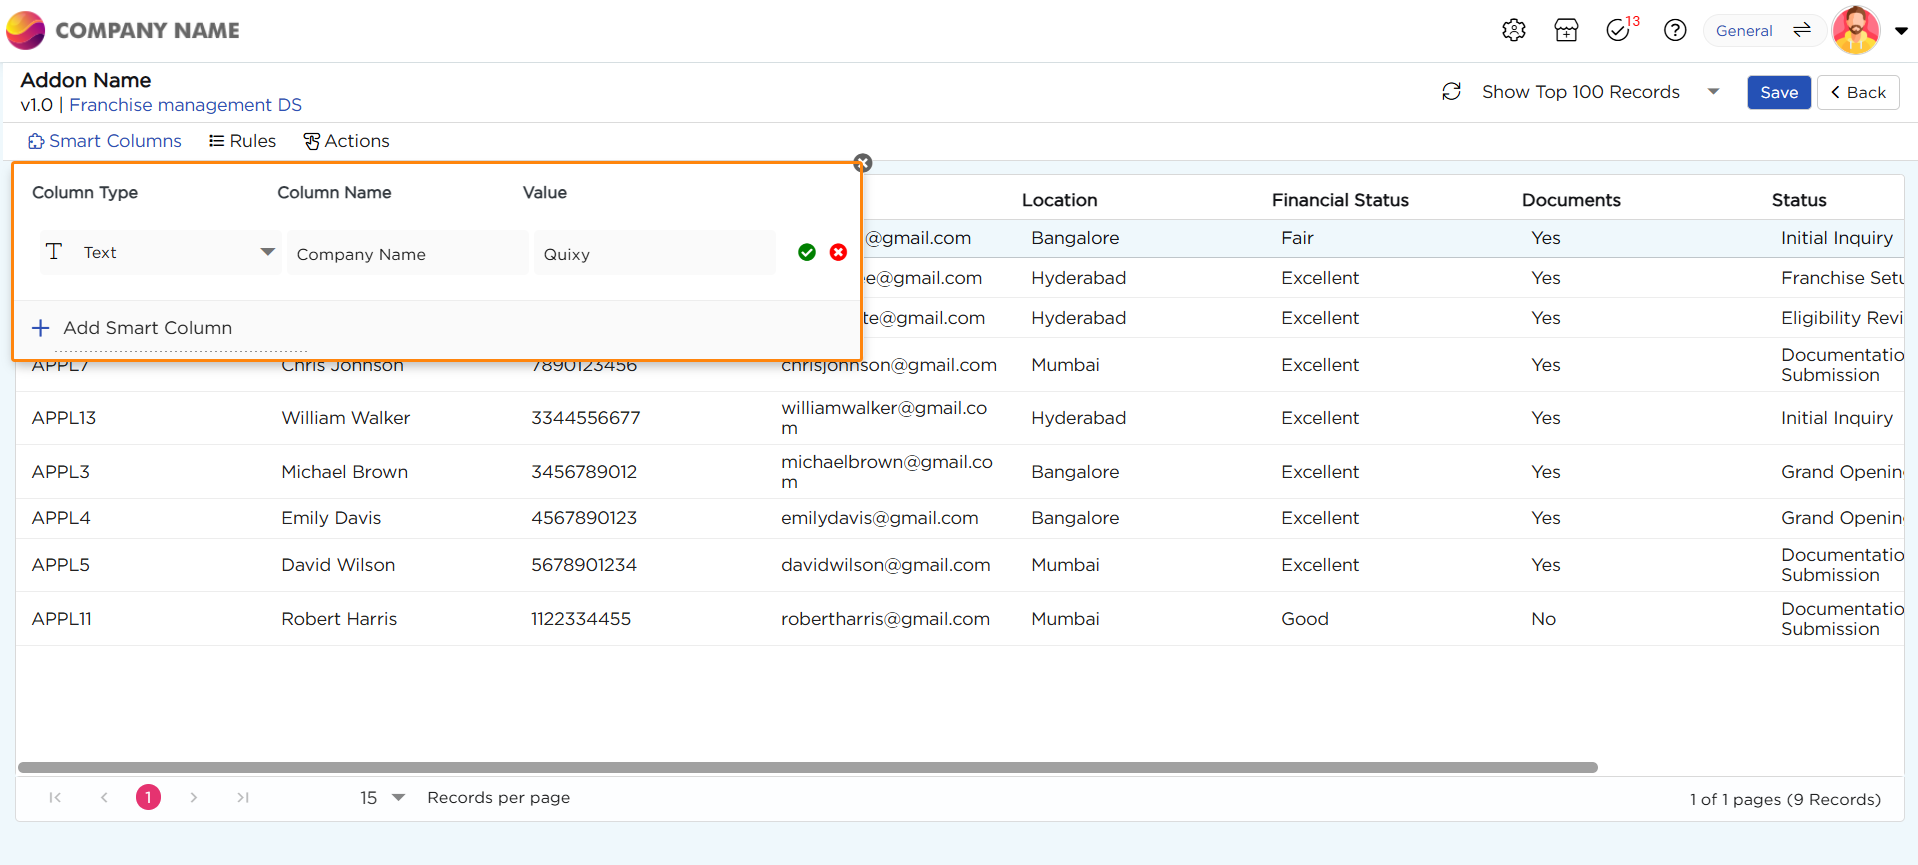
4. A new column is created with the specified name, and the static value is applied to all rows.
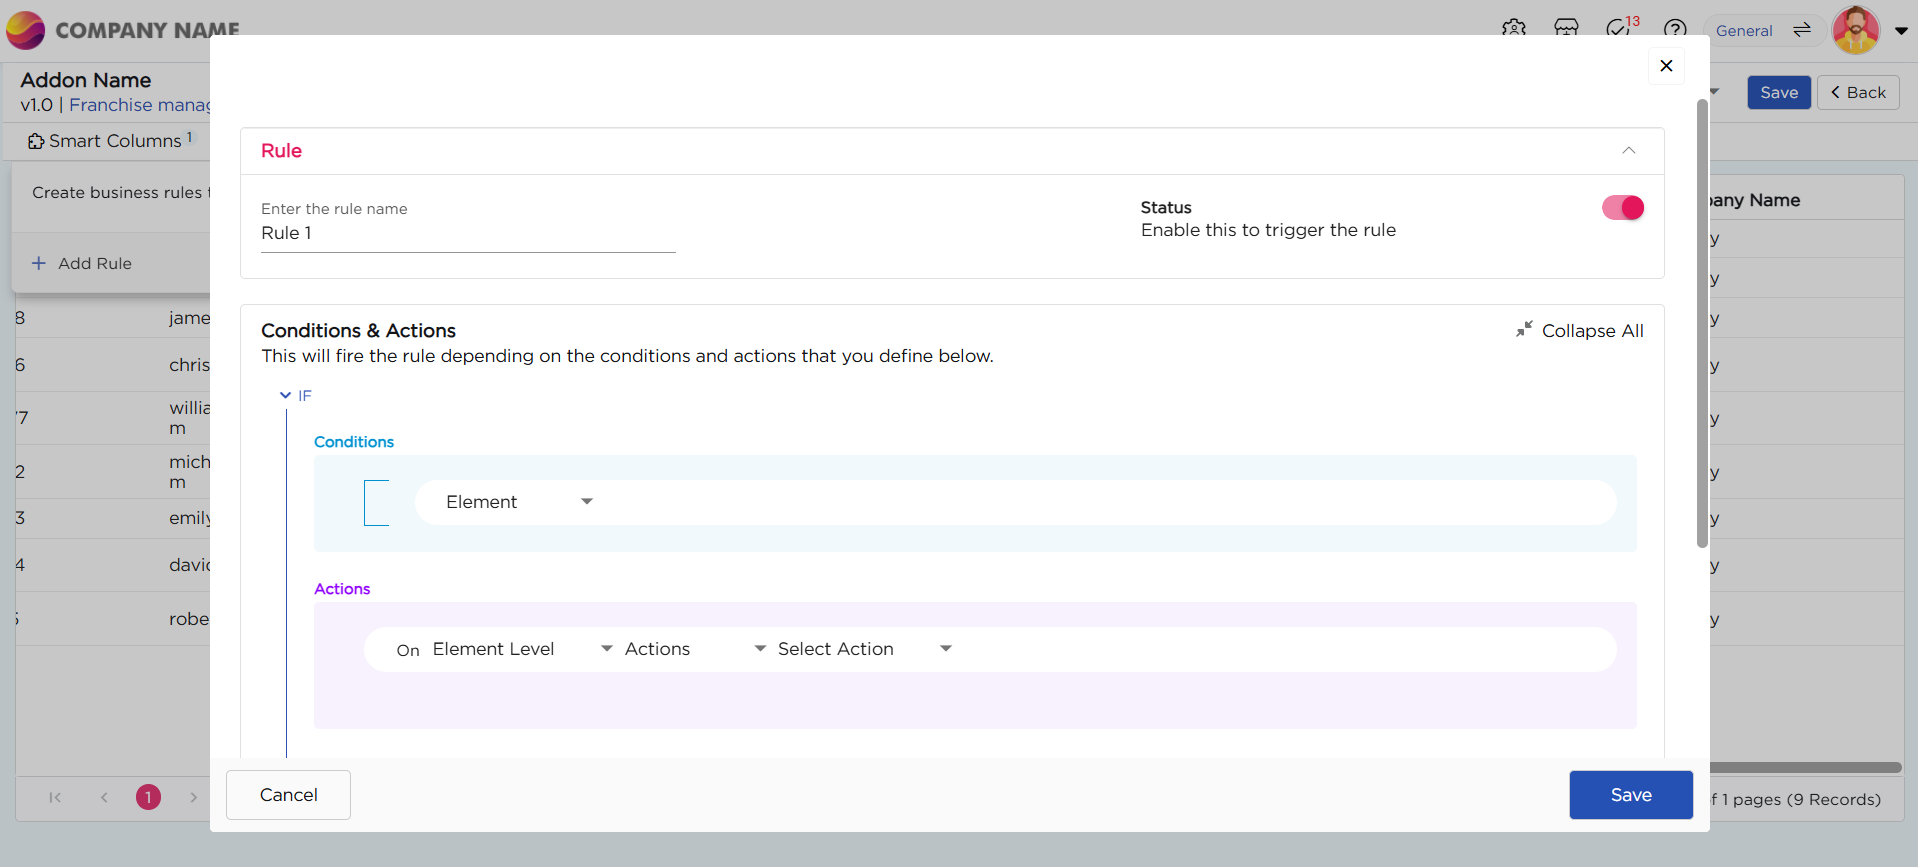
¶ Business Rules
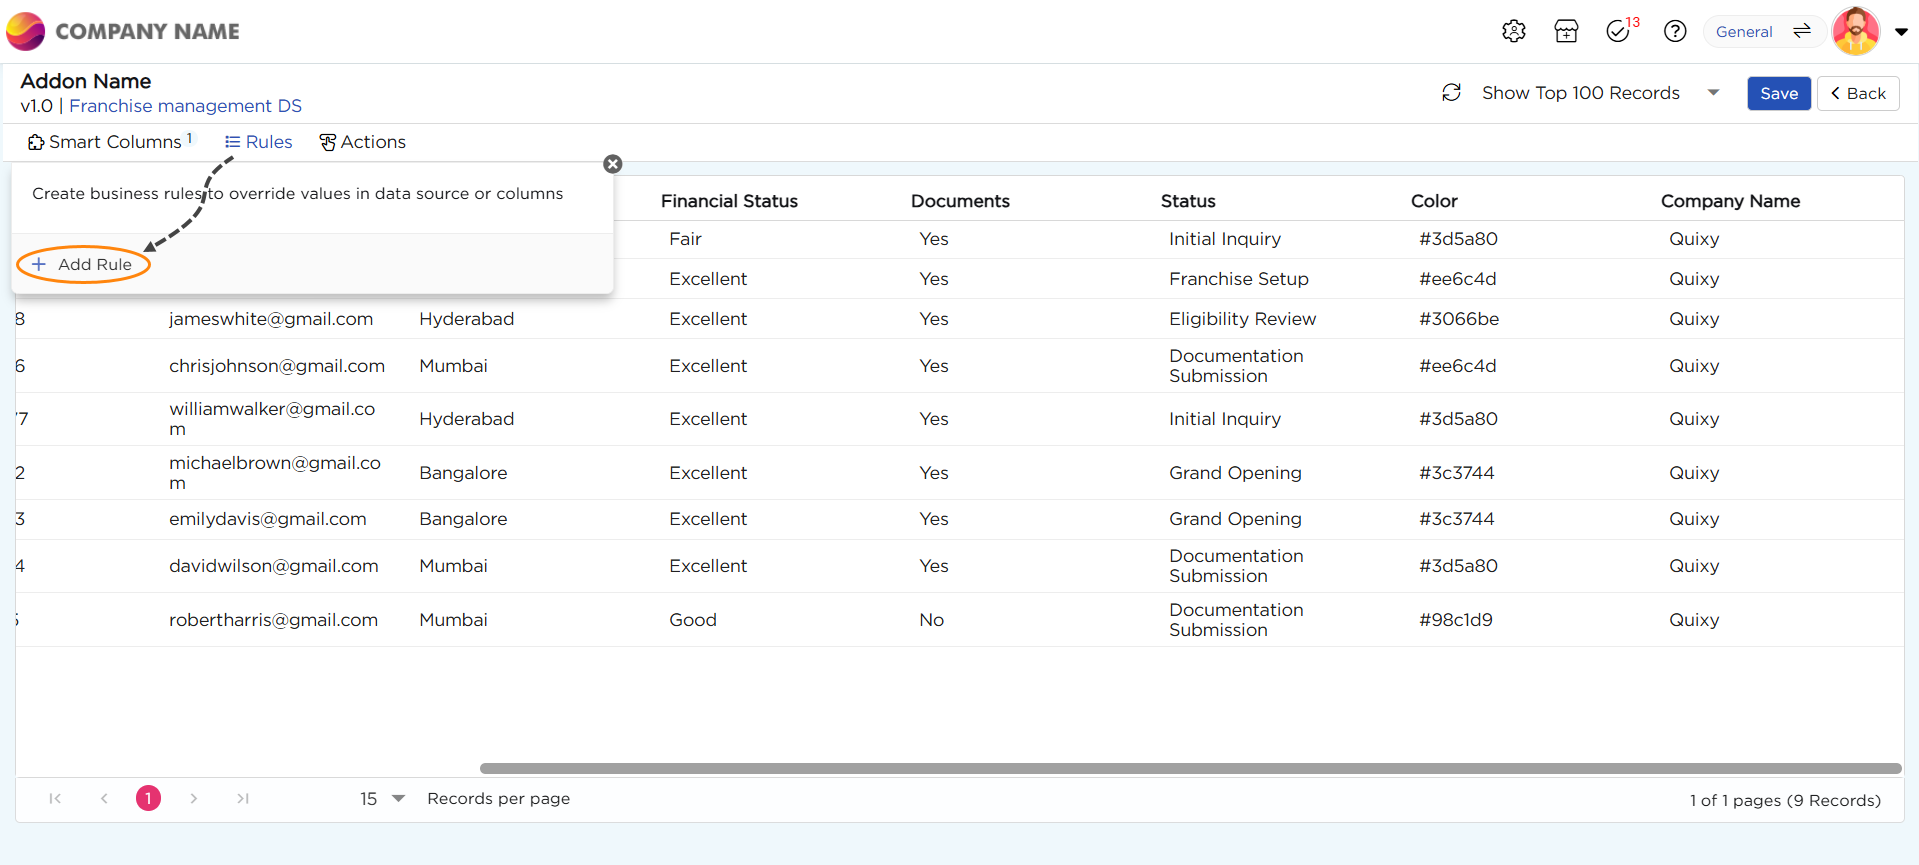
- Navigate to Rules and select Add Rule.

2. A pop-up appears; this allows you to define rules based on your requirements. Learn what Rules are and how to create them.

¶ Data Actions
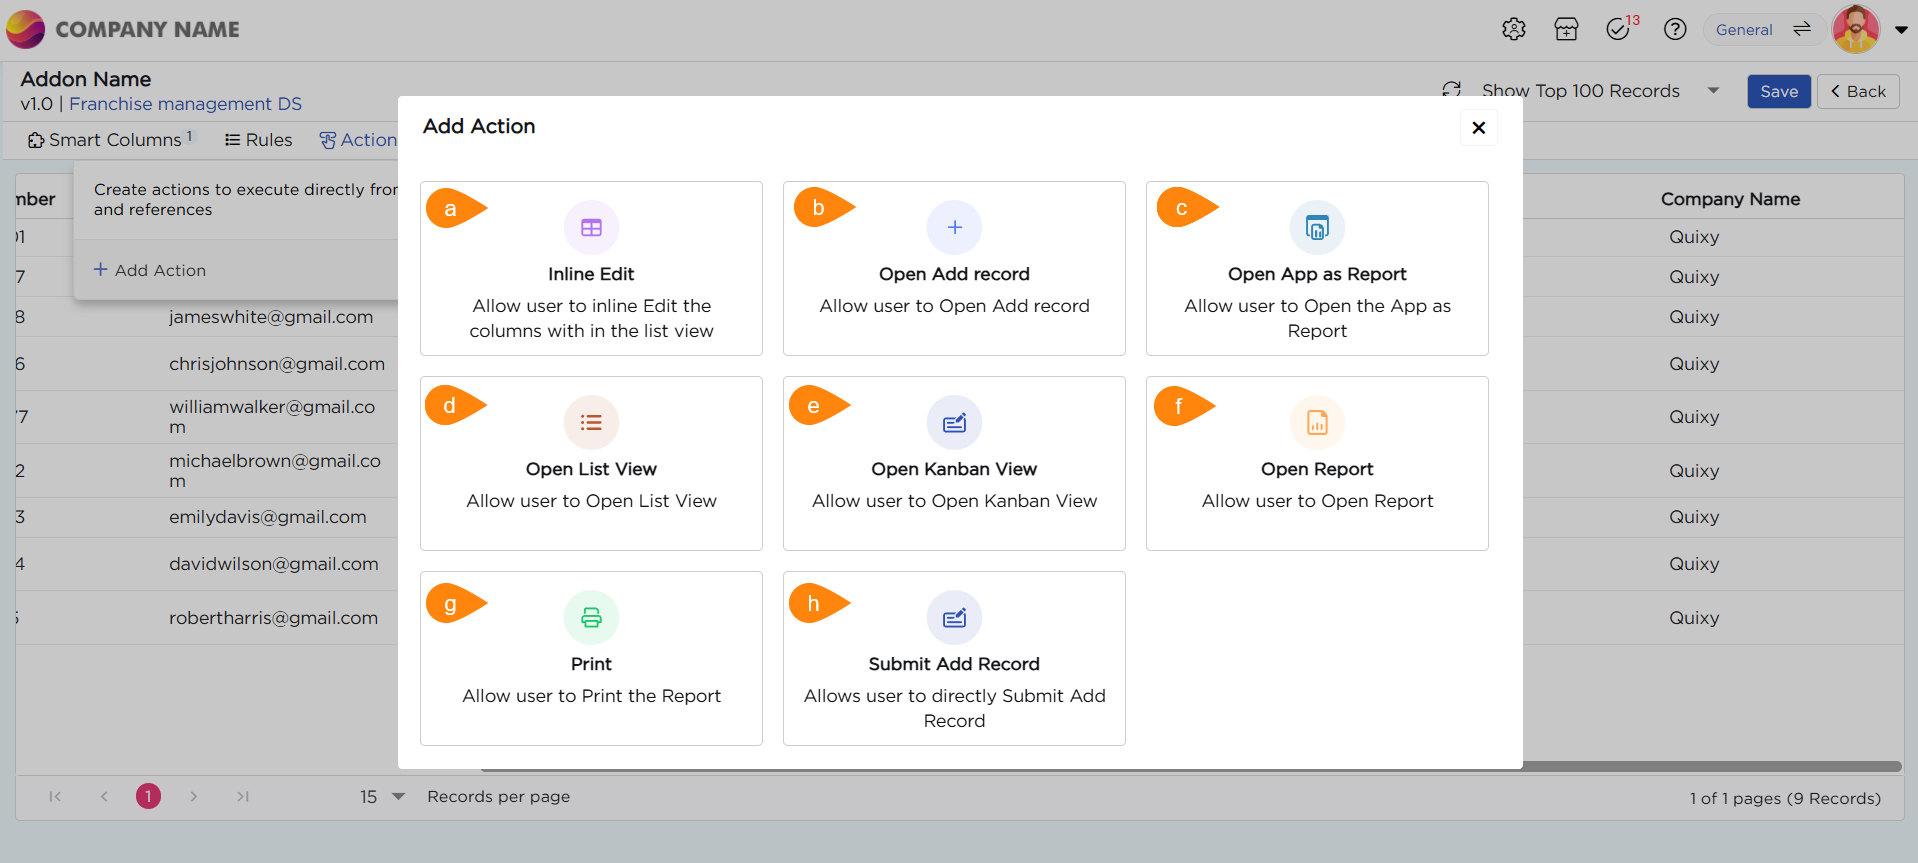
1. Navigate to Actions → Add Action.
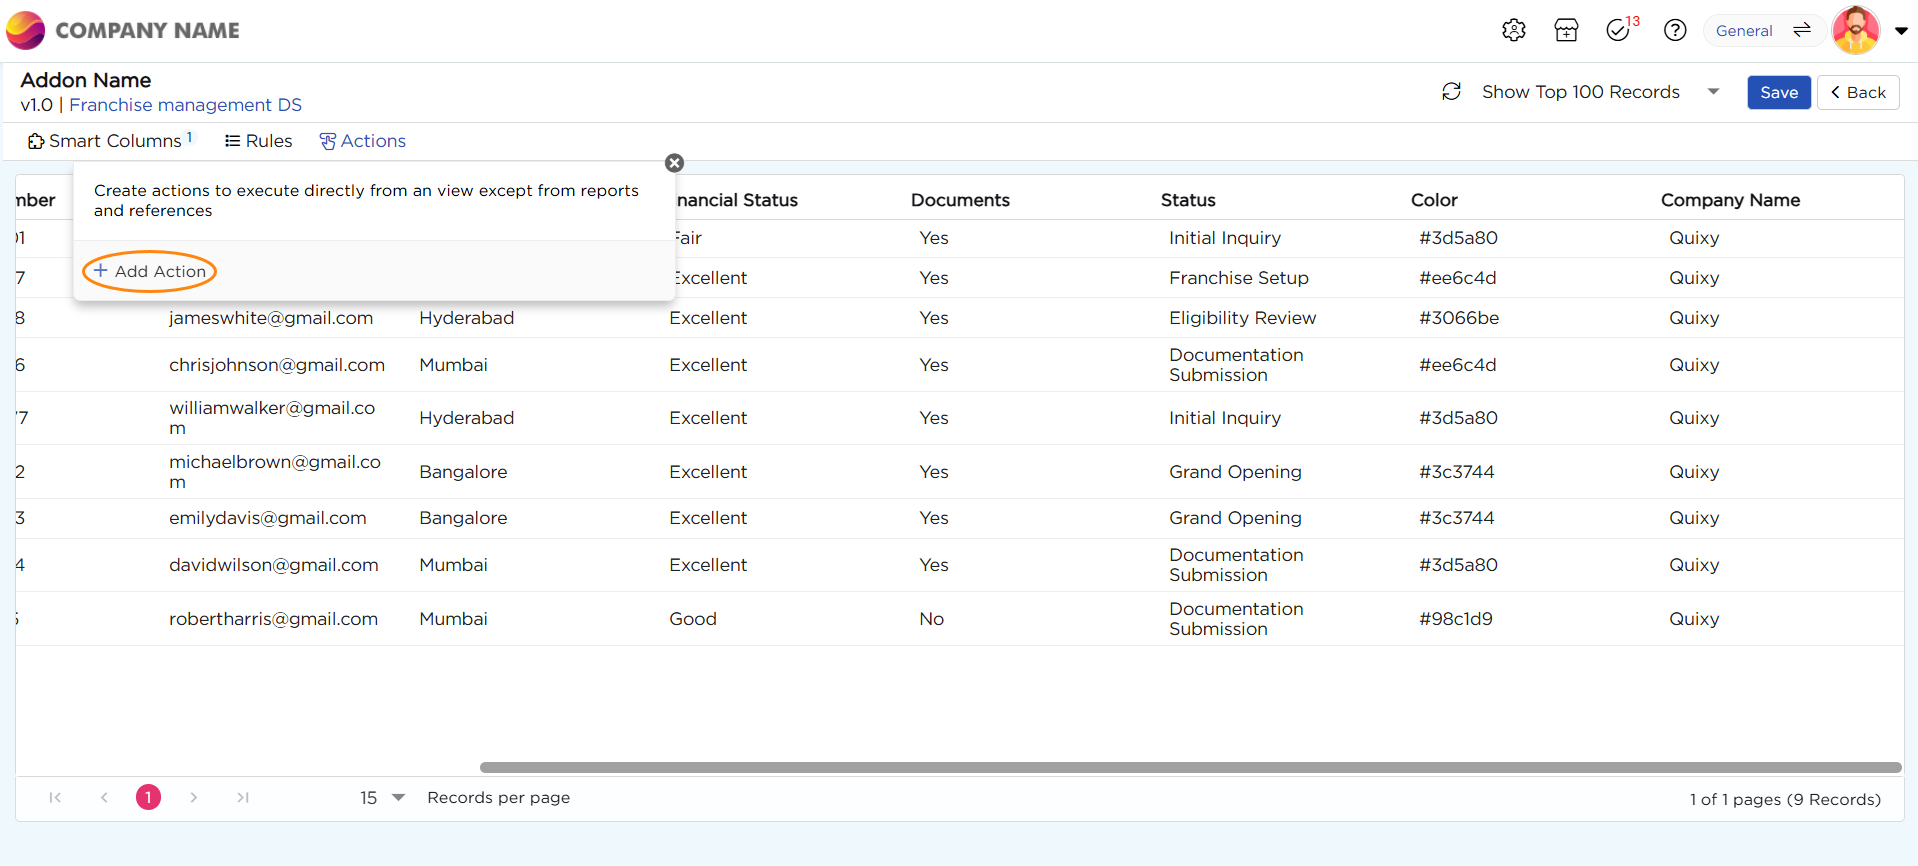
2. When you click on “Add Action,” a pop-up appears with 8 types of data actions, which are:


| S.No | Action | Definition |
|---|---|---|
| a | Inline Edit | Allow users to edit column data directly within the view, with the changes reflected in the corresponding tables |
| b | Open Add Record | Allow users to open an app in add record mode and perform transactions |
| c | Open App as Report | Allow users to open the App as Report |
| d | Open List View | Allow users to view the desired List view |
| e | Open Kanban View | Allow users to view the desired Kanban view |
| f | Open Report | Allow users to view the report (All Report Types) that is related to a record to make instant informed decisions |
| g | Allow users to print the Report | |
| h | Submit Add Record | Allow users to Submit Add Record directly from the list view |
3. Let’s use “Open Add Record” as an example to understand how to configure a data action.
4. Upon selecting “Open Add Record,” there appears a pop-up which consists of Action Details and Mapping.
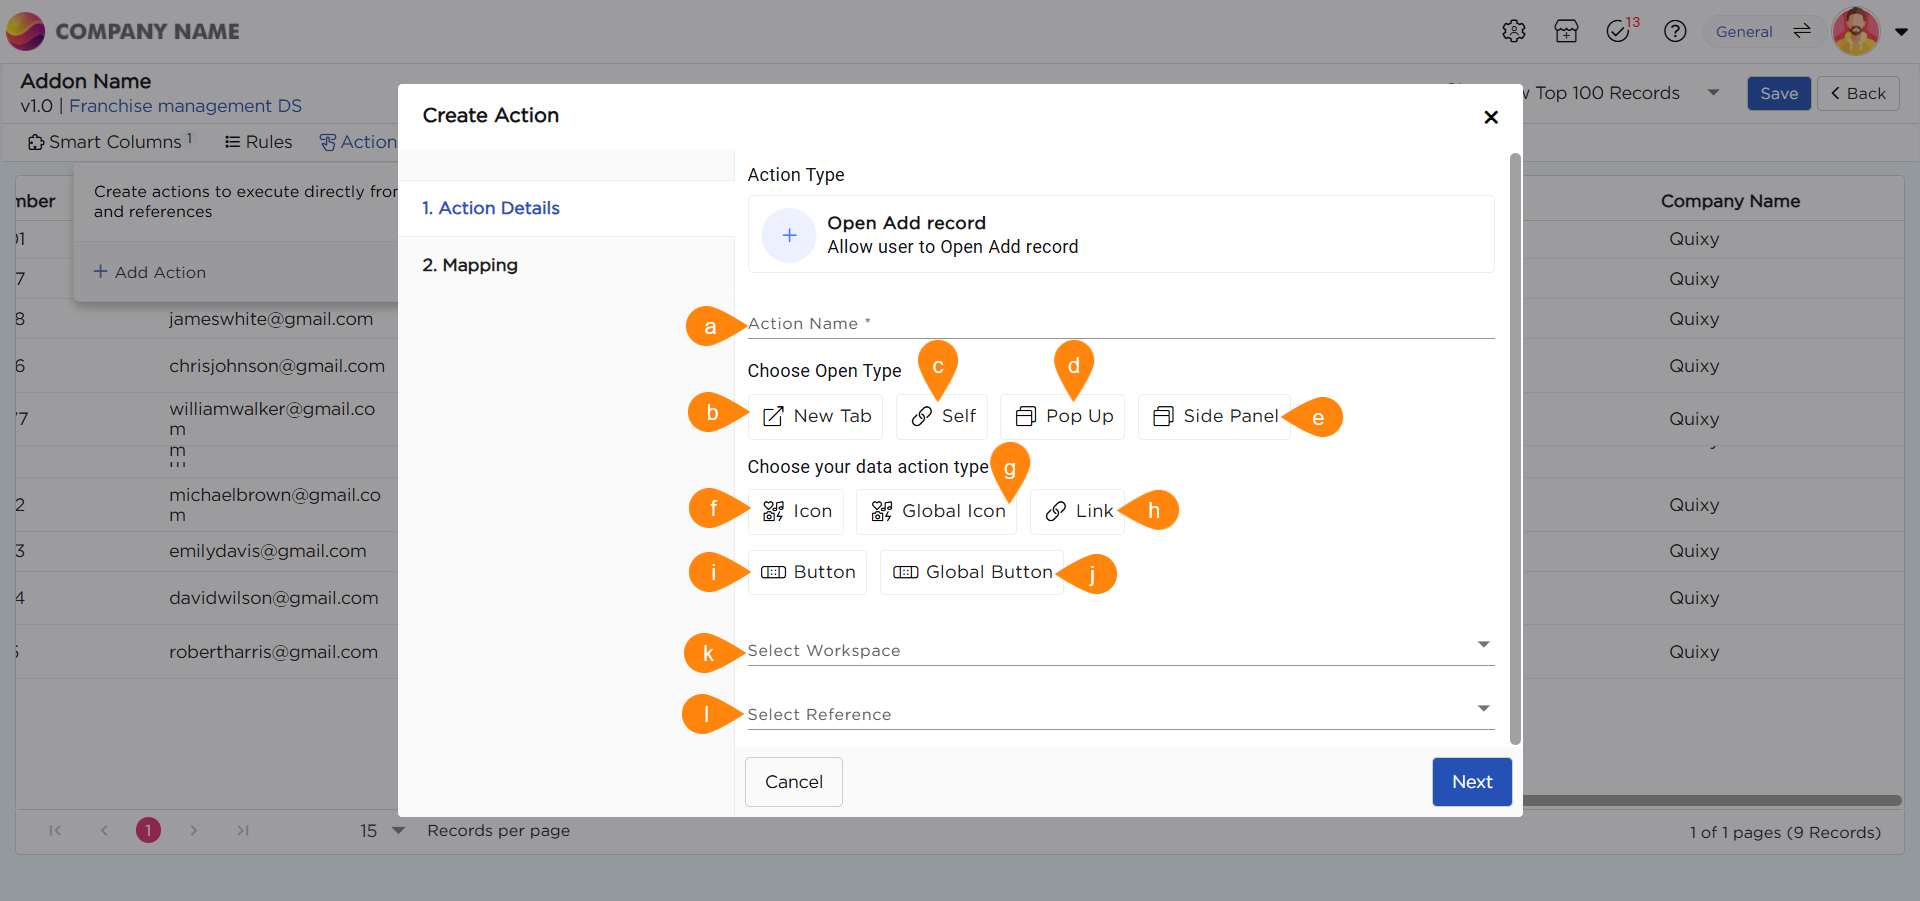

| S.No | Action Type | Details |
|---|---|---|
| a | Action Name | Provide a name for the action being created |
| b | New Tab | Opens the linked artifact or action in a new browser tab |
| c | Self | Opens the linked artifact or action in the current tab, replacing the existing view |
| d | Pop-up | Displays the linked artifact or action in a pop-up window within the same screen |
| e | Side Panel | Opens the linked artifact or action in a side panel, allowing users to view it alongside the current content |
| f | Icon | Select an icon to visually represent the data action type for easier identification |
| g | Global Icon | Choose an icon that is accessible and visible throughout the entire view |
| h | Link | Allows the name of the action or artifact to be linked, enabling easy navigation |
| i | Button | Displays the action in the form of a button for better visual emphasis and interactivity |
| j | Global Button | A button that is accessible and functional across the entire view |
| k | Select Workspace | Choose the workspace containing the artifact you want to open when the action is executed |
| l | Select Reference |
Select the specific artifact that should open when the action is clicked
|

¶ Mapping
After entering all the key details on the Action Details page, the next crucial step is mapping the elements. This process is essential for establishing a connection between the data source (such as a List View) and the relevant fields within the application.
¶ What is Mapping?
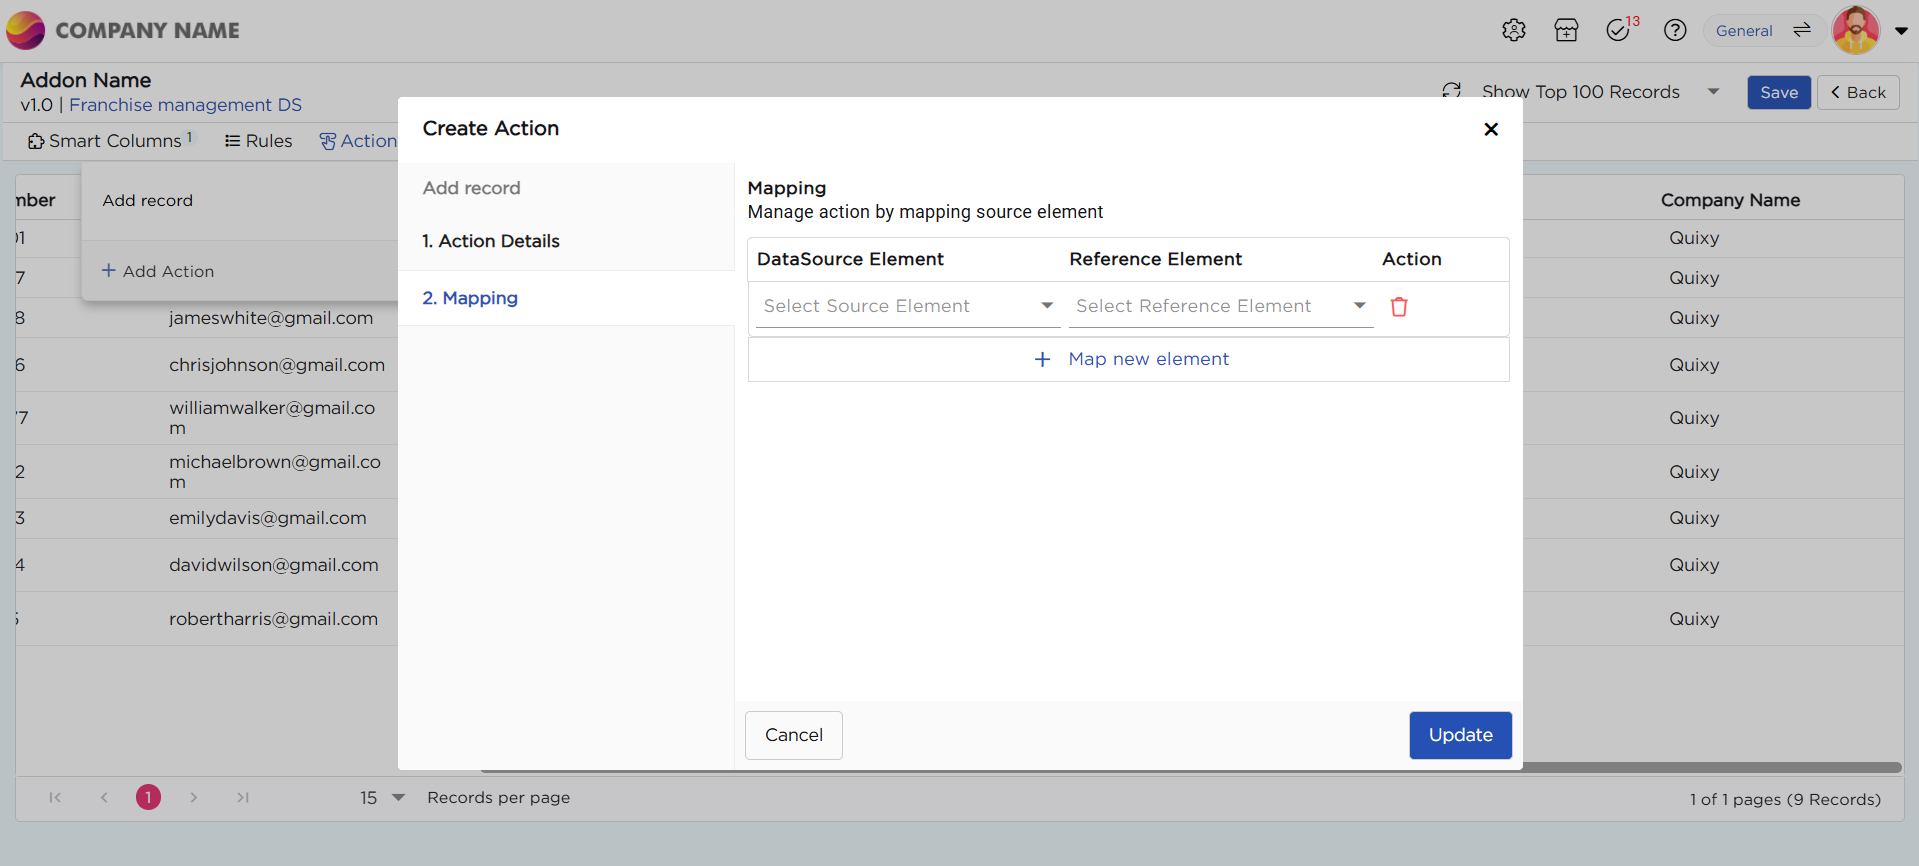
Mapping is the process of linking specific data elements from the source (List View) to their corresponding reference fields in the application. This ensures that when an action is performed, the correct data flows seamlessly between the two.
For example, if a List View contains a column for "Customer Name," you need to map it to the corresponding "Customer Name" field in the application. This way, any action performed on the List View—such as adding or updating records—will correctly reflect within the application.
¶ Data Source Element:
Refers to the element in the Data Source where the data originates. (e.g., Opening Date Column)
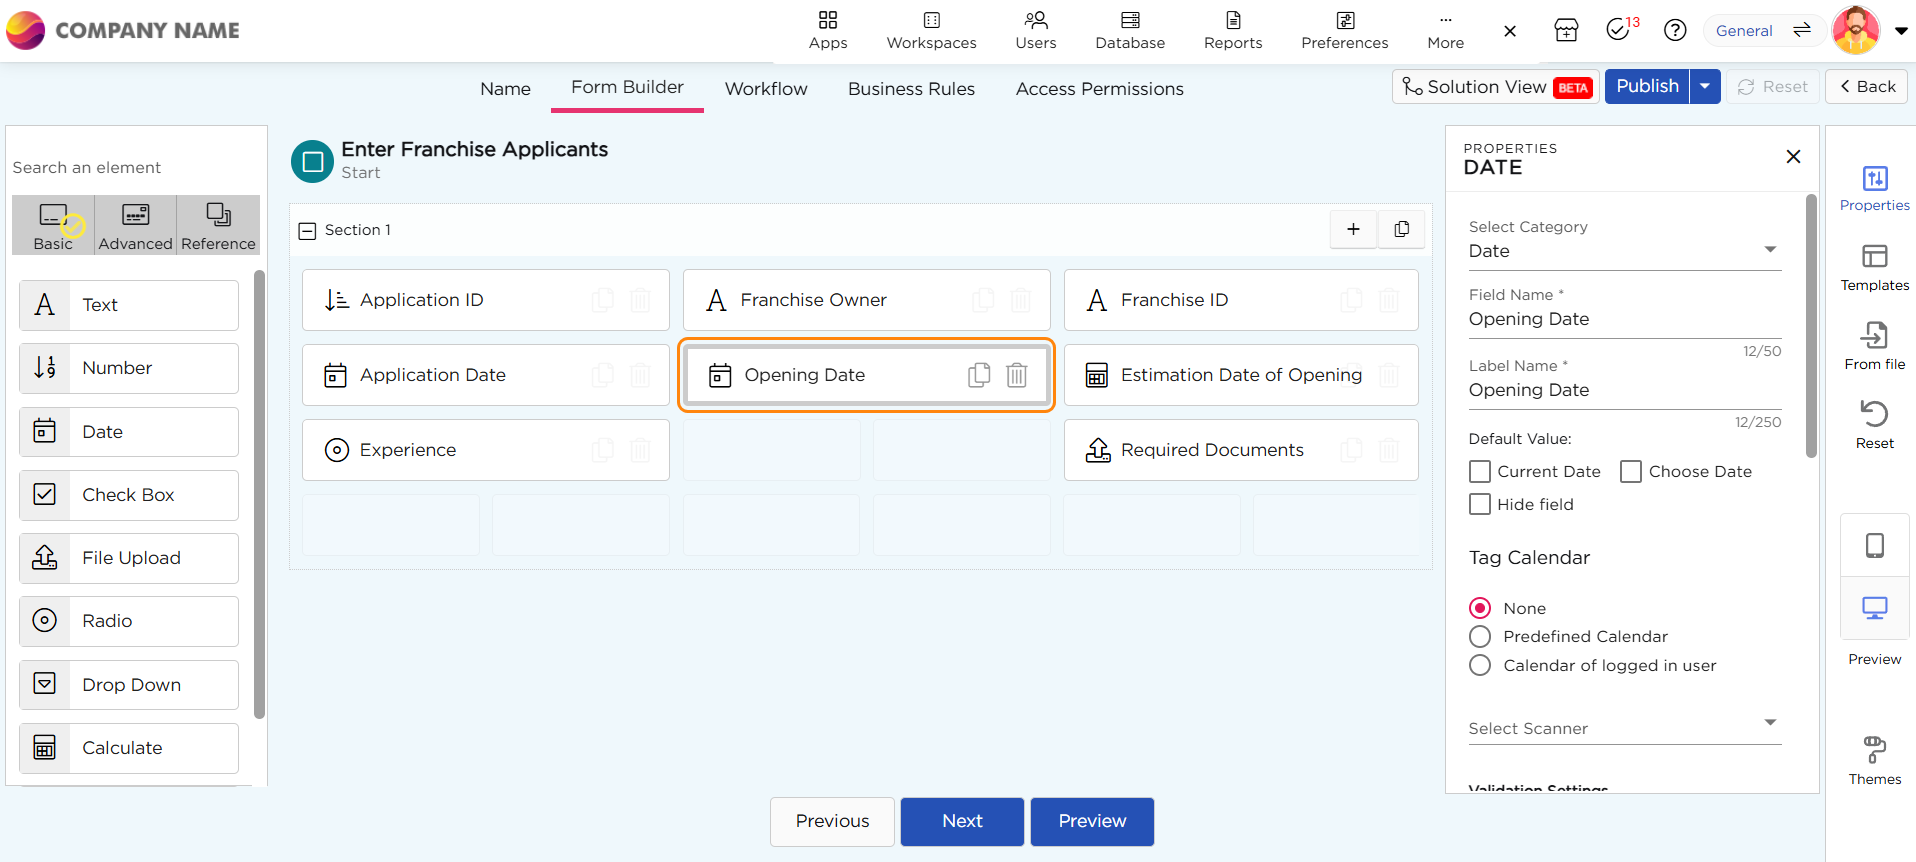
¶ Reference Element:
Refers to the specific field in the application where the data will be added or updated. (e.g., Opening Date Field)
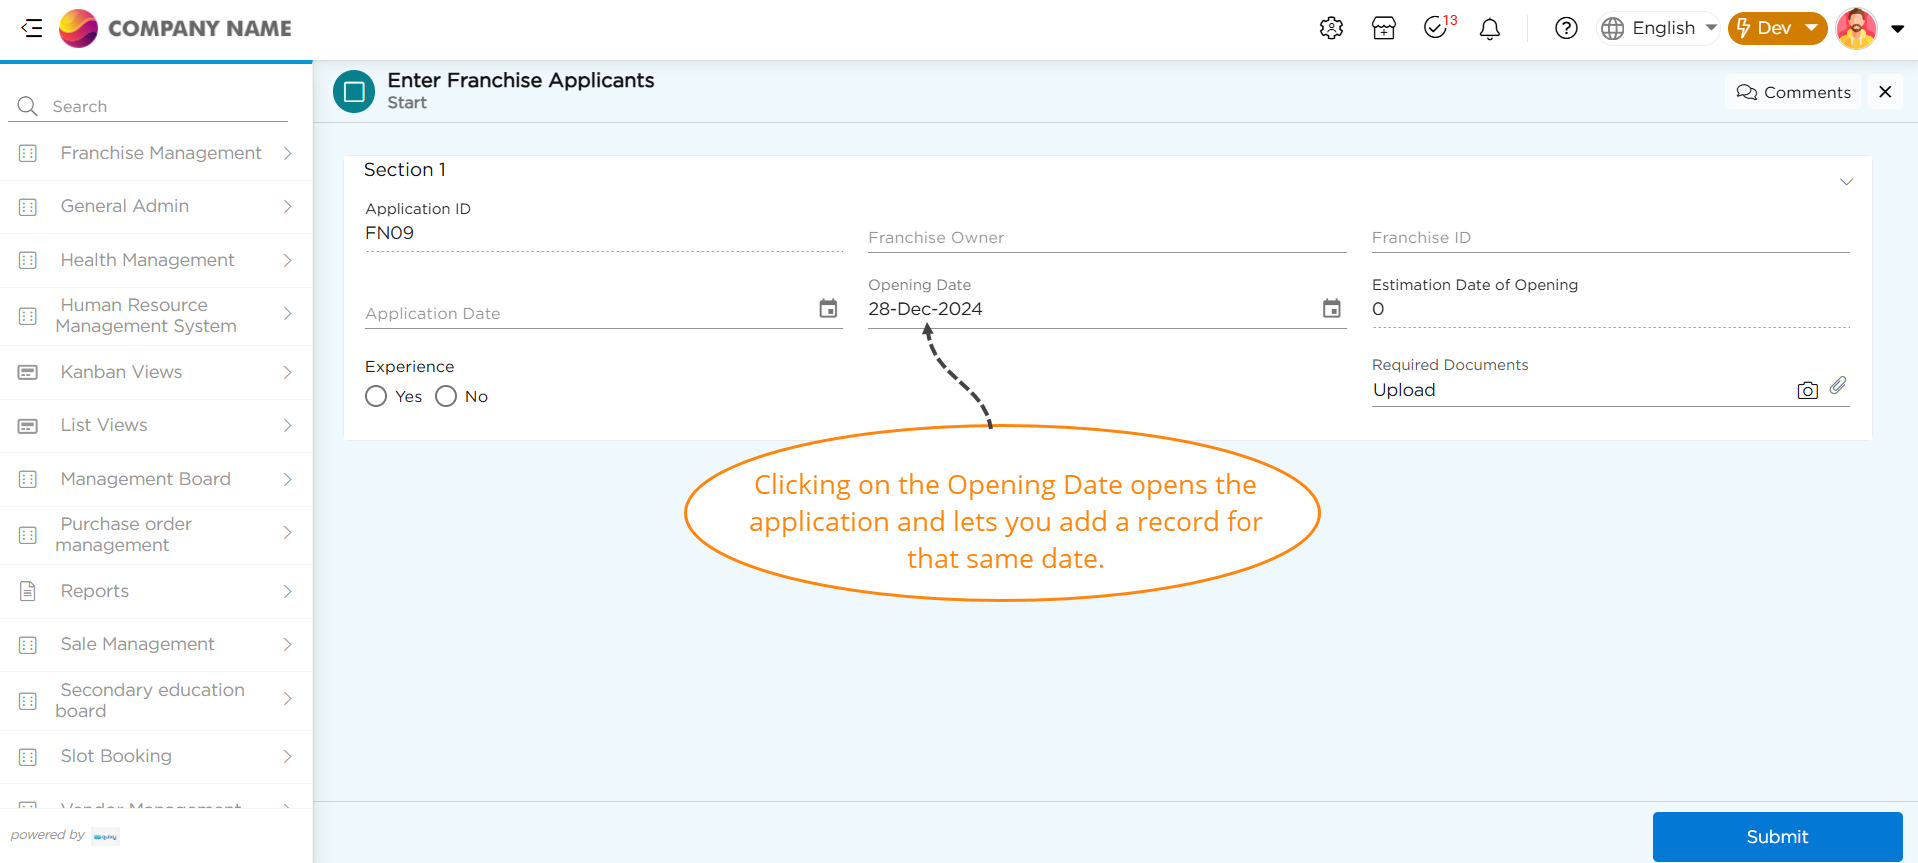
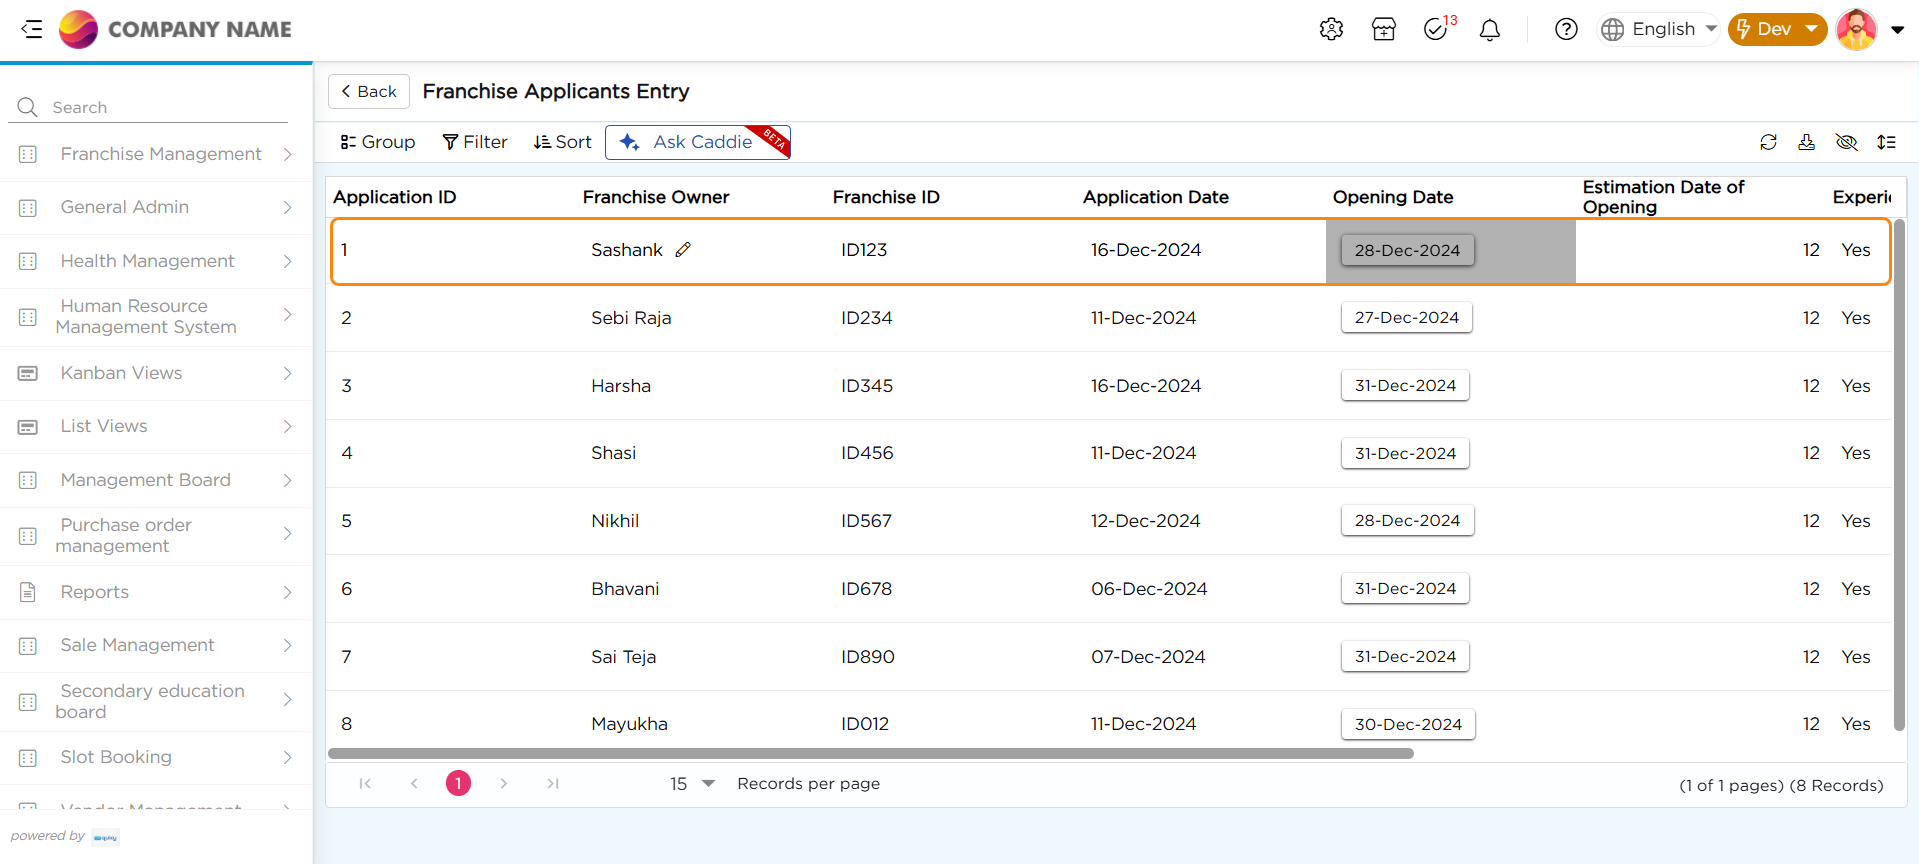
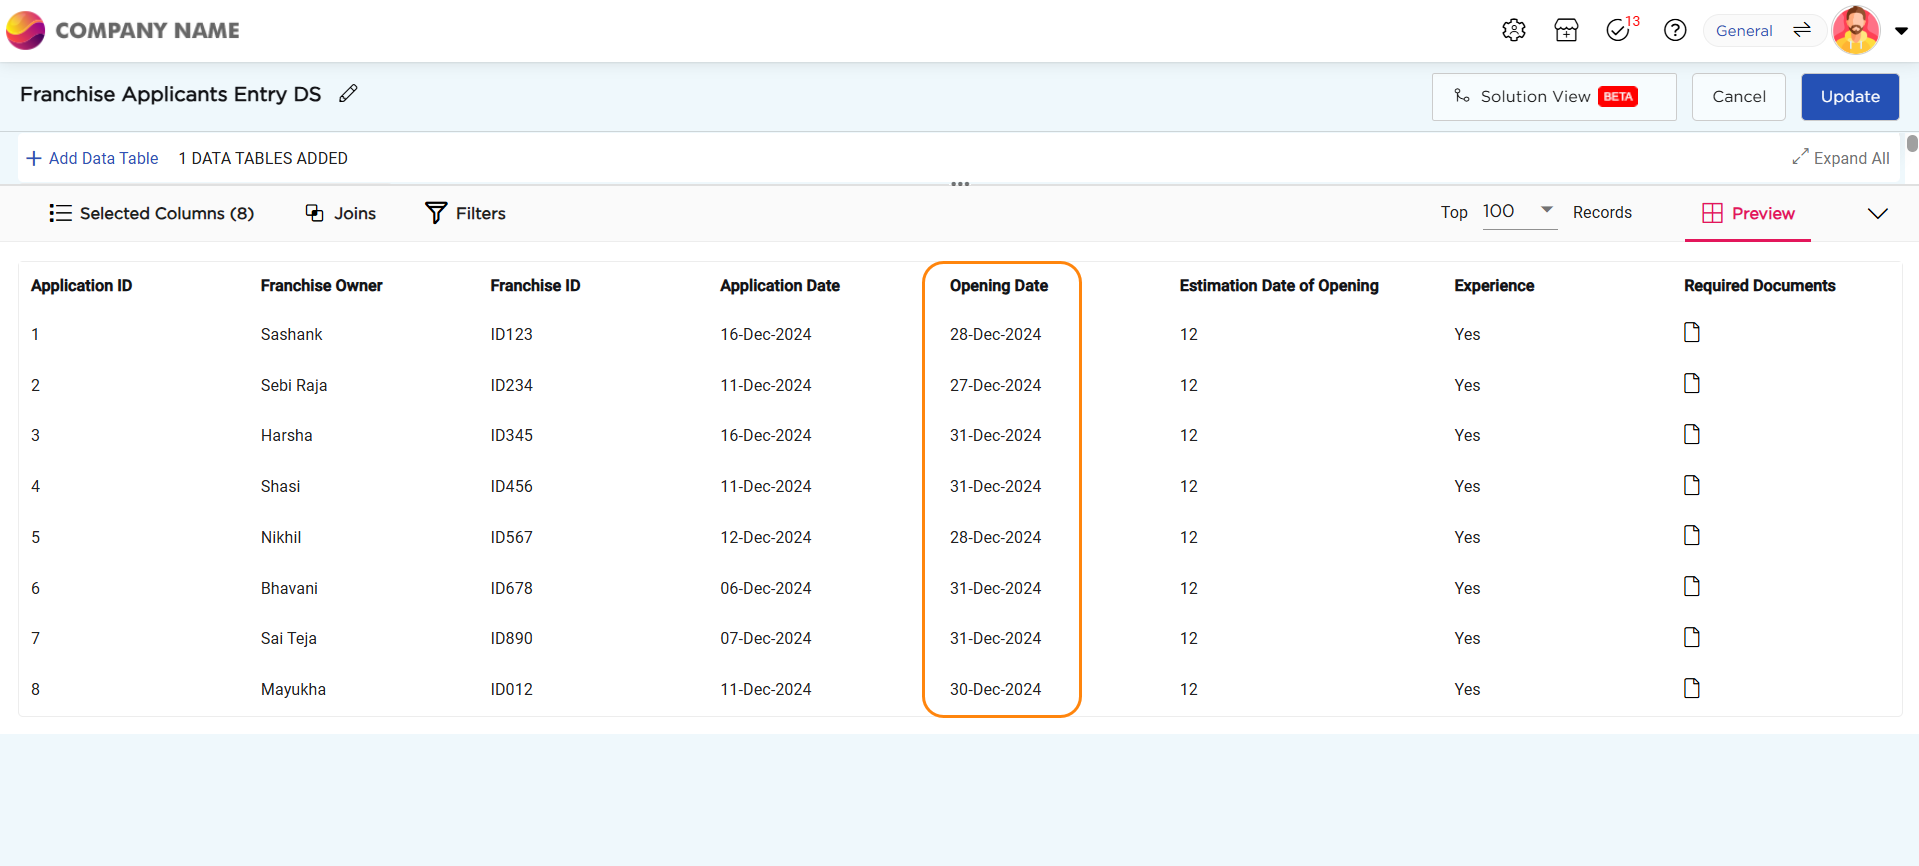
For example, we choose to “Open add record” action on the “Opening date” column in the list view using a “Button” action type that opens in a “New Tab”.

¶ Behavior of the "Open Add Record" Action:
- Since we configured the "Open Add Record" action on the “Opening Date” column in the list view.

- Now, let’s click on the “Opening Date” on the selected row.