A task is an activity that needs to be completed within a defined period or by a deadline to achieve work-related goals. It is a fundamental unit of work that helps differentiate various components of a project. Tasks are essential in managing workflows and ensuring that work is completed efficiently and on time.
Manage Icons Visibility
The Manage Icons Visibility allows administrators to decide whether icons for Notifications and Tasks should always show up to the end-users at the top of their screen or only appear when there are new messages or tasks. This feature provides flexibility in managing the visibility of these icons based on user preferences, ensuring that users can easily access important information.
![]()
Walk-through of the Tasks page
The Tasks page is a central hub for managing tasks within an organization. It provides a plethora of detailed options, each important in understanding the purpose of a task. Everything on the Tasks page is designed to provide a comprehensive view of tasks and their status.
How to Create a Task?
In the platform, a task is usually created as part of the workflow. On the task page, any user can, nevertheless, manually create a task and designate the intended user.
- Go to the Tasks -> Create Task.
- In the popup screen, select the workspace, application, and assignee. Choose between recurring or one-time task.
- If it's a recurring task, set the start and end dates. For a one-time task, set the start date and deadline in hours.
- Provide a clear task name and any additional information for the assignee.
- Click Save to create the task. It will be assigned to the chosen user or role.
- You'll receive a confirmation message once the task is successfully created.
- There are numerous features in Tasks. You can manage tasks, check deadlines, and do a lot more in the task section.
- Organizational administrators can locate and manage team tasks as well as view their own tasks in the My Tasks section. As shown in the image below.

Task Toast Notifications
Task Toast Notifications help you stay updated on new tasks with pop-up cards in the top right corner of your screen, showing task message, assignee, and source workspace/application. For urgent tasks, you can click the card to open the task page in a new tab, keeping your current work undisturbed. For less important tasks, simply close the notification and review them later.
Organizational admins can turn on the toast notifications by navigating to the Admin menu, then selecting Preferences -> General -> Toast Notification for Task.
Admins/Users can always choose to turn on/off the toast notification by navigating to My Profile -> Preferences -> Task Toast Notifications.
Configuring Task Toast Notification
Live Experience
Task History
The History functionality provides a detailed record of actions taken on a task, including who created it, when it was modified, and at what stage it currently resides in the workflow. This feature is especially useful for tracking the progress of tasks and understanding their status at any given time.
Imagine a scenario where a patient submits an application for treatment. Using the History feature, you can track when the task was created, who created it, and how it progressed through different stages, such as review by a compounder and scheduling of an appointment with a doctor. Finally, the History would show whether the doctor accepted or rejected the request at the specified time.
By providing a comprehensive overview of task history, including creation dates, modifications, and current status, the History feature enhances transparency and accountability. It allows users to easily understand the journey of a task, from its inception to its current stage, making it easier to manage workflows and ensure timely completion of tasks.
Complete/Perform a Task
Users can perform tasks directly from the Tasks page by selecting a task need to perform an action and clicking on the action button. This feature simplifies task management and allows for easy tracking of completed tasks.


Multi-Select Tasks
Select multiple tasks at the same time to assign those selected tasks to another user or colleague in just few clicks.

Custom notifications for task reassignment
CDs can personalize email templates with unique content when tasks are reassigned. This feature ensures clear communication for each reassignment. Users who prefer a more personalized approach can create their own customized templates.
Configuration:
Output:

Provision to see User Name and Created Date in Task Name column
What users can see:
- The name and profile picture of the task creator.
- The creation date of the task, as displayed in the image below.

Provision to see Task Status
Users will now see different colors for task statuses based on their stage. As shown in the diagram below, there are three different status stages.
- Open (Light Blue Color): If the task deadline has not yet been met, the task status will be open.
- Completed (Green): When the task is finished. Users will see the Turn-Around-Time below the completed status, in addition to the task completed status, as shown in the image below.
- Overdue (Red Color): When a task is not completed before the deadline, its status changes to Overdue.

The due date and delay time are shown in a separate column in the task grid, as shown in the image below.

Provision to see App/Workspace info
Users will also be able to see:
- App Icon and App Name from which the task is created.
- Workspace Name, as shown in the image below.

Provision to add more columns to the task's Grid
Users can add multiple columns to the task's grid on the My Tasks page.

When an app is published by the app-builder, three fields can be selected (i.e., Select three field elements to show data in tasks), and these field will appear in the task's grid as shown in the image below.

Group, Filters, and Sort
To simplify the process of finding tasks that need to be completed, the Tasks page offers three options: sorting, grouping, and filtering, all of which use the same parameters.
Grouping: This feature is particularly handy as it allows you to control how tasks are displayed.

Users can select specific values to group tasks accordingly, as demonstrated in the image above.

As shown in the image above:
- Users can re-arrange the groups by holding the re-arrange icon provided.
- Users can delete the configured groups one at a time by clicking on the delete icon.
- Users can clear all the configured groups at once by clicking on the Clear All option.
The tasks which are grouped according to the selected value are shown in the image below.

Filter: Filtering, or temporarily hiding, data in tasks page is simple. This allows you to focus on specific tasks.
Users can select the columns (values) and filter the tasks accordingly, as shown in the image below.
Now, you can use NLP (Natural Language Processing) to filter content with ease. Instead of adjusting filter settings manually, simply type your criteria in plain language, and NLP will transform your words into precise filters. This intuitive and efficient feature makes navigation hassle-free, whether you're working with Reports, exploring List Screens, or managing Tasks and Recurring Tasks.
As shown in the picture above:
- Users can define the filters using the different conditions provided.
- Users can delete the applied filters one at a time by clicking on the delete icon.
- Users can clear all the applied filters at once by clicking on the Clear All option.
The tasks which are filtered according to the selected value are shown in the picture below.

Sort: Sorting Tasks is a common spreadsheet task that allows you to easily reorder your tasks.

Users can select the fields and Sort the tasks accordingly, as shown in the image below.

As shown in the picture above:
- Users can re-arrange the Sort by values by holding the re-arrange icon provided.
- Users can delete the sorted values one at a time by clicking on the delete icon.

Provision to manage Team Tasks
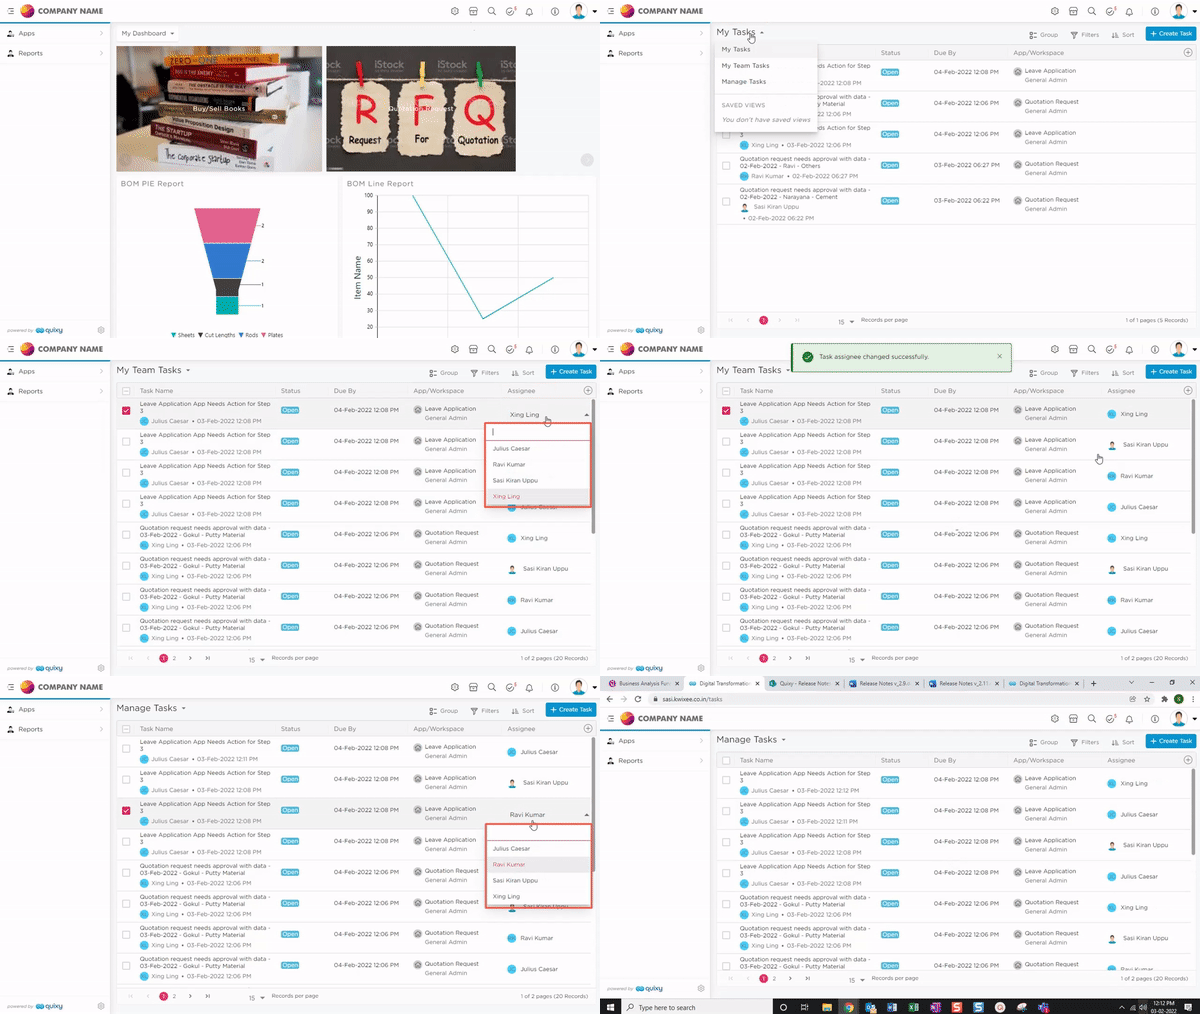
Assume any user is a manager in an organisation with employees reporting to the user. In that case, the manager will now have a new option, My Team Tasks, to manage his/her team tasks directly on the My Tasks page, as illustrated in the image below.

The manager will be able to perform tasks on behalf of his employees or reassign them to other employees under My Team Tasks.
Reassigning team tasks will be easier than ever before. With two clicks, you may reassign any assignment to any user. Have a peek at the GIF below.

Provision to Manage Tasks

If a user is an organisation or workspace admin, the admin can view the tasks of all users in that organisation or workspace. As shown in the image below, the admin can either close any task or reassign it to another user.

Provision to create multiple views from tasks list using groups, filters, and Sort
Users will now have an option to save a custom view.
1. Users can Group, Filter, or Sort the tasks according to their requirements.
2. The tasks are grouped according to the user who created the task, as shown in the picture below.
3. Users can save the customized view. Whenever the user opens the tasks page, the saved view will open on the task page.

4. Users can see the saved view under the My Tasks drop-down, as shown in the picture below.

In the saved view page, users can make changes in the saved view and use the option Save As from the 3-dot menu to save the changes or rename the saved view or delete the saved view.

Users can now configure to place the saved views on the dashboard as dashlets, as shown below.
1. Users should select the Dashlet Category as Tasks.
2. Users will find the saved view in the Select Sub Type drop-down.

3. Users can see the saved view on the dashboard.

Streamlining Task Management
Now, the "Participated Tasks" option is located exactly where you need it—in the Tasks page's drop-down menu. We've simplified the procedure to save you time and inconvenience; there's no need to browse through numerous menus.
This modification makes task management simple. You can easily download, print, and review the comments made about your participation. We have redesigned the interface to provide you with easy access to the tasks you have completed. Enjoy a more seamless and effective approach to managing your assignments.
Follow the GIF below to understand the streamlined process of Task Management.
%20GIF.gif)
.png)


