.png)
Quick Flows
- 5 Minutes to read
- Contributors


Quick Flows
- 5 Minutes to read
- Contributors
Article summary
Did you find this summary helpful?
Thank you for your feedback!
Quick Flow is a predefined action that automatically takes place after a record is submitted in an app. It helps streamline workflows by eliminating manual follow-ups and triggering necessary actions instantly. For example, after submitting an employee record, Quick Flow can open another app for additional details, generate a printable report, or redirect users to a related report for quick review. This ensures a smooth and efficient process without extra effort from end-users.
Types of Quick Flows
Quick Flows offer several actions that can be triggered automatically after record submission:
Add Record in a New App: Open another app in add record mode immediately after submitting a record in the current app, allowing data sharing between the two apps.
Open App as Report: Open another app in Read-only mode immediately after submitting a record in the current app, enabling data sharing between the two apps.
Open Kanban View: Displays submitted records in a Kanban-style layout for better visualization.
Open List View: Presents submitted records in a structured list format for easy navigation.
Print App Report: Print a report in app format along with data immediately after submitting a record, capturing the application's screenshot along with entered data.
Print Label/Receipt: Automatically generates and prints a label or receipt with relevant details as soon as the record is submitted
Print Report: Instantly generates and prints a report based on submitted records.
How to Create Quick Flows
Follow these steps to set up Quick Flows in app:
Open the app where you want to configure Quick Flows.
Go to the Events tab and select the Quick Flows section.
Click the + Add button to create a new Quick Flow.
Enter a Name for the Quick Flow.
Choose the relevant Workflow Step and Workflow Step Action.
Select the desired Quick Flow Type from the dropdown list.
Click Next to proceed to the Conditions tab.


Configuring Quick Flows Based on the Selected Type
Once a Quick Flow Type is selected, the configuration steps in the Conditions tab may vary based on the chosen action.
Add Record in a new app:
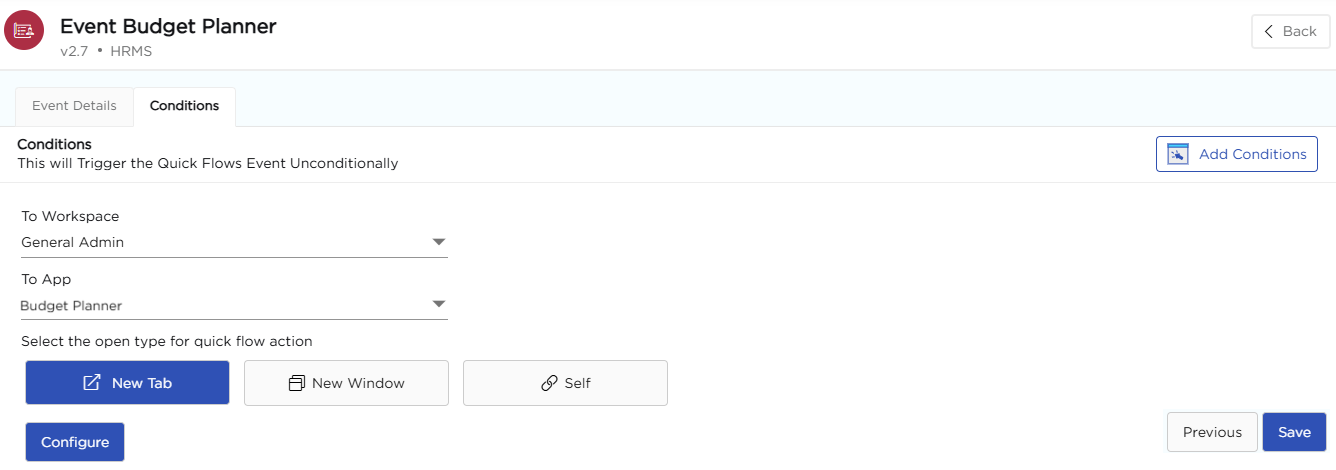
In the Conditions tab, specify when this Quick Flow should be triggered by clicking the Add Conditions button and defining conditions if required. By default, it is set to trigger unconditionally.
Choose the Workspace where the target app is located.
Select the App where the new record should be added.
Next, Select How the App Should Open:
New Tab: Opens the app in a new browser tab.
New Window: Opens the app in a separate window.
Self: Opens the app in the same window.
Click Configure to proceed.
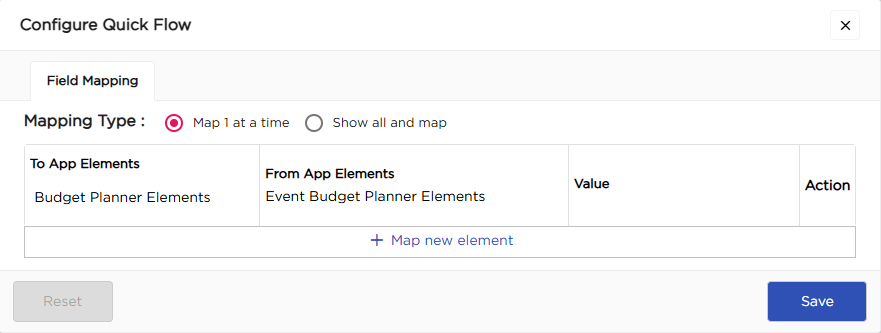
Upon clicking Configure, a pop-up titled Configure Quick Flow will appear, allowing you to map fields from the source app to the target app. In the Field Mapping tab, select the desired mapping type:
Map 1 at a time: Allows manual mapping of individual fields.
Show all and map: Displays all available fields for bulk mapping.


Once all configurations are saved, when a record is submitted in the source app, the designated app will open in Add Record mode, allowing data from the source app to be transferred smoothly to the target app.
Open App as Report:
When the Quick Flow Type is selected as Open App as Report, follow these steps to configure the Quick Flow:
In the Conditions tab, specify when this Quick Flow should be triggered by clicking the Add Conditions button and defining conditions if required. By default, it is set to trigger unconditionally.
Select the Workspace and the App that should open as a report.
Choose how the app should open: New Tab, New Window, or Self.
Click Configure to proceed.
In the Configure Quick Flow pop-up, go to the Field Mapping tab, select the mapping type, and map the required fields between the two apps.
Click Save to complete the configuration.
Now, whenever a record is submitted, the selected app will automatically open as a Report, displaying the mapped data.
Open Kanban View / Open List View:
When the Quick Flow Type is selected as Open Kanban or Open List View, follow these steps to configure the Quick Flow:
In the Conditions tab, specify when this Quick Flow should be triggered by clicking the Add Conditions button and defining conditions if required. By default, it is set to trigger unconditionally.
Select How the View Should Open: New Tab, New Window, or Self.
Click Configure to proceed.
In the Configure Quick Flow pop-up, go to the Field Mapping tab, select the mapping type, and map the fields between the source app to the target List View or Kanban View.
Click Save to apply the changes.
Print App Report:
When the Quick Flow Type is selected as Print App Report, follow these steps to configure the Quick Flow:
In the Conditions tab, specify when this Quick Flow should be triggered by clicking the Add Conditions button and defining conditions if required. By default, it is set to trigger unconditionally.
Choose how the app report should open: New Tab, New Window, or Self.
Click Configure to open the Configure Quick Flow pop-up.
In the Add Permissions tab, click Enable Permissions to customize print permissions.
Configure permissions for each section of the app:
Show: Include the section in the printed report.
Hide: Exclude the section from the printed report.
Custom: Apply custom settings for the section.
Click Save to apply the changes.

Now, whenever the workflow is triggered, the app will print the report with the selected sections and permissions.
Print Label/Receipt:
For configuring Print Label/Receipt, refer to Label Printing for detailed steps.
Print Report:
When the Quick Flow Type is selected as Print Report, follow these steps to configure the Quick Flow:
In the Conditions tab, specify when this Quick Flow should be triggered by clicking the Add Conditions button and defining conditions if required. By default, it is set to trigger unconditionally.
In the To Report dropdown, select the report destination where the generated report should appear.
Choose how the report should open: New Tab, New Window, or Self.
Click Configure to proceed.
In the Configure Quick Flow pop-up, go to the Field Mapping tab and map the required fields from the source App Elements to the target Report Elements.
Click Save to apply the changes.

Now, whenever the workflow is triggered, the report will be generated based on the mapped fields and selected conditions.
Once the conditions are set, click Save to finalize the Quick Flow setup. The Quick Flow will now automatically execute based on the selected workflow action.
Was this article helpful?
