A Workspace is a temporary digital storage space where you can keep all your apps, data tables, data sources, reports, lookups, etc. that you create in Quixy. Each workspace is unique and can be viewed as a logical separation between the related entities like applications, data tables, and so on.
IMPORTANT
Example Use Case: Human Resources Management
Imagine you are a HR manager at a medium-sized company, and you want to streamline your HR processes using Quixy. You decide to create a workspace specifically for HR management.
In this workspace, you can create various applications to automate different HR processes. For example:
Leave Management Application: You create an application to manage employee leave requests. This application includes forms for employees to submit leave requests and workflows to route the requests to the appropriate managers for approval.
Employee Directory Application: Another application is created to maintain an employee directory. This application includes a data table to store employee details such as name, contact information, and department.
Training and Development Application: You create an application to track employee training and development activities. This application includes forms for employees to request training and workflows to manage the approval process.
Recruitment Application: An application is created to streamline the recruitment process. This application includes forms for job postings, candidate applications, and interview scheduling.
Additionally, within the HR management workspace, you can create data tables to store relevant information such as leave records, training history, and recruitment data. You can also set up data sources to integrate external systems such as payroll software or employee performance management tools.
By organizing your HR processes in a dedicated workspace, you can efficiently manage all your applications, data tables, and data sources related to HR management in one place, making it easier to track, analyze, and optimize your HR operations.
The platform does not have a permanent workspace; any workspace created in Quixy can be deleted. However, you must have at least one workspace in the platform to create an app, data table, data source, and so on. When you first log in to the platform, you will be given a default workspace, so you can start creating your applications right away.
Just like the organization admin, we also have a workspace admin to manage only the workspace to which he/she is assigned. Unlike the organization admin, the workspace admin will have limited provisions like creating apps, data tables, data sources, reports etc.
For example, have a look at the options available in the admin menu for organization admin and workspace admin.
For organization admin, the options available in the admin menu are as shown in the image below.

For workspace admin, the options available in the admin menu are as shown in the image below.

IMPORTANT
There are no restrictions in Quixy on creating multiple workspaces. However, you cannot combine any two workspaces at the same time, and you cannot transfer the entities (Apps, data tables, lookups, etc.) created in one workspace to another.
However, you can link applications from different workspaces using triggers and connect data tables to create a data source.
Create a Workspace
If you're using a new account and haven't created any workspaces yet, here's how you can easily create one:
Method 1:
Click on the Admin Menu → Workspaces → Create Workspace.
Give a name for your workspace, such as "HR Management."
Click Save to create the workspace.
Method 2:
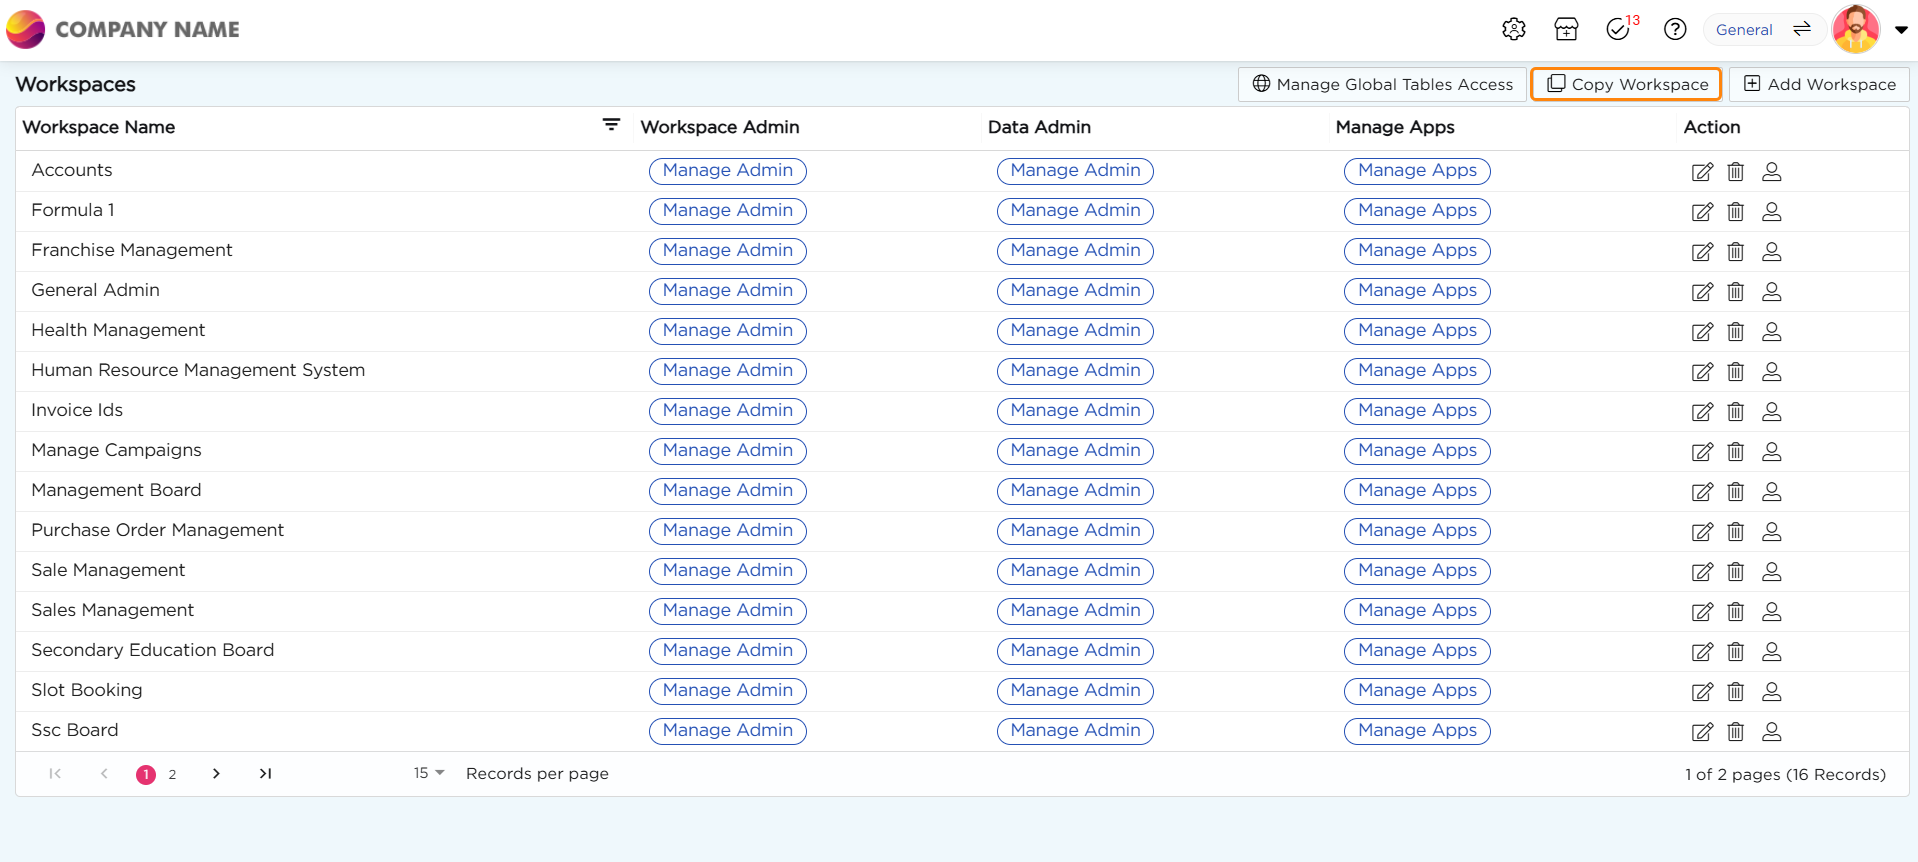
Click on the Admin Menu → Workspaces → Workspaces.
On the Workspace creation page, click the Add Workspace button.
Give a name for your workspace, such as "HR Management."
Click Save to create the workspace.
Workspace admin
An Organizational Admin is the only one who can create workspaces, including multiple ones. To manage the artifacts in these workspaces, the Organizational Admin can appoint Workspace Admins for each workspace. Any user in the platform can become a Workspace Admin, and a user can be an admin for multiple workspaces, depending on the Organization's requirements.
What can a Workspace Admin do?
A Workspace Admin has complete control over the artifacts in their assigned workspace.
They can create, edit, and delete artifacts within their workspace as desired.
Workspace Admins can add collaborators to their workspace.
Workspace Admins can grant access to reports and applications for roles that have already been created within the organization.
Assign a user as an admin for a Workspace
Click on the Admin Menu → Workspaces → Workspace.
Select the workspace from the list where you want to add an admin. Then, click on Manage admin below the Workspace Admin, to the right of the chosen Workspace.
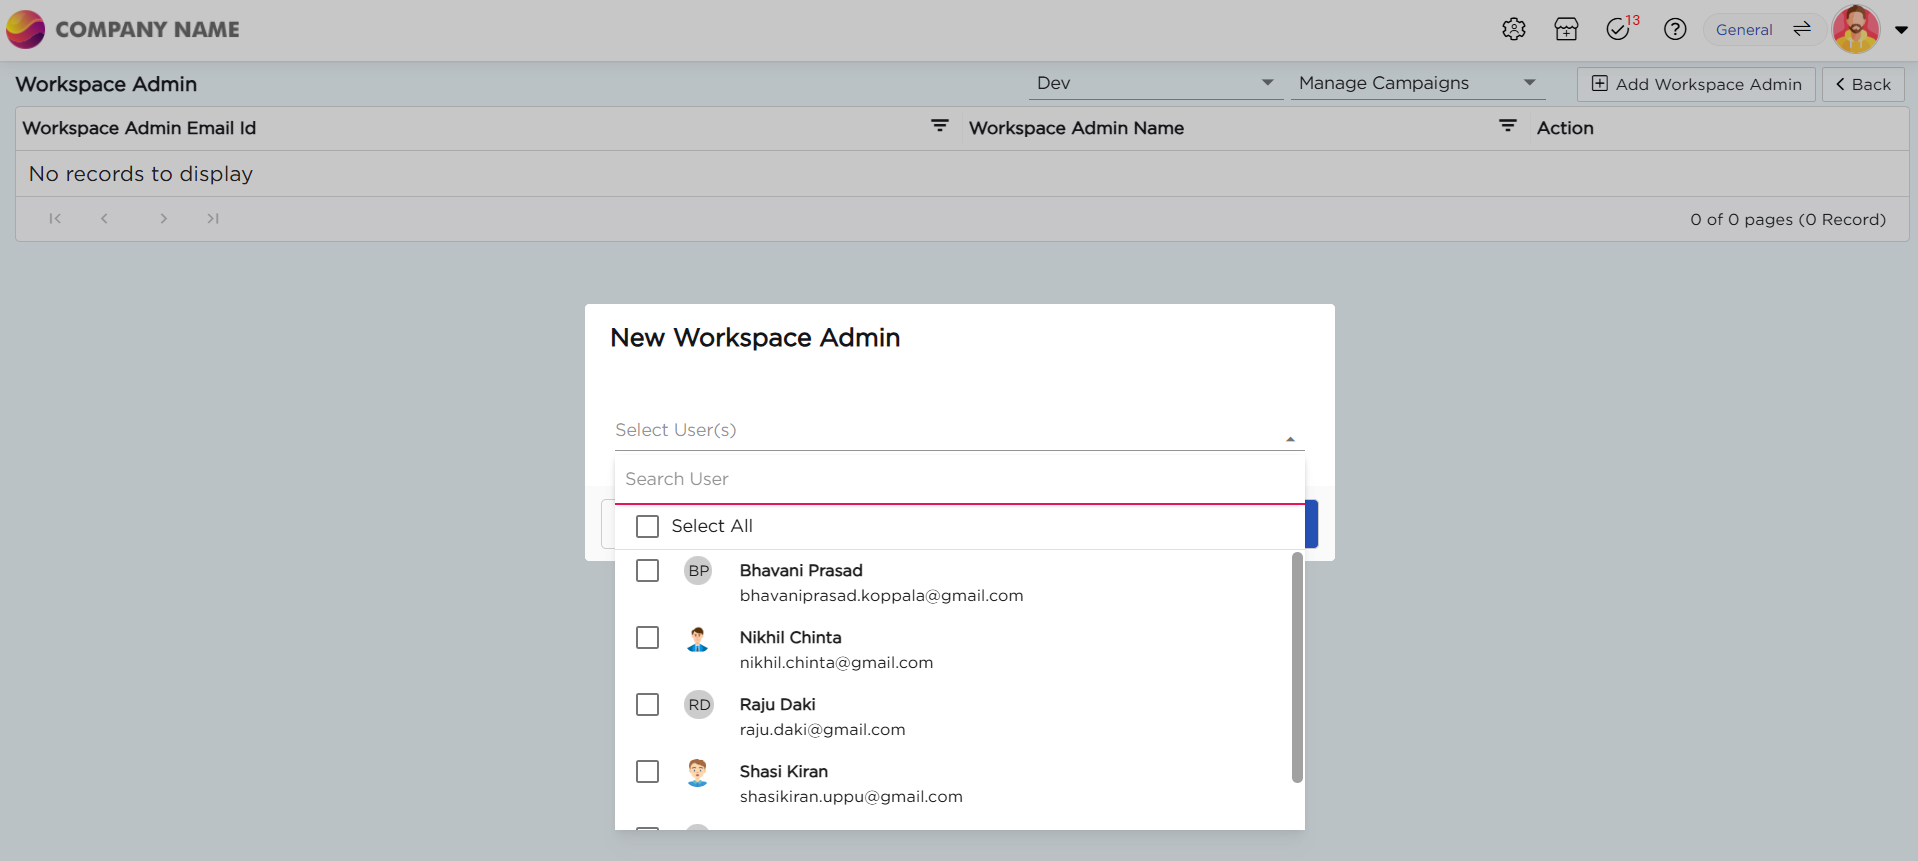
Once you click on Manage Admin, you'll be directed to the Manage Admin page. Here, you can choose the sandbox environment (DEV, QA, UAT, or LIVE) where you want to add an admin.

Click Add Workspace Admin on the top right corner of the page.

In the New Workspace Admin pop-up, select a user whom you want to make workspace admin.

Click Save.
IMPORTANT
A Workspace Admin can only organize the items in a workspace where they are assigned as an admin.
Copy a Workspace
Copying a workspace is a straightforward process. When you copy a workspace, you duplicate all its applications, data functions, lookups, data tables, integrations, and more into a new workspace. Once copied, you can modify the new workspace as needed without affecting the original.
Copying a workspace can be useful for several reasons:
Template Creation: You can use a copied workspace as a template for creating new projects or processes. This can save time by reusing existing configurations and settings.
Backup: Creating a copy of a workspace can serve as a backup in case the original workspace is accidentally modified or deleted.
Testing and Development: You can use a copied workspace to test new features, configurations, or integrations without affecting the original workspace.
Parallel Work: If you need to work on similar projects concurrently, copying a workspace allows you to have separate environments for each project.
How to copy a Workspace?
Admin Menu → Workspaces → Workspaces.
Find Copy Workspace in the top right corner. Click on it.

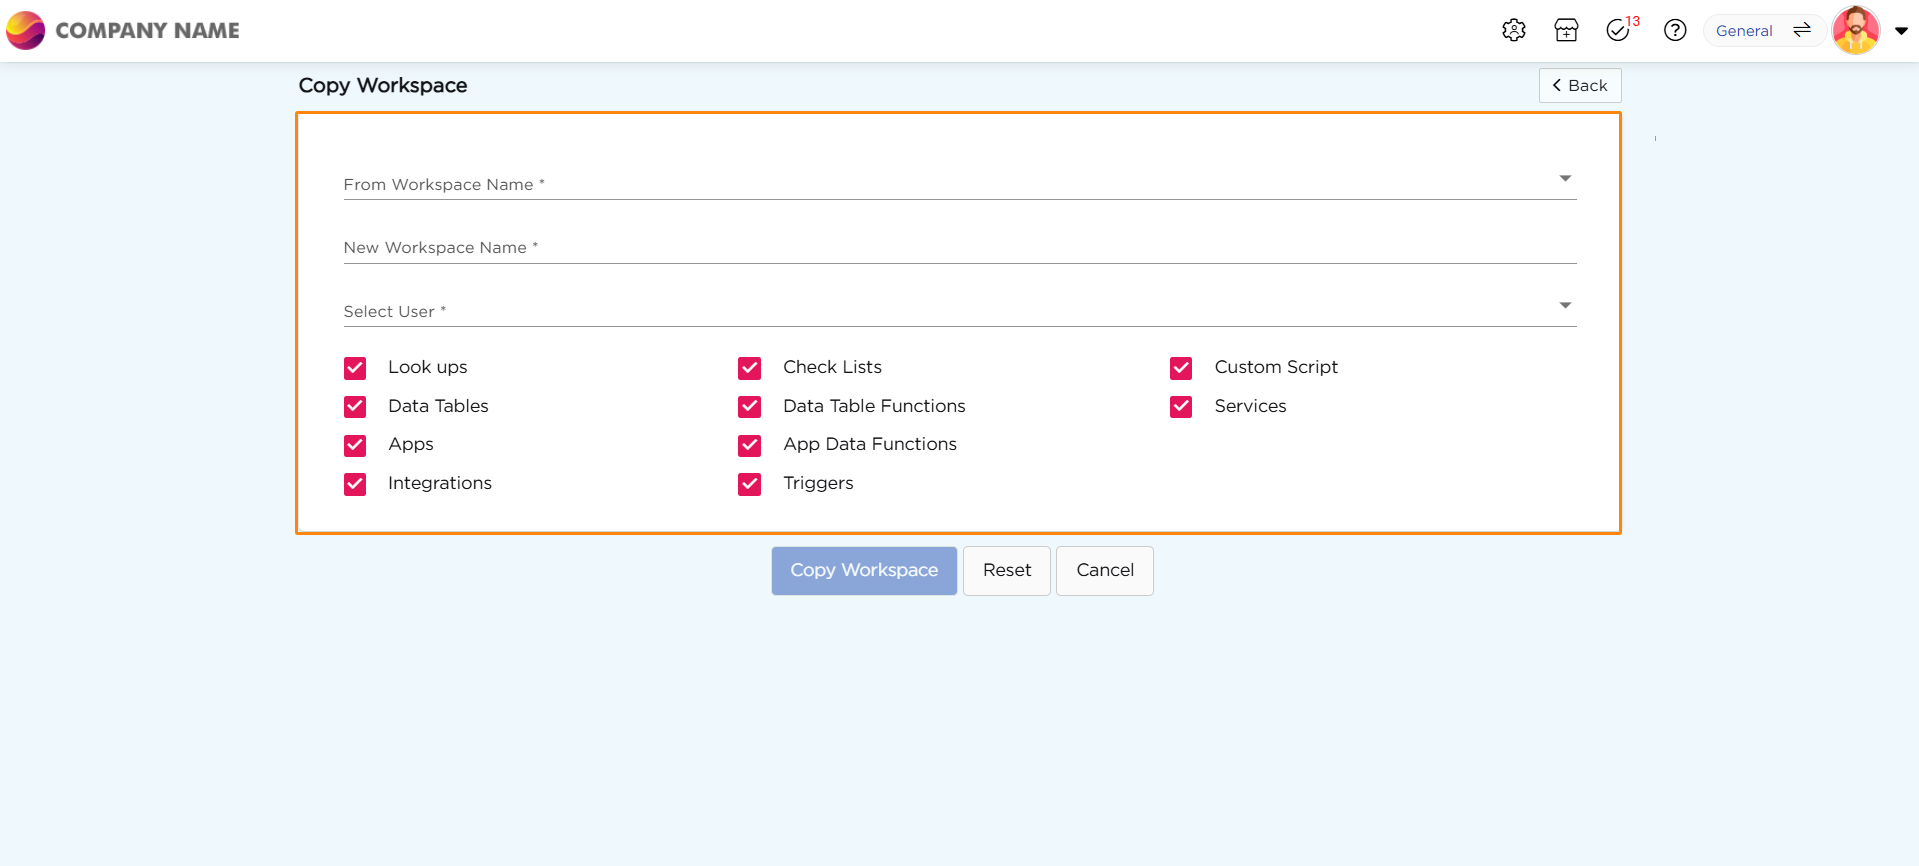
When you choose to copy a workspace, a Copy Workspace page opens. Here, you can select the artifacts you want to include in the new workspace by copying them from the original workspace.

After providing all the necessary information and selecting the artifacts you want to duplicate, click on Save to create the copied workspace.
CAUTION
A workspace admin can create a data table but cannot view its contents without being a data admin. Data admins have the authority to view, edit, delete, and update data in a table but cannot create new tables. Know more about Data Admin..
.png)


