.png)
Create a Data Table from External Data Base
- 4 Minutes to read
- Contributors


Create a Data Table from External Data Base
- 4 Minutes to read
- Contributors
Article summary
Did you find this summary helpful?
Thank you for your feedback!
The External DB option on Quixy’s Create Data Table page allows you to connect directly to an external Microsoft SQL Server (MSSQL) database. This connection allows you to access and use the data stored in the MSSQL database directly within Quixy applications without needing to store it separately.
If your organization already maintains a database, you can link it with the External DB option to access and use the data. This ensures you always work with the latest information while avoiding duplicate storage.
Why Use External DB Integration?
Access real-time data – Pull the latest information directly into your applications.
Eliminate redundancy – Avoid storing the same data in multiple places.
Enable automation – Set up workflows that use live data for seamless processes.
Now, let’s explore some practical scenarios where connecting an external database makes managing and updating data easier.
Scenarios
Scenario 1: Connect Warehouse and Factory Data
Streamline warehouse operations by linking your app to the factory’s database.
View real-time stock levels and shipment updates instantly.
Automatically update records when the factory processes new shipments or stock changes.
Set up alerts for reorders to prevent stock shortages.
This integration eliminates manual tracking and keeps warehouse management smooth and efficient.
Scenario 2: Integrate Your CRM (Customer Relationship Management)
Keep customer data accurate and accessible by connecting your CRM system.
Sync customer details—names, contacts, and order histories—seamlessly.
Automatically update records whenever changes occur in the CRM.
Enable teams to provide seamless support with up-to-date customer information.
This setup saves time and ensures consistent data across all teams.
Scenario 3: Automate Inventory Management
Track inventory efficiently by linking your stock database.
Display real-time stock levels in your app.
Automatically update inventory data when items are sold, or new stock arrives.
Reduce manual data entry and minimize errors.
This integration simplifies inventory tracking and ensures reliable data for decision-making.
Setting Up External DB in Quixy:
Before creating a data table from an external database, ensure that the External Database Connection is set up. This connection securely links Quixy with the external database, enabling seamless data flow.
Once the connection is established, you can effortlessly create a data table and pull in live data from the external source.
How to Set Up an External Database Connection?
Admin Menu → Database → External Database Connection.
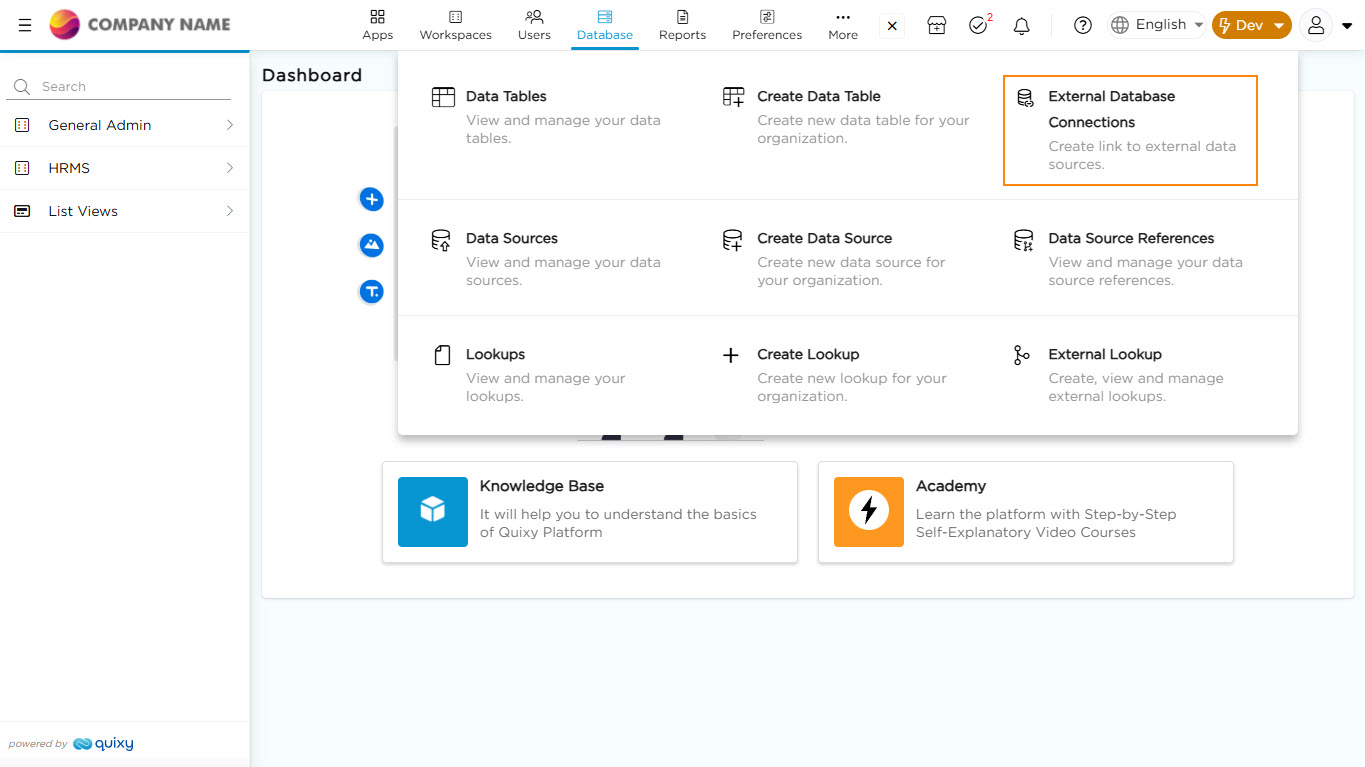
Upon selecting External Database Connections, a Create External Database Connection window appears and when clicked on +Create External Database Connection button, the Create External Database Connection page opens
On Create External Database Connection page, enter the following details:
Select Database Type: Choose the database type. MSSQL Server is the default option.
Connection Name: Enter a unique name to identify this database connection.
Connection String: Provide the connection string given by the third-party application. It contains the following information:
Server Name or IP Address: This is the address of the server where the database is stored (e.g., 172.162.12.36).
Database Name: Specify the database you want Quixy to access.
Authentication Information: Enter the username and password required to access the database (known as SQL authentication).

Example Connection String:
Data Source=172.162.12.36;Initial Catalog=QuixyTest;User ID=sa;Password=n@v@yUg@kw!x##
Let’s break down the example connection string to understand each part in detail:
Data Source: The server’s IP address (e.g., 172.162.12.36). This might change if the server’s IP is updated or if you use another server.
Initial Catalog: Specifies the name of the database being accessed (e.g., QuixyTest).
User ID: The username to log in (e.g., sa for system administrator access).
Password: The password for the username (e.g., n@v@yUg@kw!x##). Make sure the password is strong and secure to protect database access.
Save and Test:
Test the Connection:
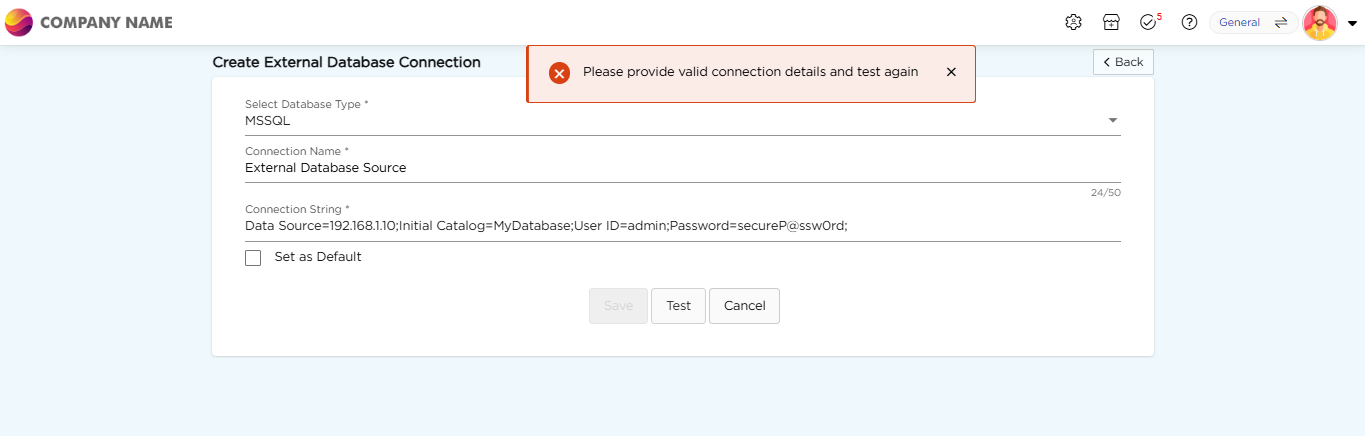
After entering all the connection details, click the Test button to verify the connection.
If the connection details are incorrect, an error message will appear: Please provide valid connection details and test again.
If the connection is successful, you’ll see the message: DB connection established successfully.
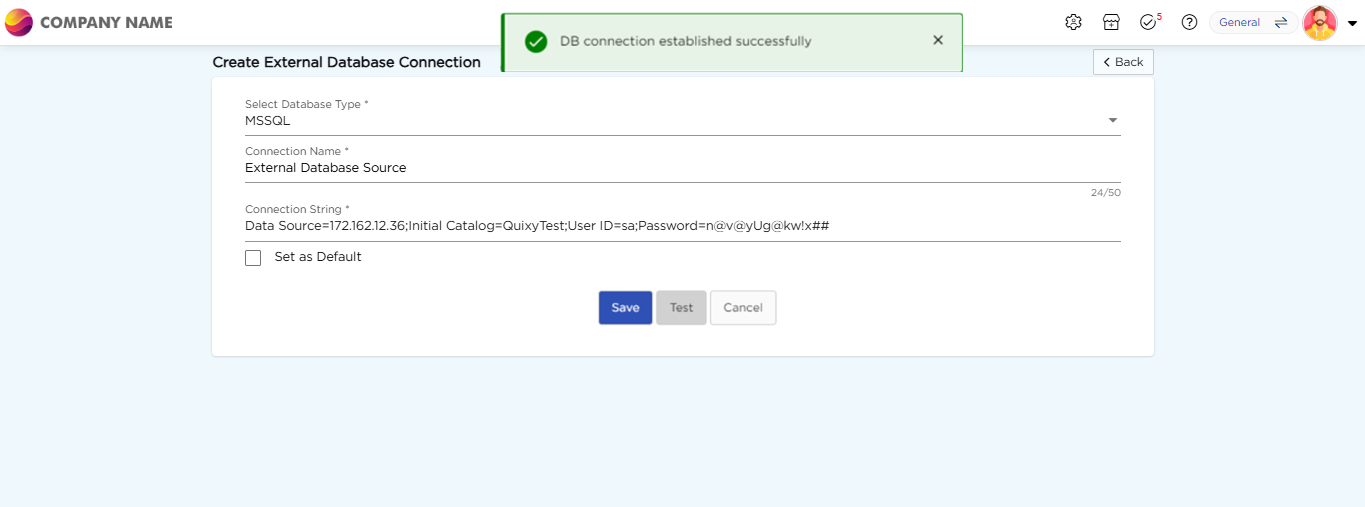


Save the Connection:
Once the test is successful, click Save to store the connection details.
If you want this connection to be default for future use, click the Set as Default option before saving.
Creating a Data Table from an External Database
Now that the connection is established, you can create a Data Table using the external database by following these steps:
Navigate to Admin Menu → Database → Create Data Table.
A pop-up appears, select Create from External DB to proceed.


From the Create from External Database dropdown, select the external database connection created earlier.
Next, from the Choose Data table dropdown, select the table to import. These tables are fetched from the connected external database
Provide a unique name for the data table and select where to save it:
Global Level: A globally saved data table can be utilized to store data from any application or retrieve data into any application from any workspace.
Workspace Level: A data table that is limited to a workspace can store data from an application or retrieve data into an application that is linked to the same workspace.

Click Create. The imported data table now appears in the Data Tables List.
Note
Ensure the connection type is set to External Database Source instead of Quixy Native to view the data tables created from an external database in the Data Tables List.

Why Use External Database Connections for Data Tables?
Access External Data with Ease: Connect directly to external systems like CRMs, ERPs, or SQL databases to pull in critical business information. No need for manual entry or separate uploads—just seamless data integration.
Stay Updated in Real Time: Keep your Quixy data tables synced with the latest information. Whether refreshed automatically or manually, your customer, sales, or inventory data is always up to date.
Bring Data Together in One Place: Combine data from multiple external systems effortlessly. Once connected, the integration happens, giving you a centralized view without the hassle of manual linking.
Was this article helpful?
