In any organization, protecting sensitive information—such as employee IDs, customer contact details, or financial records—isn’t just good practice, it’s essential. When this kind of data flows through different parts of your system—from forms to reports and shared views—it’s important to make sure it’s not only stored securely but also shown carefully.
That’s exactly what Data Protection helps you do. It gives you control over how sensitive field data is encrypted behind the scenes and how much of it is visible to users on the surface.
To keep information safe and reduce unnecessary exposure, two key layers come into play:
- Encryption, which secures data in storage
- Masking, which controls how that data appears on screen
Let’s break down how each of these works and how you can set them up in your system.
¶ 🔐What is Encryption?
Encryption transforms your data into a protected, unreadable format as soon as it's saved in the backend. Even if someone gains unauthorized access to the database, encrypted values remain scrambled and unreadable.
This is especially important for fields that store sensitive or personally identifiable information (PII), like:
- Government-issued ID numbers
- Bank account details
- Employee salaries
- Contact numbers
By encrypting this data, you add a layer of safety that protects it from unauthorized viewing or tampering—even at the system level.
¶ 👁️What is Data Masking?
Data masking controls what part of sensitive information is shown to users on the screen. Even though the actual value exists in the system, masking helps hide or blur it when it appears in reports, data tables, views, or data sources.
This is useful when users need to see or work with records—like customer IDs or phone numbers—without viewing the entire value.
Example
Instead of showing a full phone number like 9876543210, you could mask it as *******210.
Masking is especially helpful for fields such as:
- Contact numbers
- Bank or ID numbers
- Email addresses
- Financial or payroll data
By masking data, you reduce the chances of accidental exposure while still allowing users to verify or identify records when needed.
¶ How to Enable and Configure Data Protection
1. Click on Admin Menu → Preferences → Security & Privacy → Data Protection.
.png)
2. From here, you’ll find the Encrypted Field Display Format section.
3. This section lets you decide how encrypted field values appear across all reports, data tables, views, and data sources.
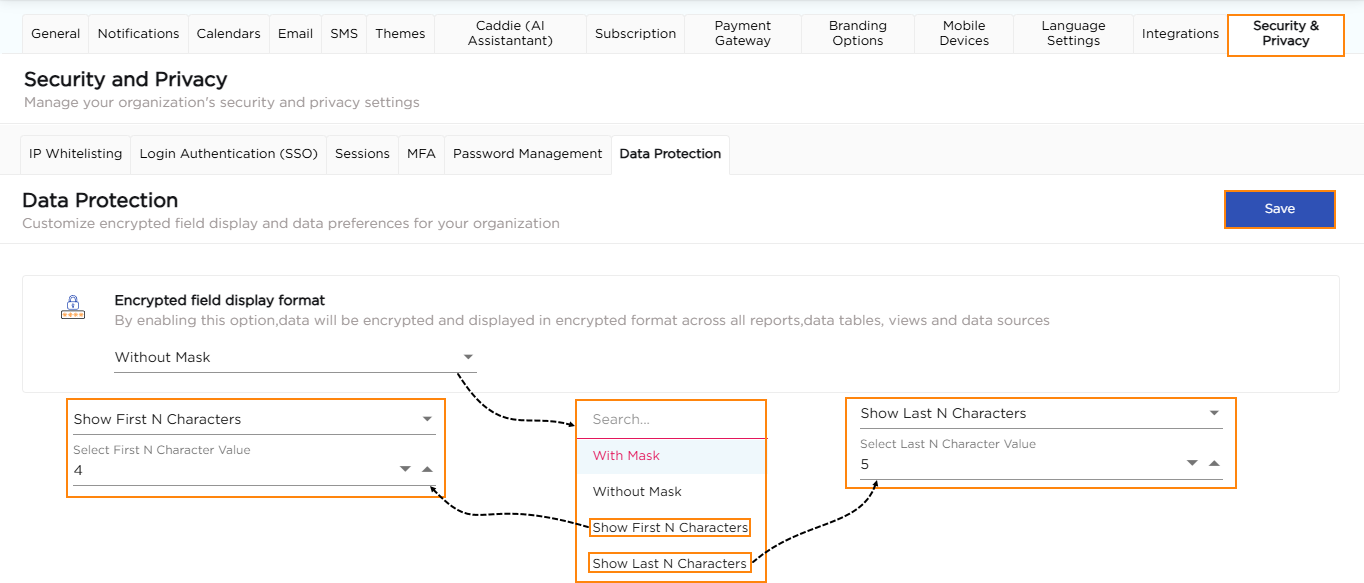
4. You can select one of the following display formats based on your data protection needs:
- With Mask – Fully hides the encrypted value using asterisks (e.g., ********).
- Without Mask – Displays the complete value (only use this if necessary).
- Show First N Characters – Reveals only the first few characters. You’ll need to enter how many characters to show.
Example
Original: 9876543210
N = 4 → Shown as: 9876******
- Show Last N Characters – Reveals only the last few characters. You’ll need to enter how many characters to show.
Example
Original: 9876543210
N = 5 → Shown as: *****43210
5. After selecting the desired option and entering the number of characters (if applicable), click Save to apply your settings. These settings will now apply consistently across all areas of your platform where encrypted data appears—keeping your display preferences clean and your data safe.